
Cards, Pod Holder & Tag Using the Coffee Lover's Kit by Eva
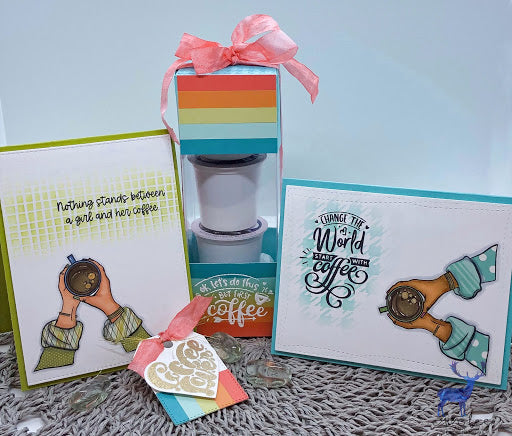
Happy Monday Creative Friends! It’s Eva here with a few fun pieces to share with you today. I decided to give one more shout out to the Coffee Lover’s Kit. This kit has been a ton of fun to work with. So staying with today’s theme, grab a cuppa coffee and enjoy the post. I have several projects to share with you today. First up, two cards.

Both of these cards feature images and sentiments from the 6x8 stamp set in the kit. The images in this set really scream “paper piece me” when I look at them. Big open spaces, great for patterned paper pieces.

I had a few 6x6 paper pads laying around that needed some love so I pulled a few pieces out of the stash that coordinate and off to town I went stamping and cutting.

Stamp the image on the white card panel first, then on the pieces of coordinating patterned paper.
Color any pieces of the image that will not be paper pieced before you add the pieces.
Then cut, cut, cut away.
A couple of tips for paper piecing.
1.) When cutting pieces use a small pair of scissors.
2.) Put adhesive on the back of the image before you cut the pieces out. I used double stick tape or my ATG gun. This helps stabilize the paper as you cut and even the smallest pieces have adhesive on them once you are done cutting.
3.) Cut in the middle to outer edge of your stamp line. That way you will get all of the image covered with your cut piece.
4.) Use a grey watercolor marker (I use tombow) and run it around the outer edges of the cut piece to get rid of any white on the edge.
5.) Feel free to add details with markers or pencils to your patterned paper pieces.

Once the images were colored and the paper pieces added,I added some shading with grey to the sleeves and details to the coffee with a white pen and glossy accents.

The first card features the Burlap Mesh Stencil behind the stamped sentiment and the second card features the Houndstooth Stencil.
Next up, I tried a little gifty project.

I decided to try a box with a few coffee pods, PERFECT for the theme of the day!
Honestly, I did this “fly by the seat of my pants” style. No instructions, just some measuring and trial an error. I am sure had I looked there are probably instructions somewhere on the internet for a coffee pod box, lol. But why make things easy???
Once I figured out the clear box, I embellished it with some paper scraps cut into strips. I did use the Stripe Die for the bottom piece. I then heat embossed the fun sentiment on the strip piece before applying it to the box.
Last, I decided to make a little tag to add to this collection of goodies.

I decided I needed a little glitter goodness added to this group of projects. I used the heart shaped Coffee Lover Image from the 6x8 stamp set in the kit along with the coordinating die. I heat embossed with some sparkling gold embossing powder. So cute and simple!
Here is one last look at all of the projects from today.

There are some amazing sale prices over in the ELC Shop, stop by and check it out!
Thank you for stopping by today. Until next time, Happy Crafting and Happy New Year!!
55 comments
https://bora-casino.com/
https://bora-casino.com/shangrilacasino/
https://bora-casino.com/pharaohcasino/
https://bora-casino.com/coolcasino/
https://bora-casino.com/baccarat/
https://bora-casino.com/orangecasino/
안전 카지노사이트 추천
안전 바카라사이트 추천
안전 온라인카지노 추천
파라오카지노
쿨카지노
바카라사이트 게임
샹그릴라카지노
오렌지카지노
안전 카지노사이트 추천_https://bora-casino.com/
안전 바카라사이트 추천_https://bora-casino.com/
안전 온라인카지노 추천_https://bora-casino.com/
파라오카지노_https://bora-casino.com/shangrilacasino/
쿨카지노_https://bora-casino.com/pharaohcasino/
바카라사이트 게임_https://bora-casino.com/coolcasino/
샹그릴라카지노_https://bora-casino.com/baccarat/
오렌지카지노_https://bora-casino.com/orangecasino/
https://sites.google.com/view/mia-backlinks-221008/%EC%B9%B4%EC%A7%80%EB%85%B8%EC%82%AC%EC%9D%B4%ED%8A%B8/bora-casino
https://yamcode.com/eia70tvsne
https://notes.io/qgNAm
https://pastebin.com/aBrtiT2k
http://paste.jp/c7ab1522/
https://pastelink.net/axjle9jd
https://paste.feed-the-beast.com/view/03786358
https://pasteio.com/xgpCwNQ56mHw
https://p.teknik.io/FFImV
https://justpaste.it/9bo08
https://pastebin.freeswitch.org/view/6b4cc4ee
http://pastebin.falz.net/2430257
https://paste.laravel.io/f3a3c0a5-dd66-40c8-81f2-d52947b61abb
https://paste2.org/bem65hy3
https://paste.firnsy.com/paste/GLQJWKLZxlG
https://paste.myst.rs/gnpwy2v9
https://controlc.com/5040c620
https://paste.cutelyst.org/r-2O6RC6R
https://bitbin.it/m9kAdBMu/
http://pastehere.xyz/xTrm3bfSl/
https://rentry.co/dudxq
https://paste.enginehub.org/saV6PjHlZ
https://sharetext.me/m5vo957vj4
http://nopaste.paefchen.net/1922576
https://anotepad.com/note/read/j5si824e
https://telegra.ph/Bora-Casino-10-08
https://geany.org/p/c498n/
https://www.oltv.cz/redirect.php?url=https://bora-casino.com/
http://www.bigblackmamas.com/cgi-bin/sites/out.cgi?url=https://bora-casino.com
https://www.yeaah.com/disco/DiscoGo.asp?ID=3435&Site=https://bora-casino.com
https://primorye.ru/go.php?id=19&url=https://bora-casino.com/
https://www.123gomme.it/it/ViewSwitcher/SwitchView?mobile=True&returnUrl=https://bora-casino.com
https://www.agriis.co.kr/search/jump.php?url=https://bora-casino.com/
http://youmydaddy.com/cgi-bin/at3/out.cgi?id=88&trade=https://bora-casino.com
https://naviking.localking.com.tw/about/redirect.aspx?mid=7&url=https://bora-casino.com/
http://sms-muzeji.si/Home/ChangeCulture?lang=sl&returnUrl=https://bora-casino.com
http://r.emeraldexpoinfo.com/s.ashx?ms=EXI2:125462_115115&e=krubin723@aol.com&eId=440186886&c=h&url=https://bora-casino.com
https://apps.firstrain.com/service/openurl.jsp?action=titleclick&src=rss&u=https://bora-casino.com/
https://delphic.games/bitrix/redirect.php?goto=https://bora-casino.com/
http://orthographia.ru/go.php?url=https://bora-casino.com/
http://archive.cym.org/conference/gotoads.asp?url=https://bora-casino.com/
http://cdp.thegoldwater.com/click.php?id=101&url=https://bora-casino.com/
http://www.appenninobianco.it/ads/adclick.php?bannerid=159&zoneid=8&source=&dest=https://bora-casino.com/
https://www.eduplus.hk/special/emailalert/goURL.jsp?clickURL=https://bora-casino.com/
http://www.japan.road.jp/navi/navi.cgi?jump=226&url=https://bora-casino.com
http://earthsciencescanada.com/modules/babel/redirect.php?newlang=en_us&newurl=https://bora-casino.com/
http://psykodynamiskt.nu/?wptouch_switch=desktop&redirect=https://bora-casino.com
http://www.ma.by/away.php?url=https://bora-casino.com/
http://www.pcbheaven.com/forum/index.php?thememode=full;redirect=https://bora-casino.com/
http://www.gyvunugloba.lt/url.php?url=https://bora-casino.com/
http://www.castellodivezio.it/lingua.php?lingua=EN&url=https://bora-casino.com
http://elit-apartament.ru/go?https://bora-casino.com/
http://moscowdesignmuseum.ru/bitrix/rk.php?goto=https://bora-casino.com/
http://www.fairpoint.net/~jensen1242/gbook/go.php?url=https://bora-casino.com/
https://lirasport.com.ar/bloques/bannerclick.php?id=7&url=https://bora-casino.com/
http://www.knabstrupper.se/guestbook/go.php?url=https://bora-casino.com/
https://www.pba.ph/redirect?url=https://bora-casino.com&id=3&type=tab
http://www.taodaxiang.cn/p.php?go=https://bora-casino.com
https://bondage-guru.net/bitrix/rk.php?goto=https://bora-casino.com/
http://www.westbloomfieldlibrary.org/includes/statistics.php?StatType=Link&StatID=Facebook&weblink=https://bora-casino.com
https://tenisnews.com.br/clickTracker/clickTracker.php?u=https://bora-casino.com/
http://www.stevestechspot.com/ct.ashx?id=9fdcf4a4-6e09-4807-bc31-ac1adf836f6c&url=https://bora-casino.com/
http://rcoi71.ru/bitrix/redirect.php?goto=https://bora-casino.com/
http://www.laselection.net/redir.php3?cat=int&url=bora-casino.com
http://www.masai-mara.com/cgi-bin/link2.pl?grp=mm&link=https://bora-casino.com
https://www.net-filter.com/link.php?id=36047&url=https://bora-casino.com/
http://evenemangskalender.se/redirect/?id=15723&lank=https://bora-casino.com/
http://anifre.com/out.html?go=https://bora-casino.com
http://www.restavracije-gostilne.si/banner.php?id=44&url=https://bora-casino.com/
http://hobbyplastic.co.uk/trigger.php?r_link=https://bora-casino.com
https://www.actualitesdroitbelge.be/click_newsletter.php?url=https://bora-casino.com/
http://ads.pukpik.com/myads/click.php?banner_id=316&banner_url=https://bora-casino.com/
https://portalaz.com.br/client_login_check?redirectUrl=https://bora-casino.com
http://members.asoa.org/sso/logout.aspx?returnurl=https://bora-casino.com/
http://login.mediafort.ru/autologin/mail/?code=14844×02ef859015x290299&url=https://bora-casino.com/
https://www.sports-central.org/cgi-bin/axs/ax.pl?https://bora-casino.com/
http://dot.boss.sk/o/rs.php?ssid=1&szid=4&dsid=12&dzid=32&url=https://bora-casino.com
http://sistema.sendmailing.com.ar/includes/php/emailer.track.php?vinculo=https://bora-casino.com/
http://www.americanstylefridgefreezer.co.uk/go.php?url=https://bora-casino.com/
https://www.newzealandgirls.co.nz/auckland/escorts/clicks.php?click_id=NavBar_AF_AdultDirectory&target=https://bora-casino.com/
https://wdesk.ru/go?https://bora-casino.com/
http://1000love.net/lovelove/link.php?url=https://bora-casino.com/
https://www.adminer.org/redirect/?sa=t&url=https%3A%2F%2Fbora-casino.com%2F
http://nter.net.ua/go/?url=https://bora-casino.com/
http://www.bigblackbootywatchers.com/cgi-bin/sites/out.cgi?url=https://bora-casino.com
http://barykin.com/go.php?bora-casino.com
https://seocodereview.com/redirect.php?url=https://bora-casino.com
http://miningusa.com/adredir.asp?url=https://bora-casino.com/
http://www.arch.iped.pl/artykuly.php?id=1&cookie=1&url=https://bora-casino.com/
http://hirlevelcenter.eu/click.php?hirlevel_id=13145441085508&url=https://bora-casino.com/
https://birds.cz/avif/redirect.php?from=avif.obs.php&url=https://bora-casino.com/
http://old.kob.su/url.php?url=https://bora-casino.com
http://search.pointcom.com/k.php?ai=&url=https://bora-casino.com/
http://www.cercasostituto.it/index.php?name=GestBanner&file=counter&idbanner=40&dir_link=https://bora-casino.com/
http://vsvejr.dk/mt/plugins/stationExtremes/redirect.php?url=https://bora-casino.com/
http://www.meteo-leran.fr/meteotemplate/template/plugins/deviations/redirect.php?url=https://bora-casino.com/
https://www.eurobichons.com/fda%20alerts.php?url=https://bora-casino.com/
https://mydojo.at/de_AT/karate/weiterleitung?redirect=https://bora-casino.com/
http://click.phosphodiesterase4.com/k.php?ai=&url=https://bora-casino.com/
http://www.mariahownersclub.com/forum/redirect-to/?redirect=https://bora-casino.com/
http://www.wildromance.com/buy.php?url=https://bora-casino.com/&store=iBooks&book=omk-ibooks-us
http://mapleriverweather.com/mobile/pages/station/redirect.php?url=https://bora-casino.com/
http://www.archijob.co.il/index/comp_website.asp?companyId=1469&website=https://bora-casino.com/
https://student-helpr.rminds.dev/redirect?redirectTo=https://bora-casino.com/
http://www.kalinna.de/url?q=https://bora-casino.com/
http://www.hartmanngmbh.de/url?q=https://bora-casino.com/
http://titan.hannemyr.no/brukbilde/?creator=EivindTorgersen/UiO&title=B%C3%B8lgersl%C3%A5rmotstrandaiLarvik&license=CCBY4.0&url=https://bora-casino.com/
https://www.the-mainboard.com/proxy.php?link=https://bora-casino.com/
https://lists.gambas-basic.org/cgi-bin/search.cgi?cc=1&URL=https://bora-casino.com/
https://www.betamachinery.com/?URL=https://bora-casino.com/
http://nishiyama-takeshi.com/mobile2/mt4i.cgi?id=3&mode=redirect&no=67&ref_eid=671&url=https://bora-casino.com/
http://www.sprang.net/url?q=https://bora-casino.com/
https://img.2chan.net/bin/jump.php?https://bora-casino.com/
http://www.is.kyusan-u.ac.jp/htmllint/htmllint.cgi?ViewSource=on;URL=https://bora-casino.com/
https://forum.winhost.com/proxy.php?link=https://bora-casino.com/
https://forum.everleap.com/proxy.php?link=https://bora-casino.com/
http://www.mosig-online.de/url?q=https://bora-casino.com/
http://www.hccincorporated.com/?URL=https://bora-casino.com/
http://fatnews.com/?URL=https://bora-casino.com/
http://www.dominasalento.it/?URL=https://bora-casino.com/
http://esuli.pixelrain.hu/demo/ios/open-url.php?title=Szert%C3%A1r&url=https://bora-casino.com/
https://rushnsp.org.au/?URL=https://bora-casino.com/
https://csirealty.com/?URL=https://bora-casino.com/
http://asadi.de/url?q=https://bora-casino.com/
http://treblin.de/url?q=https://bora-casino.com/
https://kentbroom.com/?URL=https://bora-casino.com/
http://0845.boo.jp/cgi/mt3/mt4i.cgi?id=24&mode=redirect&no=15&ref_eid=3387&url=https://bora-casino.com/
http://110.164.66.211/ULIB6//dublin.linkout.php?url=https://bora-casino.com/
http://110.164.92.12/ULIB//dublin.linkout.php?url=https://bora-casino.com/
http://198.54.125.86.myopenlink.net/describe/?url=https://bora-casino.com/
http://202.144.225.38/jmp?url=https://bora-casino.com/
http://202.183.204.132/ULIB6//dublin.linkout.php?url=https://bora-casino.com/
http://2cool2.be/url?q=https://bora-casino.com/
http://4coma.net/cgi/mt4/mt4i.cgi?cat=12&mode=redirect&ref_eid=3231&url=https://bora-casino.com/
http://4travel.jp/dynamic/redirect.php?mode=dm_tour&url=https://bora-casino.com/
http://imaginingourselves.globalfundforwomen.org/pb/External.aspx?url=https://bora-casino.com/
http://imags.sandbox.google.com.pe/url?q=https://bora-casino.com/
https://www.sandbox.google.be/url?sa=t&url=https://bora-casino.com/
https://www.sandbox.google.ca/url?sa=t&url=https://bora-casino.com/
https://www.sandbox.google.co.ve/url?sa=t&url=https://bora-casino.com/
https://www.sandbox.google.com.mx/url?sa=t&url=https://bora-casino.com/
https://clients1.google.al/url?q=https://bora-casino.com/
https://clients1.google.cd/url?q=https://bora-casino.com/
https://clients1.google.co.id/url?q=https://bora-casino.com/
https://clients1.google.co.in/url?q=https://bora-casino.com/
https://clients1.google.com.ag/url?q=https://bora-casino.com/
https://clients1.google.com.et/url?q=https://bora-casino.com/
https://clients1.google.com.tr/url?q=https://bora-casino.com/
https://clients1.google.com.ua/url?q=https://bora-casino.com/
https://clients1.google.fm/url?q=https://bora-casino.com/
https://clients1.google.hu/url?q=https://bora-casino.com/
https://clients1.google.md/url?q=https://bora-casino.com/
https://clients1.google.mw/url?q=https://bora-casino.com/
https://clients1.google.nu/url?sa=j&url=https://bora-casino.com/
https://clients1.google.rw/url?q=https://bora-casino.com/
https://cssanz.org/?URL=https://bora-casino.com/
http://local.rongbachkim.com/rdr.php?url=https://bora-casino.com/
http://bachecauniversitaria.it/link/frm_top.php?url=https://bora-casino.com/
https://www.stcwdirect.com/redirect.php?url=https://bora-casino.com/
http://forum.vcoderz.com/externalredirect.php?url=https://bora-casino.com/
https://www.momentumstudio.com/?URL=https://bora-casino.com/
http://kuzu-kuzu.com/l.cgi?https://bora-casino.com/
https://s-p.me/template/pages/station/redirect.php?url=https://bora-casino.com/
http://ww.thesteelbrothers.com/buy.php?store=iBooks&url=https://bora-casino.com/
http://thdt.vn/convert/convert.php?link=https://bora-casino.com/
http://www.noimai.com/modules/thienan/news.php?id=https://bora-casino.com/
https://www.weerstationgeel.be/template/pages/station/redirect.php?url=https://bora-casino.com/
http://www.doitweb365.de/scripts/doitweb.exe/rasklickzaehler2?https://bora-casino.com/
https://www.guadamur.eu/template/pages/station/redirect.php?url=https://bora-casino.com/
https://weather.cube.com.gr/pages/station/redirect.php?url=https://bora-casino.com/
https://uk.kindofbook.com/redirect.php/?red=https://bora-casino.com/
http://www.fimmgviterbo.org/mobfimmgviterbo/index.php?nametm=counter&idbanner=4&dir_link=https://bora-casino.com/
https://wuqishi.com/wp-content/themes/begin/inc/go.php?url=https://bora-casino.com/
http://www.mckinneyfarm.com/template/plugins/stationExtremes/redirect.php?url=https://bora-casino.com/
https://www.lionscup.dk/?side_unique=4fb6493f-b9cf-11e0-8802-a9051d81306c&s_id=30&s_d_id=64&go=https://bora-casino.com/
http://www.skladcom.ru/(S(qdiwhk55jkcyok45u4ti0a55))/banners.aspx?url=https://bora-casino.com/
https://smartservices.ru/bitrix/rk.php?goto=https://bora-casino.com/
http://www.topkam.ru/gtu/?url=https://bora-casino.com/
http://torgi-rybinsk.ru/bitrix/rk.php?goto=https://bora-casino.com/
http://tpprt.ru/bitrix/rk.php?goto=https://bora-casino.com/
https://turbazar.ru/url/index?url=https://bora-casino.com/
https://twilightrussia.ru/go?https://bora-casino.com/
https://ulfishing.ru/forum/go.php?https://bora-casino.com/
https://underwood.ru/away.html?url=https://bora-casino.com/
https://unicom.ru/links.php?go=https://bora-casino.com/
http://www.unifin.ru/bitrix/redirect.php?goto=https://bora-casino.com/
https://uogorod.ru/feed/520?redirect=https://bora-casino.com/
https://utmagazine.ru/r?url=https://bora-casino.com/
http://uvbnb.ru/go?https://bora-casino.com/
http://www.evrika41.ru/redirect?url=https://bora-casino.com/
http://expomodel.ru/bitrix/redirect.php?goto=https://bora-casino.com/
https://facto.ru/bitrix/rk.php?goto=https://bora-casino.com/
http://fallout3.ru/utils/ref.php?url=https://bora-casino.com/
https://fc-zenit.ru/bitrix/redirect.php?goto=https://bora-casino.com/
http://forum-region.ru/forum/away.php?s=https://bora-casino.com/
http://forumdate.ru/redirect-to/?redirect=https://bora-casino.com/
http://shckp.ru/ext_link?url=https://bora-casino.com/
https://shinglas.ru/bitrix/redirect.php?goto=https://bora-casino.com/
https://www.shtrih-m.ru/bitrix/redirect.php?goto=https://bora-casino.com/
https://sibran.ru/bitrix/redirect.php?goto=https://bora-casino.com/
http://simvol-veri.ru/xp/?goto=https://bora-casino.com/
http://sintez-oka.ru/bitrix/redirect.php?goto=https://bora-casino.com/
https://app.espace.cool/clientapi/subscribetocalendar/974?url=https://bora-casino.com/
http://111056.net/yomisearch/rank.cgi?mode=link&id=6205&url=https://bora-casino.com/
http://stanko.tw1.ru/redirect.php?url=https://bora-casino.com/
http://www.sozialemoderne.de/url?q=https://bora-casino.com/
http://www.showb.com/search/ranking.cgi?mode=link&id=7083&url=https://bora-casino.com/
https://telepesquisa.com/redirect?page=redirect&site=https://bora-casino.com/
http://imagelibrary.asprey.com/?URL=www.bora-casino.com/
http://ime.nu/https://bora-casino.com/
http://inginformatica.uniroma2.it/?URL=https://bora-casino.com/
http://interflex.biz/url?q=https://bora-casino.com/
http://ivvb.de/url?q=https://bora-casino.com/
http://j.lix7.net/?https://bora-casino.com/
http://jacobberger.com/?URL=www.bora-casino.com/
http://jahn.eu/url?q=https://bora-casino.com/
http://jamesvelvet.com/?URL=www.bora-casino.com/
http://jla.drmuller.net/r.php?url=https://bora-casino.com/
http://jump.pagecs.net/https://bora-casino.com/
http://kagarin.net/cgi/mt/mt4i.cgi?id=2&mode=redirect&no=330&ref_eid=103&url=https://bora-casino.com/
http://kancler-k.com.ua/bitrix/redirect.php?event1=&event2=&event3=&goto=https://bora-casino.com/
http://kancler-k.com/bitrix/redirect.php?event1=&event2=&event3=&goto=https://bora-casino.com/
http://karkom.de/url?q=https://bora-casino.com/
http://kens.de/url?q=https://bora-casino.com/
http://kinderundjugendpsychotherapie.de/url?q=https://bora-casino.com/
http://kinhtexaydung.net/redirect/?url=https://bora-casino.com/
https://www.hudsonvalleytraveler.com/Redirect?redirect_url=https://bora-casino.com/
https://triumph-hannover.de/de/TriumphContent/LeavePage?url=https://bora-casino.com/
http://neoromance.info/link/rank.cgi?mode=link&id=26&url=https://bora-casino.com/
http://www.hainberg-gymnasium.com/url?q=https://bora-casino.com/
https://befonts.com/checkout/redirect?url=https://bora-casino.com/
https://ref.webhostinghub.com/scripts/click.php?ref_id=Eduarea&desturl=https://bora-casino.com/
https://www.usap.gov/externalsite.cfm?https://bora-casino.com/
https://maps.google.com.ua/url?rct=j&sa=t&url=https://bora-casino.com/
https://skamata.ru/bitrix/redirect.php?goto=https://bora-casino.com/
https://www.skamata.ru/bitrix/redirect.php?event1=cafesreda&event2=&event3=&goto=https://bora-casino.com/
http://images.google.hu/url?q=https://bora-casino.com/
http://images.google.com.mx/url?q=https://bora-casino.com/
http://www.google.com.mx/url?q=https://bora-casino.com/
http://images.google.com.hk/url?q=https://bora-casino.com/
http://images.google.fi/url?q=https://bora-casino.com/
http://maps.google.fi/url?q=https://bora-casino.com/
http://www.shinobi.jp/etc/goto.html?https://bora-casino.com/
http://images.google.co.id/url?q=https://bora-casino.com/
http://maps.google.co.id/url?q=https://bora-casino.com/
http://images.google.no/url?q=https://bora-casino.com/
http://maps.google.no/url?q=https://bora-casino.com/
http://images.google.co.th/url?q=https://bora-casino.com/
http://maps.google.co.th/url?q=https://bora-casino.com/
http://www.google.co.th/url?q=https://bora-casino.com/
http://maps.google.co.za/url?q=https://bora-casino.com/
http://images.google.ro/url?q=https://bora-casino.com/
http://maps.google.ro/url?q=https://bora-casino.com/
http://cse.google.dk/url?q=https://bora-casino.com/
http://cse.google.com.tr/url?q=https://bora-casino.com/
http://cse.google.hu/url?q=https://bora-casino.com/
http://cse.google.com.hk/url?q=https://bora-casino.com/
http://cse.google.fi/url?q=https://bora-casino.com/
http://images.google.com.sg/url?q=https://bora-casino.com/
http://cse.google.pt/url?q=https://bora-casino.com/
http://cse.google.co.nz/url?q=https://bora-casino.com/
http://images.google.com.ar/url?q=https://bora-casino.com/
http://cse.google.co.id/url?q=https://bora-casino.com/
http://images.google.com.ua/url?q=https://bora-casino.com/
http://cse.google.no/url?q=https://bora-casino.com/
http://cse.google.co.th/url?q=https://bora-casino.com/
http://cse.google.ro/url?q=https://bora-casino.com/
http://images.google.com.tr/url?q=https://bora-casino.com/
http://maps.google.dk/url?q=https://bora-casino.com/
http://www.google.fi/url?q=https://bora-casino.com/
https://skibaza.ru/bitrix/rk.php?goto=https://bora-casino.com/
https://supplier-portal-uat.daimler.com/external-link.jspa?url=https://bora-casino.com/
https://stroim100.ru/redirect?url=https://bora-casino.com/
https://strelmag.ru/bitrix/rk.php?goto=https://bora-casino.com/
https://store-pro.ru/go?https://bora-casino.com/
https://splash.hume.vic.gov.au/analytics/outbound?url=https://bora-casino.com/
https://spb90.ru/bitrix/redirect.php?goto=https://bora-casino.com/
https://spartak.ru/bitrix/redirect.php?goto=https://bora-casino.com/
https://sovaisova.ru/bitrix/redirect.php?event1=2009_mainpage&event2=go_www&event3=&goto=https://bora-casino.com/
https://socport.ru/redirect?url=https://bora-casino.com/
https://slashwrestling.com/cgi-bin/redirect.cgi?https://bora-casino.com/
https://seoandme.ru/bitrix/redirect.php?goto=https://bora-casino.com/
https://s-online.ru/bitrix/redirect.php?goto=https://bora-casino.com/
https://ru.xhamster3.com/exit.php?url=https://bora-casino.com/
https://rssfeeds.wtsp.com/~/t/0/0/wtsp/home/~bora-casino.com/
https://rostovmama.ru/redirect?url=https://bora-casino.com/
https://rev1.reversion.jp/redirect?url=https://bora-casino.com/
https://relationshiphq.com/french.php?u=https://bora-casino.com/
https://ref.gamer.com.tw/redir.php?url=https://bora-casino.com/
https://ramset.com.au/document/url/?url=https://bora-casino.com/
https://www.star174.ru/redir.php?url=https://bora-casino.com/
https://staten.ru/bitrix/rk.php?goto=https://bora-casino.com/
https://stav-geo.ru/go?https://bora-casino.com/
http://stopcran.ru/go?https://bora-casino.com/
http://studioad.ru/go?https://bora-casino.com/
http://swepub.kb.se/setattribute?language=en&redirect=https://bora-casino.com/
https://www.licnioglasi.org/index.php?thememode=full;redirect=https://bora-casino.com/
http://www.rexart.com/cgi-rexart/al/affiliates.cgi?aid=872&redirect=https://bora-casino.com/
http://www2.smartmail.com.ar/tl.php?p=hqf/f94/rs/1fp/4c0/rs//https://bora-casino.com/
http://elsy.at/elearningdownload.php?link=https://bora-casino.com/
http://old.roofnet.org/external.php?link=https://bora-casino.com/
http://www.forum-wodociagi.pl/system/links/3a337d509d017c7ca398d1623dfedf85.html?link=https://bora-casino.com/
http://www.bucatareasa.ro/link.php?url=https://bora-casino.com/
http://mosprogulka.ru/go?https://bora-casino.com/
https://uniline.co.nz/Document/Url/?url=https://bora-casino.com/
http://count.f-av.net/cgi/out.cgi?cd=fav&id=ranking_306&go=https://bora-casino.com/
https://tracker.onrecruit.net/api/v1/redirect/?redirect_to=https://bora-casino.com/
http://slipknot1.info/go.php?url=https://bora-casino.com/
https://www.donbosco.it/common/mod_30_conta.asp?id=6&link=https://bora-casino.com/
https://www.samovar-forum.ru/go?https://bora-casino.com/
http://san-house.ru/bitrix/rk.php?goto=https://bora-casino.com/
https://sbereg.ru/links.php?go=https://bora-casino.com/
http://staldver.ru/go.php?go=https://bora-casino.com/
https://posts.google.com/url?q=https://bora-casino.com/
https://plus.google.com/url?q=https://bora-casino.com/
https://passport.sfacg.com/LoginOut.aspx?Returnurl=https://bora-casino.com/
https://offers.sidex.ru/stat_ym_new.php?redir=https://bora-casino.com/&hash=1577762
https://naruto.su/link.ext.php?url=https://bora-casino.com/
https://meguro.keizai.biz/banner.php?type=image_banner&position=right&id=13&uri=https://bora-casino.com/
https://lekoufa.ru/banner/go?banner_id=4&link=https://bora-casino.com/
https://kakaku-navi.net/items/detail.php?url=https://bora-casino.com/
https://justpaste.it/redirect/172fy/https://bora-casino.com/
https://jt-pr-dot-yamm-track.appspot.com/Redirect?ukey=1iXi3dF8AuzUIsgifbcVnqqx-anF4B8R-9PC3UGhHO3E-1131306248&key=YAMMID-79725512&link=https://bora-casino.com/
https://ipv4.google.com/url?q=https://bora-casino.com/
https://im.tonghopdeal.net/pic.php?q=https://bora-casino.com/
https://heaven.porn/te3/out.php?u=https://bora-casino.com/
https://good-surf.ru/r.php?g=https://bora-casino.com/
https://golden-resort.ru/out.php?out=https://bora-casino.com/
https://globalmedia51.ru/bitrix/redirect.php?goto=https://bora-casino.com/
https://gektor-nsk.ru/bitrix/redirect.php?goto=https://bora-casino.com/
https://gcup.ru/go?https://bora-casino.com/
https://forum.solidworks.com/external-link.jspa?url=https://bora-casino.com/
https://forsto.ru/bitrix/redirect.php?goto=https://bora-casino.com/
https://foro.infojardin.com/proxy.php?link=https://bora-casino.com/
https://es.catholic.net/ligas/ligasframe.phtml?liga=https://bora-casino.com/
https://ditu.google.com/url?q=https://bora-casino.com/
https://de.flavii.de/index.php?flavii=linker&link=https://bora-casino.com/
https://dakke.co/redirect/?url=https://bora-casino.com/
https://creativecommons.org/choose/results-one?q_1=2&q_1=1&field_attribute_to_url=https://bora-casino.com/
https://contacts.google.com/url?sa=t&url=https://bora-casino.com/
https://community.rsa.com/external-link.jspa?url=https://bora-casino.com/
https://community.nxp.com/external-link.jspa?url=https://bora-casino.com/
https://community.esri.com/external-link.jspa?url=https://bora-casino.com/
https://community.cypress.com/external-link.jspa?url=https://bora-casino.com/
https://club.panasonic.jp/member/terms/?siteId=B1&returnURL=https://bora-casino.com/
https://cdn.iframe.ly/api/iframe?url=https://bora-casino.com/
https://bukkit.org/proxy.php?link=https://bora-casino.com/
https://branch.app.link/?$deeplink_path=article%2Fjan%2F123&$fallback_url=https%3A%2F%2Fbora-casino.com/&channel=facebook&feature=affiliate
https://boowiki.info/go.php?go=https://bora-casino.com/
https://blaze.su/bitrix/redirect.php?event1=&event2=&event3=&goto=https://bora-casino.com/
https://bbs.pku.edu.cn/v2/jump-to.php?url=https://bora-casino.com/
https://bbs.hgyouxi.com/kf.php?u=https://bora-casino.com/
https://bares.blog.idnes.cz/redir.aspx?url=https://bora-casino.com/
https://analytics.bluekai.com/site/16231?phint=event=click&phint=campaign=BRAND-TAB&phint=platform=search&done=https://bora-casino.com/
https://advisor.wmtransfer.com/SiteDetails.aspx?url=https://bora-casino.com/
https://advisor.wmtransfer.com/SiteDetails.aspx?url=bora-casino.com/
https://adengine.old.rt.ru/go.jsp?to=https://bora-casino.com/
https://www.flyingsamaritans.net/Startup/SetupSite.asp?RestartPage=https://bora-casino.com/
https://www.ewind.cz/index.php?page=home/redirect&url=https://bora-casino.com/
https://www.eas-racing.se/gbook/go.php?url=https://bora-casino.com/
https://www.direkt-einkauf.de/includes/refer.php?id=170&url=https://bora-casino.com/
https://www.dialogportal.com/Services/Forward.aspx?link=https://bora-casino.com/
https://www.curseforge.com/linkout?remoteUrl=https://bora-casino.com/
https://www.counterwelt.com/charts/click.php?user=14137&link=https://bora-casino.com/
https://www.cossa.ru/bitrix/redirect.php?event1=click&event2=&event3=&goto=https://bora-casino.com/
https://www.cheerunion.org/tracker/index.html?t=ad&pool_id=2&ad_id=5&url=https://bora-casino.com/
https://www.bing.com/news/apiclick.aspx?ref=FexRss&aid=&tid=9BB77FDA801248A5AD23FDBDD5922800&url=https://bora-casino.com/
https://www.bettnet.com/blog/?URL=https://bora-casino.com/
https://www.bartaz.lt/wp-content/plugins/clikstats/ck.php?Ck_id=438&Ck_lnk=https://bora-casino.com/
https://www.bandb.ru/redirect.php?URL=https://bora-casino.com/
https://www.autopartskart.com/buyfromamzon.php?url=https://bora-casino.com/
https://www.autoandrv.com/linkout.aspx?websiteurl=https://bora-casino.com/
https://www.art-prizes.com/AdRedirector.aspx?ad=MelbPrizeSculpture_2017&target=https://bora-casino.com/
https://www.adminer.org/redirect/?url=https://bora-casino.com/
https://wirelessestimator.com/advertise/newsletter_redirect.php?url=https://bora-casino.com/
https://webfeeds.brookings.edu/~/t/0/0/~bora-casino.com/
https://wasitviewed.com/index.php?href=https://bora-casino.com/
https://tvtropes.org/pmwiki/no_outbounds.php?o=https://bora-casino.com/
https://trello.com/add-card?source=mode=popup&name=click+here&desc=https://bora-casino.com/
https://transtats.bts.gov/exit.asp?url=https://bora-casino.com/
https://track.effiliation.com/servlet/effi.redir?id_compteur=13215059&url=https://bora-casino.com/
https://temptationsaga.com/buy.php?url=https://bora-casino.com/
https://tempechamber.glueup.com/track/redirect?type=campaign&lid=42&tracking_id=[trackingId]&redirect_url=https%3A%2F%2Fwww.bora-casino.com/%2F
https://sutd.ru/links.php?go=https://bora-casino.com/
https://abiznes.com.ua/bitrix/redirect.php?event1=&event2=&event3=&goto=https://bora-casino.com/
http://www.webclap.com/php/jump.php?url=https://bora-casino.com/
http://www.torrent.ai/lt/redirect.php?url=https://bora-casino.com/
http://www.sv-mama.ru/shared/go.php?url=https://bora-casino.com/
http://www.sofion.ru/banner.php?r1=41&r2=2234&goto=https://bora-casino.com/
http://www.shippingchina.com/pagead.php?id=RW4uU2hpcC5tYWluLjE=&tourl=https://bora-casino.com/
http://www.sermemole.com/public/serbook/redirect.php?url=https://bora-casino.com/
http://www.semtex.ru/go.php?a=https://bora-casino.com/
http://www.runiwar.ru/go?https://bora-casino.com/
http://www.rucem.ru/doska/redirect/?go=https://bora-casino.com/
http://www.rss.geodles.com/fwd.php?url=https://bora-casino.com/
http://www.paladiny.ru/go.php?url=https://bora-casino.com/
http://www.nuttenzone.at/jump.php?url=https://bora-casino.com/
http://www.myhottiewife.com/cgi-bin/arpro/out.cgi?id=Jojo&url=https://bora-casino.com/
http://www.mix-choice.com/yomi/rank.cgi?mode=link&id=391&url=https://bora-casino.com/
http://www.mistress-and-slave.com/cgi-bin/out.cgi?id=123crush&url=https://bora-casino.com/
http://www.laosubenben.com/home/link.php?url=https://bora-casino.com/
http://www.laopinpai.com/gourl.asp?url=/gourl.asp?url=https://bora-casino.com/
http://www.kollabora.com/external?url=https://bora-casino.com/
http://www.johnvorhees.com/gbook/go.php?url=https://bora-casino.com/
http://www.jkes.tyc.edu.tw/dyna/webs/gotourl.php?id=357&url=https://bora-casino.com/
http://www.internettrafficreport.com/cgi-bin/cgirdir.exe?https://bora-casino.com/
http://www.interfacelift.com/goto.php?url=https://bora-casino.com/
http://www.interempresas.net/estadisticas/r.asp?idsector=129&e=221083&c=195&d=https://bora-casino.com/
http://www.imsnet.at/LangChange.aspx?uri=https://bora-casino.com/
http://www.humanbrainmapping.org/i4a/etrack/track.cfm?rType=2&campaignID=3572&contactID=4524&origURL=https://bora-casino.com/
http://www.hon-cafe.net/cgi-bin/re.cgi?lid=hmw&url=https://bora-casino.com/
http://www.glorioustronics.com/redirect.php?link=https://bora-casino.com/
http://www.global-flat.com/mobile/mobile_switch.php?dir=tofull&url=https://bora-casino.com/
http://www.gigatran.ru/go?url=https://bora-casino.com/
http://www.gigaalert.com/view.php?h=&s=https://bora-casino.com/
http://www.gearguide.ru/phpbb/go.php?https://bora-casino.com/
http://www.etis.ford.com/externalURL.do?url=https://bora-casino.com/
http://www.erotikplatz.at/redirect.php?id=939&mode=fuhrer&url=https://bora-casino.com/
http://www.cyprus-net.com/banner_click.php?banid=4&link=https://bora-casino.com/
http://www.compusystems.com/servlet/Et?x=270.-101.233736|%20https://bora-casino.com/
http://www.chungshingelectronic.com/redirect.asp?url=https://bora-casino.com/
http://www.beigebraunapartment.de/url?q=https://bora-casino.com/
http://www.bdsmandfetish.com/cgi-bin/sites/out.cgi?id=mandymon&url=https://bora-casino.com/
http://visits.seogaa.ru/redirect/?g=https://bora-casino.com/
http://twindish-electronics.de/url?q=https://bora-casino.com/
http://tido.al/vazhdo.php?url=https://bora-casino.com/
http://tharp.me/?url_to_shorten=https://bora-casino.com/
http://stroysoyuz.ru/bitrix/rk.php?goto=https://bora-casino.com/
http://speakrus.ru/links.php?go=https://bora-casino.com/
http://spbstroy.ru/bitrix/redirect.php?goto=https://bora-casino.com/
http://solo-center.ru/links.php?go=https://bora-casino.com/
http://smile.wjp.am/link-free/link3.cgi?mode=cnt&no=8&hpurl=https://bora-casino.com/
http://seriesandtv.com/?wptouch_switch=desktop&redirect=https://bora-casino.com/
http://sennheiserstore.ru/bitrix/rk.php?goto=https://bora-casino.com/
http://school364.spb.ru/bitrix/rk.php?goto=https://bora-casino.com/
http://sc.sie.gov.hk/TuniS/bora-casino.com/
http://rzngmu.ru/go?https://bora-casino.com/
http://rostovklad.ru/go.php?https://bora-casino.com/
http://portalnp.snauka.ru/bitrix/redirect.php?goto=https://bora-casino.com/
http://park3.wakwak.com/~yadoryuo/cgi-bin/click3/click3.cgi?cnt=chalet-main&url=https://bora-casino.com/
http://page.yicha.cn/tp/j?url=https://bora-casino.com/
http://onlinemanuals.txdot.gov/help/urlstatusgo.html?url=https://bora-casino.com/
http://mbrf.ae/knowledgeaward/language/ar/?redirect_url=https://bora-casino.com/
http://markiza.me/bitrix/rk.php?goto=https://bora-casino.com/
http://m.17ll.com/apply/tourl/?url=https://bora-casino.com/
http://landbidz.com/redirect.asp?url=https://bora-casino.com/
http://kreepost.com/go/?https://bora-casino.com/
http://jump.5ch.net/?https://bora-casino.com/
http://imperialoptical.com/news-redirect.aspx?url=https://bora-casino.com/
http://hellothai.com/wwwlink/wwwredirect.asp?hp_id=1242&url=https://bora-casino.com/
http://guru.sanook.com/?URL=https://bora-casino.com/
http://go.gomtv.com/rd?link_id=10805&code=SHARE_DREAMWIZ&send=https://bora-casino.com/
http://gfmis.crru.ac.th/web/redirect.php?url=https://bora-casino.com/
http://gfaq.ru/go?https://bora-casino.com/
http://gbi-12.ru/links.php?go=https://bora-casino.com/
http://frienddo.com/out.php?url=https://bora-casino.com/
http://fr.knubic.com/redirect_to?url=https://bora-casino.com/
http://ezproxy.lib.uh.edu/login?url=https://bora-casino.com/
http://edcommunity.ru/bitrix/rk.php?goto=https://bora-casino.com/
http://dvd24online.de/url?q=https://bora-casino.com/
http://client.paltalk.com/client/webapp/client/External.wmt?url=https://bora-casino.com/
http://chuanroi.com/Ajax/dl.aspx?u=https://bora-casino.com/
http://branch.app.link/?$deeplink_path=article/jan/123&$fallback_url=https://bora-casino.com/
http://biz-tech.org/bitrix/rk.php?goto=https://bora-casino.com/
http://avalon.gondor.ru/away.php?link=https://bora-casino.com/
http://ads.cars.cz/adclick.php?bannerid=333&zoneid=237&source=&dest=https://bora-casino.com/
http://a.gongkong.com/db/adredir.asp?id=16757&url=https://bora-casino.com/
http://2010.russianinternetweek.ru/bitrix/rk.php?goto=https://bora-casino.com/
https://xat.com/web_gear/chat/linkvalidator.php?link=https://bora-casino.com/
https://www.yeaah.com/disco/DiscoGo.asp?ID=3435&Site=https://bora-casino.com/
https://www.woodlist.us/delete-company?nid=13964&element=https://bora-casino.com/
https://www.viecngay.vn/go?to=https://bora-casino.com/
https://www.vicsport.com.au/analytics/outbound?url=https://bora-casino.com/
https://www.uts.edu.co/portal/externo.php?id=https://bora-casino.com/
https://www.usjournal.com/go.php?campusID=190&url=https://bora-casino.com/
https://www.talgov.com/Main/exit.aspx?url=https://bora-casino.com/
https://www.spyro-realms.com/go?https://bora-casino.com/
https://www.snek.ai/redirect?url=https://bora-casino.com/
https://www.skoberne.si/knjiga/go.php?url=https://bora-casino.com/
https://www.serie-a.ru/bitrix/redirect.php?goto=https://bora-casino.com/
https://www.russianrobotics.ru/bitrix/rk.php?goto=https://bora-casino.com/
https://www.ruchnoi.ru/ext_link?url=https://bora-casino.com/
https://www.rprofi.ru/bitrix/rk.php?goto=https://bora-casino.com/
https://www.roccotube.com/cgi-bin/at3/out.cgi?id=27&tag=toplist&trade=https://bora-casino.com/
https://www.oebb.at/nightjet_newsletter/tc/xxxx?url=https://bora-casino.com/
https://www.nyl0ns.com/cgi-bin/a2/out.cgi?id=43&l=btop&u=https://bora-casino.com/
https://www.moonbbs.com/dm/dmlink.php?dmurl=https://bora-casino.com/
https://www.moneydj.com/ads/adredir.aspx?bannerid=39863&url=https://bora-casino.com/
https://www.meetme.com/apps/redirect/?url=https://bora-casino.com/
https://www.kath-kirche-kaernten.at/pfarren/pfarre/C3014?URL=https://bora-casino.com/
https://www.interpals.net/url_redirect.php?href=https://bora-casino.com/
https://www.interecm.com/interecm/tracker?op=click&id=5204.db2&url=https://bora-casino.com/
https://www.info-realty.ru/bitrix/rk.php?goto=https://bora-casino.com/
https://www.ibm.com/links/?cc=us&lc=en&prompt=1&url=https://bora-casino.com/
https://www.hradycz.cz/redir.php?b=445&t=https://bora-casino.com/
https://www.hottystop.com/cgi-bin/at3/out.cgi?id=12&trade=https://bora-casino.com/
https://www.hobowars.com/game/linker.php?url=https://bora-casino.com/
https://www.hentainiches.com/index.php?id=derris&tour=https://bora-casino.com/
https://www.hachimantaishi.com/click3/click3.cgi?cnt=c5&url=https://bora-casino.com/
https://www.gvomail.com/redir.php?k=1560a19819b8f93348a7bc7fc28d0168&url=https://bora-casino.com/
https://www.gutscheinaffe.de/wp-content/plugins/AND-AntiBounce/redirector.php?url=https://bora-casino.com/
https://www.gudarjavalambre.com/sections/miscelany/link.php?url=https://bora-casino.com/
https://www.greencom.ru/catalog/irrigation_systems.html?jump_site=2008&url=https://bora-casino.com/
https://www.girlznation.com/cgi-bin/atc/out.cgi?id=50&l=side&u=https://bora-casino.com/
https://www.gaelchultur.com/changelang.aspx?url=https://bora-casino.com/
https://www.funeralunion.org/delete-company?nid=39&element=https://bora-casino.com/
https://www.fudbal91.com/tz.php?zone=America/Iqaluit&r=https://bora-casino.com/
https://www.frodida.org/BannerClick.php?BannerID=29&LocationURL=https://bora-casino.com/
https://www.freemusic123.com/karaoke/cgi-bin/out.cgi?id=castillo&url=https://bora-casino.com/
https://chunk9.top/url?q=https://bora-casino.com/
https://kryvbas.at.ua/go?https://bora-casino.com/
https://google.cat/url?q=https://bora-casino.com/
https://joomluck.com/go/?https://bora-casino.com/
https://www.leefleming.com/?URL=bora-casino.com/
https://www.anonymz.com/?https://bora-casino.com/
https://weburg.net/redirect?url=bora-casino.com/
https://tw6.jp/jump/?url=https://bora-casino.com/
https://www.spainexpat.com/?URL=bora-casino.com/
https://www.fotka.pl/link.php?u=bora-casino.com/
https://www.lolinez.com/?https://bora-casino.com/
https://ape.st/share?url=https://bora-casino.com/
https://nanos.jp/jmp?url=https://bora-casino.com/
https://www.fca.gov/?URL=https://bora-casino.com/
https://savvylion.com/?bmDomain=bora-casino.com/
https://www.soyyooestacaido.com/bora-casino.com/
https://www.gta.ru/redirect/www.bora-casino.com/
https://mintax.kz/go.php?https://bora-casino.com/
https://directx10.org/go?https://bora-casino.com/
https://mejeriet.dk/link.php?id=bora-casino.com/
https://ezdihan.do.am/go?https://bora-casino.com/
https://fishki.net/click?https://bora-casino.com/
https://hiddenrefer.com/?https://bora-casino.com/
https://kernmetal.ru/?go=https://bora-casino.com/
https://romhacking.ru/go?https://bora-casino.com/
https://turion.my1.ru/go?https://bora-casino.com/
https://kassirs.ru/sweb.asp?url=bora-casino.com/
https://www.allods.net/redirect/bora-casino.com/
https://icook.ucoz.ru/go?https://bora-casino.com/
https://megalodon.jp/?url=https://bora-casino.com/
https://www.pasco.k12.fl.us/?URL=bora-casino.com/
https://anolink.com/?link=https://bora-casino.com/
https://www.questsociety.ca/?URL=bora-casino.com/
https://www.disl.edu/?URL=https://bora-casino.com/
https://holidaykitchens.com/?URL=bora-casino.com/
https://www.mbcarolinas.org/?URL=bora-casino.com/
https://ovatu.com/e/c?url=https://bora-casino.com/
https://www.anibox.org/go?https://bora-casino.com/
https://google.info/url?q=https://bora-casino.com/
https://atlantis-tv.ru/go?https://bora-casino.com/
https://otziv.ucoz.com/go?https://bora-casino.com/
https://www.sgvavia.ru/go?https://bora-casino.com/
https://element.lv/go?url=https://bora-casino.com/
https://karanova.ru/?goto=https://bora-casino.com/
https://789.ru/go.php?url=https://bora-casino.com/
https://krasnoeselo.su/go?https://bora-casino.com/
https://game-era.do.am/go?https://bora-casino.com/
https://kudago.com/go/?to=https://bora-casino.com/
https://after.ucoz.net/go?https://bora-casino.com/
https://kinteatr.at.ua/go?https://bora-casino.com/
https://nervetumours.org.uk/?URL=bora-casino.com/
https://kopyten.clan.su/go?https://bora-casino.com/
https://www.taker.im/go/?u=https://bora-casino.com/
https://usehelp.clan.su/go?https://bora-casino.com/
https://www.wow-game.ru/go?https://bora-casino.com/
https://sepoa.fr/wp/go.php?https://bora-casino.com/
https://world-source.ru/go?https://bora-casino.com/
https://mail2.mclink.it/SRedirect/bora-casino.com/
https://www.swleague.ru/go?https://bora-casino.com/
https://nazgull.ucoz.ru/go?https://bora-casino.com/
https://www.rosbooks.ru/go?https://bora-casino.com/
https://infosort.ru/go?url=https://bora-casino.com/
https://pavon.kz/proxy?url=https://bora-casino.com/
https://beskuda.ucoz.ru/go?https://bora-casino.com/
https://ma.by/away.php?url=https://bora-casino.com/
https://cloud.squirrly.co/go34692/bora-casino.com/
https://richmonkey.biz/go/?https://bora-casino.com/
https://vlpacific.ru/?goto=https://bora-casino.com/
https://google.co.ck/url?q=https://bora-casino.com/
https://google.co.uz/url?q=https://bora-casino.com/
https://google.co.ls/url?q=https://bora-casino.com/
https://google.co.zm/url?q=https://bora-casino.com/
https://google.co.ve/url?q=https://bora-casino.com/
https://google.co.zw/url?q=https://bora-casino.com/
https://google.co.uk/url?q=https://bora-casino.com/
https://google.co.ao/url?q=https://bora-casino.com/
https://google.co.cr/url?q=https://bora-casino.com/
https://google.co.nz/url?q=https://bora-casino.com/
https://google.co.th/url?q=https://bora-casino.com/
https://google.co.ug/url?q=https://bora-casino.com/
https://google.co.ma/url?q=https://bora-casino.com/
https://google.co.za/url?q=https://bora-casino.com/
https://google.co.kr/url?q=https://bora-casino.com/
https://google.co.mz/url?q=https://bora-casino.com/
https://google.co.vi/url?q=https://bora-casino.com/
https://google.co.ke/url?q=https://bora-casino.com/
https://google.co.hu/url?q=https://bora-casino.com/
https://google.co.tz/url?q=https://bora-casino.com/
https://gadgets.gearlive.com/?URL=bora-casino.com/
https://google.co.jp/url?q=https://bora-casino.com/
https://eric.ed.gov/?redir=https://bora-casino.com/
https://www.usich.gov/?URL=https://bora-casino.com/
https://sec.pn.to/jump.php?https://bora-casino.com/
https://www.earth-policy.org/?URL=bora-casino.com/
https://www.silverdart.co.uk/?URL=bora-casino.com/
https://www.onesky.ca/?URL=https://bora-casino.com/
https://pr-cy.ru/jump/?url=https://bora-casino.com/
https://google.co.bw/url?q=https://bora-casino.com/
https://google.co.id/url?q=https://bora-casino.com/
https://google.co.in/url?q=https://bora-casino.com/
https://google.co.il/url?q=https://bora-casino.com/
https://pikmlm.ru/out.php?p=https://bora-casino.com/
https://masculist.ru/go/url=https://bora-casino.com/
https://regnopol.clan.su/go?https://bora-casino.com/
https://tannarh.narod.ru/go?https://bora-casino.com/
https://mss.in.ua/go.php?to=https://bora-casino.com/
https://owohho.com/away?url=https://bora-casino.com/
https://bel-kot.com/away?to=https://bora-casino.com/
https://www.youa.eu/r.php?u=https://bora-casino.com/
https://cool4you.ucoz.ru/go?https://bora-casino.com/
https://gu-pdnp.narod.ru/go?https://bora-casino.com/
https://rg4u.clan.su/go?https://bora-casino.com/
https://dawnofwar.org.ru/go?https://bora-casino.com/
https://tobiz.ru/on.php?url=https://bora-casino.com/
https://www.de-online.ru/go?https://bora-casino.com/
https://bglegal.ru/away/?to=https://bora-casino.com/
https://www.allpn.ru/redirect/?url=bora-casino.com/
https://nter.net.ua/go/?url=https://bora-casino.com/
https://click.start.me/?url=https://bora-casino.com/
https://prizraks.clan.su/go?https://bora-casino.com/
https://flyd.ru/away.php?to=https://bora-casino.com/
https://risunok.ucoz.com/go?https://bora-casino.com/
https://www.google.ca/url?q=https://bora-casino.com/
https://www.google.fr/url?q=https://bora-casino.com/
https://cse.google.mk/url?q=https://bora-casino.com/
https://cse.google.ki/url?q=https://bora-casino.com/
https://www.google.sn/url?q=https://bora-casino.com/
https://cse.google.sr/url?q=https://bora-casino.com/
https://www.google.so/url?q=https://bora-casino.com/
https://www.google.cl/url?q=https://bora-casino.com/
https://www.google.sc/url?q=https://bora-casino.com/
https://www.google.iq/url?q=https://bora-casino.com/
https://www.semanticjuice.com/site/bora-casino.com/
https://cse.google.kz/url?q=https://bora-casino.com/
https://www.google.gy/url?q=https://bora-casino.com/
https://s79457.gridserver.com/?URL=bora-casino.com/
https://cdl.su/redirect?url=https://bora-casino.com/
https://www.fondbtvrtkovic.hr/?URL=bora-casino.com/
https://lostnationarchery.com/?URL=bora-casino.com/
https://www.booktrix.com/live/?URL=bora-casino.com/
https://www.google.ro/url?q=https://bora-casino.com/
https://www.google.tm/url?q=https://bora-casino.com/
https://www.marcellusmatters.psu.edu/?URL=https://bora-casino.com/
https://cse.google.vu/url?sa=i&url=https://bora-casino.com/
https://cse.google.vg/url?sa=i&url=https://bora-casino.com/
https://cse.google.tn/url?sa=i&url=https://bora-casino.com/
https://cse.google.tl/url?sa=i&url=https://bora-casino.com/
https://cse.google.tg/url?sa=i&url=https://bora-casino.com/
https://cse.google.td/url?sa=i&url=https://bora-casino.com/
https://cse.google.so/url?sa=i&url=https://bora-casino.com/
https://cse.google.sn/url?sa=i&url=https://bora-casino.com/
https://cse.google.se/url?sa=i&url=https://bora-casino.com/
https://cse.google.ne/url?sa=i&url=https://bora-casino.com/
https://cse.google.mu/url?sa=i&url=https://bora-casino.com/
https://cse.google.ml/url?sa=i&url=https://bora-casino.com/
https://cse.google.kz/url?sa=i&url=https://bora-casino.com/
https://cse.google.hn/url?sa=i&url=https://bora-casino.com/
https://cse.google.gy/url?sa=i&url=https://bora-casino.com/
https://cse.google.gp/url?sa=i&url=https://bora-casino.com/
https://cse.google.gl/url?sa=i&url=https://bora-casino.com/
https://cse.google.ge/url?sa=i&url=https://bora-casino.com/
https://cse.google.dj/url?sa=i&url=https://bora-casino.com/
https://cse.google.cv/url?sa=i&url=https://bora-casino.com/
https://cse.google.com/url?sa=i&url=https://bora-casino.com/
https://cse.google.com/url?q=https://bora-casino.com/
https://cse.google.com.vc/url?sa=i&url=https://bora-casino.com/
https://cse.google.com.tj/url?sa=i&url=https://bora-casino.com/
https://cse.google.com.sl/url?sa=i&url=https://bora-casino.com/
https://cse.google.com.sb/url?sa=i&url=https://bora-casino.com/
https://cse.google.com.py/url?sa=i&url=https://bora-casino.com/
https://cse.google.com.ph/url?sa=i&url=https://bora-casino.com/
https://cse.google.com.pg/url?sa=i&url=https://bora-casino.com/
https://cse.google.com.np/url?sa=i&url=https://bora-casino.com/
https://cse.google.com.nf/url?sa=i&url=https://bora-casino.com/
https://cse.google.com.mt/url?sa=i&url=https://bora-casino.com/
https://cse.google.com.ly/url?sa=i&url=https://bora-casino.com/
https://cse.google.com.lb/url?sa=i&url=https://bora-casino.com/
https://cse.google.com.kw/url?sa=i&url=https://bora-casino.com/
https://cse.google.com.kh/url?sa=i&url=https://bora-casino.com/
https://cse.google.com.jm/url?sa=i&url=https://bora-casino.com/
https://cse.google.com.gi/url?sa=i&url=https://bora-casino.com/
https://cse.google.com.gh/url?sa=i&url=https://bora-casino.com/
https://cse.google.com.fj/url?sa=i&url=https://bora-casino.com/
https://cse.google.com.et/url?sa=i&url=https://bora-casino.com/
https://cse.google.com.do/url?sa=i&url=https://bora-casino.com/
https://cse.google.com.cy/url?sa=i&url=https://bora-casino.com/
https://cse.google.com.bz/url?sa=i&url=https://bora-casino.com/
https://cse.google.com.bo/url?sa=i&url=https://bora-casino.com/
https://cse.google.com.bn/url?sa=i&url=https://bora-casino.com/
https://cse.google.com.ai/url?sa=i&url=https://bora-casino.com/
https://cse.google.com.ag/url?sa=i&url=https://bora-casino.com/
https://cse.google.com.af/url?sa=i&url=https://bora-casino.com/
https://cse.google.co.zw/url?sa=i&url=https://bora-casino.com/
https://cse.google.co.zm/url?sa=i&url=https://bora-casino.com/
https://cse.google.co.vi/url?sa=i&url=https://bora-casino.com/
https://cse.google.co.uz/url?sa=i&url=https://bora-casino.com/
https://cse.google.co.tz/url?sa=i&url=https://bora-casino.com/
https://cse.google.co.mz/url?sa=i&url=https://bora-casino.com/
https://cse.google.co.ma/url?sa=i&url=https://bora-casino.com/
https://cse.google.co.ls/url?sa=i&url=https://bora-casino.com/
https://cse.google.co.ke/url?sa=i&url=https://bora-casino.com/
https://cse.google.co.ck/url?sa=i&url=https://bora-casino.com/
https://cse.google.co.bw/url?sa=i&url=https://bora-casino.com/
https://cse.google.cm/url?sa=i&url=https://bora-casino.com/
https://cse.google.ci/url?sa=i&url=https://bora-casino.com/
https://cse.google.cg/url?sa=i&url=https://bora-casino.com/
https://cse.google.cf/url?sa=i&url=https://bora-casino.com/
https://cse.google.cd/url?sa=i&url=https://bora-casino.com/
https://cse.google.cat/url?sa=i&url=https://bora-casino.com/
https://cse.google.bt/url?sa=i&url=https://bora-casino.com/
https://cse.google.bj/url?sa=i&url=https://bora-casino.com/
https://cse.google.bf/url?sa=i&url=https://bora-casino.com/
https://cse.google.am/url?sa=i&url=https://bora-casino.com/
https://cse.google.al/url?sa=i&url=https://bora-casino.com/
https://cse.google.ad/url?sa=i&url=https://bora-casino.com/
https://cse.google.ac/url?sa=i&url=https://bora-casino.com/
https://maps.google.ws/url?q=https://bora-casino.com/
https://maps.google.tn/url?q=https://bora-casino.com/
https://maps.google.tl/url?q=https://bora-casino.com/
https://maps.google.tk/url?q=https://bora-casino.com/
https://maps.google.td/url?q=https://bora-casino.com/
https://maps.google.st/url?q=https://bora-casino.com/
https://maps.google.sn/url?q=https://bora-casino.com/
https://maps.google.sm/url?q=https://bora-casino.com/
https://maps.google.si/url?sa=t&url=https://bora-casino.com/
https://maps.google.sh/url?q=https://bora-casino.com/
https://maps.google.se/url?q=https://bora-casino.com/
https://maps.google.rw/url?q=https://bora-casino.com/
https://maps.google.ru/url?sa=t&url=https://bora-casino.com/
https://maps.google.ru/url?q=https://bora-casino.com/
https://maps.google.rs/url?q=https://bora-casino.com/
https://maps.google.pt/url?sa=t&url=https://bora-casino.com/
https://maps.google.pt/url?q=https://bora-casino.com/
https://maps.google.pn/url?q=https://bora-casino.com/
https://maps.google.pl/url?sa=t&url=https://bora-casino.com/
https://maps.google.pl/url?q=https://bora-casino.com/
https://maps.google.nr/url?q=https://bora-casino.com/
https://maps.google.no/url?q=https://bora-casino.com/
https://maps.google.nl/url?sa=t&url=https://bora-casino.com/
https://maps.google.ne/url?q=https://bora-casino.com/
https://maps.google.mw/url?q=https://bora-casino.com/
https://maps.google.mu/url?q=https://bora-casino.com/
https://maps.google.ms/url?q=https://bora-casino.com/
https://maps.google.mn/url?sa=t&url=https://bora-casino.com/
https://maps.google.ml/url?q=https://bora-casino.com/
https://maps.google.mk/url?q=https://bora-casino.com/
https://maps.google.mg/url?q=https://bora-casino.com/
https://maps.google.lv/url?sa=t&url=https://bora-casino.com/
https://maps.google.lt/url?sa=t&url=https://bora-casino.com/
https://maps.google.lt/url?q=https://bora-casino.com/
https://maps.google.lk/url?q=https://bora-casino.com/
https://maps.google.li/url?q=https://bora-casino.com/
https://maps.google.la/url?q=https://bora-casino.com/
https://maps.google.kz/url?q=https://bora-casino.com/
https://maps.google.ki/url?q=https://bora-casino.com/
https://maps.google.kg/url?q=https://bora-casino.com/
https://maps.google.jo/url?q=https://bora-casino.com/
https://maps.google.je/url?q=https://bora-casino.com/
https://maps.google.iq/url?q=https://bora-casino.com/
https://maps.google.ie/url?sa=t&url=https://bora-casino.com/
https://maps.google.hu/url?q=https://bora-casino.com/
https://maps.google.gg/url?q=https://bora-casino.com/
https://maps.google.ge/url?sa=t&url=https://bora-casino.com/
https://maps.google.ge/url?q=https://bora-casino.com/
https://maps.google.ga/url?q=https://bora-casino.com/
https://maps.google.fr/url?sa=t&url=https://bora-casino.com/
https://maps.google.fr/url?q=https://bora-casino.com/
https://maps.google.es/url?sa=t&url=https://bora-casino.com/
https://maps.google.ee/url?q=https://bora-casino.com/
https://maps.google.dz/url?q=https://bora-casino.com/
https://maps.google.dm/url?q=https://bora-casino.com/
https://maps.google.dk/url?q=https://bora-casino.com/
https://maps.google.de/url?sa=t&url=https://bora-casino.com/
https://maps.google.cz/url?sa=t&url=https://bora-casino.com/
https://maps.google.cz/url?q=https://bora-casino.com/
https://maps.google.cv/url?q=https://bora-casino.com/
https://maps.google.com/url?sa=t&url=https://bora-casino.com/
https://maps.google.com/url?q=https://bora-casino.com/
https://maps.google.com.vc/url?q=https://bora-casino.com/
https://maps.google.com.uy/url?q=https://bora-casino.com/
https://maps.google.com.ua/url?q=https://bora-casino.com/
https://maps.google.com.tw/url?sa=t&url=https://bora-casino.com/
https://maps.google.com.tw/url?q=https://bora-casino.com/
https://maps.google.com.sg/url?q=https://bora-casino.com/
https://maps.google.com.sb/url?q=https://bora-casino.com/
https://maps.google.com.qa/url?q=https://bora-casino.com/
https://maps.google.com.py/url?q=https://bora-casino.com/
https://maps.google.com.ph/url?q=https://bora-casino.com/
https://maps.google.com.pa/url?q=https://bora-casino.com/
https://maps.google.com.om/url?q=https://bora-casino.com/
https://maps.google.com.ni/url?sa=t&url=https://bora-casino.com/
https://maps.google.com.ni/url?q=https://bora-casino.com/
https://maps.google.com.na/url?q=https://bora-casino.com/
https://maps.google.com.mx/url?q=https://bora-casino.com/
https://maps.google.com.mt/url?sa=t&url=https://bora-casino.com/
https://maps.google.com.ly/url?q=https://bora-casino.com/
https://maps.google.com.lb/url?q=https://bora-casino.com/
https://maps.google.com.kw/url?q=https://bora-casino.com/
https://maps.google.com.kh/url?q=https://bora-casino.com/
https://maps.google.com.jm/url?q=https://bora-casino.com/
https://maps.google.com.gt/url?q=https://bora-casino.com/
https://maps.google.com.gh/url?q=https://bora-casino.com/
https://maps.google.com.fj/url?q=https://bora-casino.com/
https://maps.google.com.et/url?q=https://bora-casino.com/
https://maps.google.com.bz/url?sa=t&url=https://bora-casino.com/
https://maps.google.com.bz/url?q=https://bora-casino.com/
https://maps.google.com.br/url?sa=t&url=https://bora-casino.com/
https://maps.google.com.bo/url?sa=t&url=https://bora-casino.com/
https://maps.google.com.bo/url?q=https://bora-casino.com/
https://maps.google.com.bn/url?q=https://bora-casino.com/
https://maps.google.com.au/url?sa=t&url=https://bora-casino.com/
https://maps.google.com.au/url?q=https://bora-casino.com/
https://maps.google.com.ar/url?q=https://bora-casino.com/
https://maps.google.com.ai/url?q=https://bora-casino.com/
https://maps.google.com.ag/url?q=https://bora-casino.com/
https://maps.google.co.zm/url?q=https://bora-casino.com/
https://maps.google.co.za/url?sa=t&url=https://bora-casino.com/
https://maps.google.co.vi/url?q=https://bora-casino.com/
https://maps.google.co.ug/url?q=https://bora-casino.com/
https://maps.google.co.tz/url?q=https://bora-casino.com/
https://maps.google.co.th/url?sa=t&url=https://bora-casino.com/
https://maps.google.co.nz/url?sa=t&url=https://bora-casino.com/
https://maps.google.co.nz/url?q=https://bora-casino.com/
https://maps.google.co.ls/url?q=https://bora-casino.com/
https://maps.google.co.kr/url?q=https://bora-casino.com/
https://maps.google.co.jp/url?sa=t&url=https://bora-casino.com/
https://maps.google.co.in/url?sa=t&url=https://bora-casino.com/
https://maps.google.co.il/url?sa=t&url=https://bora-casino.com/
https://maps.google.co.il/url?q=https://bora-casino.com/
https://maps.google.co.id/url?q=https://bora-casino.com/
https://maps.google.co.cr/url?sa=t&url=https://bora-casino.com/
https://maps.google.co.ck/url?q=https://bora-casino.com/
https://maps.google.co.bw/url?q=https://bora-casino.com/
https://maps.google.co.ao/url?q=https://bora-casino.com/
https://maps.google.cm/url?q=https://bora-casino.com/
https://maps.google.cl/url?sa=t&url=https://bora-casino.com/
https://maps.google.ci/url?q=https://bora-casino.com/
https://maps.google.ch/url?q=https://bora-casino.com/
https://maps.google.cg/url?q=https://bora-casino.com/
https://maps.google.cf/url?q=https://bora-casino.com/
https://maps.google.cd/url?sa=t&url=https://bora-casino.com/
https://maps.google.cd/url?q=https://bora-casino.com/
https://maps.google.ca/url?q=https://bora-casino.com/
https://maps.google.bs/url?q=https://bora-casino.com/
https://maps.google.bj/url?q=https://bora-casino.com/
https://maps.google.bi/url?sa=t&url=https://bora-casino.com/
https://maps.google.bg/url?q=https://bora-casino.com/
https://maps.google.bf/url?q=https://bora-casino.com/
https://maps.google.be/url?q=https://bora-casino.com/
https://maps.google.at/url?sa=t&url=https://bora-casino.com/
https://maps.google.at/url?q=https://bora-casino.com/
https://maps.google.ad/url?q=https://bora-casino.com/
https://images.google.ws/url?q=https://bora-casino.com/
https://images.google.vg/url?q=https://bora-casino.com/
https://images.google.tt/url?q=https://bora-casino.com/
https://images.google.tm/url?q=https://bora-casino.com/
https://images.google.tk/url?q=https://bora-casino.com/
https://images.google.tg/url?q=https://bora-casino.com/
https://images.google.sk/url?sa=t&url=https://bora-casino.com/
https://images.google.si/url?sa=t&url=https://bora-casino.com/
https://images.google.sh/url?q=https://bora-casino.com/
https://images.google.se/url?q=https://bora-casino.com/
https://images.google.pt/url?q=https://bora-casino.com/
https://images.google.ps/url?sa=t&url=https://bora-casino.com/
https://images.google.pn/url?q=https://bora-casino.com/
https://images.google.pl/url?q=https://bora-casino.com/
https://images.google.nr/url?q=https://bora-casino.com/
https://images.google.no/url?q=https://bora-casino.com/
https://images.google.mw/url?q=https://bora-casino.com/
https://images.google.mv/url?q=https://bora-casino.com/
https://images.google.ml/url?q=https://bora-casino.com/
https://images.google.mg/url?q=https://bora-casino.com/
https://images.google.me/url?q=https://bora-casino.com/
https://images.google.lk/url?q=https://bora-casino.com/
https://images.google.li/url?sa=t&url=https://bora-casino.com/
https://images.google.la/url?q=https://bora-casino.com/
https://images.google.kz/url?q=https://bora-casino.com/
https://images.google.kg/url?sa=t&url=https://bora-casino.com/
https://images.google.kg/url?q=https://bora-casino.com/
https://images.google.je/url?q=https://bora-casino.com/
https://images.google.it/url?sa=t&url=https://bora-casino.com/
https://images.google.it/url?q=https://bora-casino.com/
https://images.google.im/url?q=https://bora-casino.com/
https://images.google.ie/url?sa=t&url=https://bora-casino.com/
https://images.google.hu/url?sa=t&url=https://bora-casino.com/
https://images.google.hu/url?q=https://bora-casino.com/
https://images.google.ht/url?q=https://bora-casino.com/
https://images.google.hn/url?q=https://bora-casino.com/
https://images.google.gy/url?q=https://bora-casino.com/
https://images.google.gp/url?q=https://bora-casino.com/
https://images.google.gm/url?q=https://bora-casino.com/
https://images.google.gg/url?q=https://bora-casino.com/
https://images.google.ge/url?q=https://bora-casino.com/
https://images.google.ga/url?q=https://bora-casino.com/
https://images.google.fr/url?q=https://bora-casino.com/
https://images.google.fi/url?sa=t&url=https://bora-casino.com/
https://images.google.fi/url?q=https://bora-casino.com/
https://images.google.ee/url?sa=t&url=https://bora-casino.com/
https://images.google.dz/url?q=https://bora-casino.com/
https://images.google.dm/url?q=https://bora-casino.com/
https://images.google.de/url?sa=t&url=https://bora-casino.com/
https://images.google.de/url?q=https://bora-casino.com/
https://images.google.cz/url?q=https://bora-casino.com/
https://images.google.com/url?sa=t&url=https://bora-casino.com/
https://images.google.com/url?q=https://bora-casino.com/
https://images.google.com.vn/url?q=https://bora-casino.com/
https://images.google.com.vc/url?q=https://bora-casino.com/
https://images.google.com.ua/url?sa=t&url=https://bora-casino.com/
https://images.google.com.tj/url?q=https://bora-casino.com/
https://images.google.com.sl/url?q=https://bora-casino.com/
https://images.google.com.sb/url?q=https://bora-casino.com/
https://images.google.com.qa/url?sa=t&url=https://bora-casino.com/
https://images.google.com.py/url?q=https://bora-casino.com/
https://images.google.com.pk/url?sa=t&url=https://bora-casino.com/
https://images.google.com.ph/url?q=https://bora-casino.com/
https://images.google.com.pa/url?q=https://bora-casino.com/
https://images.google.com.om/url?q=https://bora-casino.com/
https://images.google.com.ni/url?q=https://bora-casino.com/
https://images.google.com.ng/url?sa=t&url=https://bora-casino.com/
https://images.google.com.na/url?q=https://bora-casino.com/
https://images.google.com.my/url?sa=t&url=https://bora-casino.com/
https://images.google.com.mx/url?sa=t&url=https://bora-casino.com/
https://images.google.com.mm/url?sa=t&url=https://bora-casino.com/
https://images.google.com.ly/url?sa=t&url=https://bora-casino.com/
https://images.google.com.ly/url?q=https://bora-casino.com/
https://images.google.com.lb/url?sa=t&url=https://bora-casino.com/
https://images.google.com.kw/url?sa=t&url=https://bora-casino.com/
https://images.google.com.kw/url?q=https://bora-casino.com/
https://images.google.com.kh/url?sa=t&url=https://bora-casino.com/
https://images.google.com.kh/url?q=https://bora-casino.com/
https://images.google.com.jm/url?q=https://bora-casino.com/
https://images.google.com.hk/url?sa=t&url=https://bora-casino.com/
https://images.google.com.gt/url?sa=t&url=https://bora-casino.com/
https://images.google.com.gi/url?q=https://bora-casino.com/
https://images.google.com.gh/url?sa=t&url=https://bora-casino.com/
https://images.google.com.fj/url?q=https://bora-casino.com/
https://images.google.com.eg/url?sa=t&url=https://bora-casino.com/
https://images.google.com.eg/url?q=https://bora-casino.com/
https://images.google.com.do/url?sa=t&url=https://bora-casino.com/
https://images.google.com.cy/url?sa=t&url=https://bora-casino.com/
https://images.google.com.cy/url?q=https://bora-casino.com/
https://images.google.com.bz/url?q=https://bora-casino.com/
https://images.google.com.br/url?sa=t&url=https://bora-casino.com/
https://images.google.com.bn/url?sa=t&url=https://bora-casino.com/
https://images.google.com.bd/url?q=https://bora-casino.com/
https://images.google.com.au/url?q=https://bora-casino.com/
https://images.google.com.ag/url?sa=t&url=https://bora-casino.com/
https://images.google.com.ag/url?q=https://bora-casino.com/
https://images.google.co.zw/url?q=https://bora-casino.com/
https://images.google.co.zm/url?q=https://bora-casino.com/
https://images.google.co.za/url?q=https://bora-casino.com/
https://images.google.co.vi/url?q=https://bora-casino.com/
https://images.google.co.ve/url?sa=t&url=https://bora-casino.com/
https://images.google.co.ve/url?q=https://bora-casino.com/
https://images.google.co.uz/url?q=https://bora-casino.com/
https://images.google.co.uk/url?q=https://bora-casino.com/
https://images.google.co.ug/url?q=https://bora-casino.com/
https://images.google.co.tz/url?q=https://bora-casino.com/
https://images.google.co.nz/url?q=https://bora-casino.com/
https://images.google.co.mz/url?q=https://bora-casino.com/
https://images.google.co.ma/url?q=https://bora-casino.com/
https://images.google.co.jp/url?q=https://bora-casino.com/
https://images.google.co.id/url?q=https://bora-casino.com/
https://images.google.co.cr/url?q=https://bora-casino.com/
https://images.google.co.ck/url?q=https://bora-casino.com/
https://images.google.co.bw/url?q=https://bora-casino.com/
https://images.google.cm/url?q=https://bora-casino.com/
https://images.google.ci/url?q=https://bora-casino.com/
https://images.google.ch/url?q=https://bora-casino.com/
https://images.google.cg/url?q=https://bora-casino.com/
https://images.google.cf/url?q=https://bora-casino.com/
https://images.google.cat/url?sa=t&url=https://bora-casino.com/
https://images.google.ca/url?q=https://bora-casino.com/
https://images.google.by/url?q=https://bora-casino.com/
https://images.google.bt/url?q=https://bora-casino.com/
https://images.google.bs/url?q=https://bora-casino.com/
https://images.google.bj/url?q=https://bora-casino.com/
https://images.google.bg/url?sa=t&url=https://bora-casino.com/
https://images.google.bf/url?q=https://bora-casino.com/
https://images.google.be/url?sa=t&url=https://bora-casino.com/
https://images.google.ba/url?q=https://bora-casino.com/
https://images.google.at/url?q=https://bora-casino.com/
https://images.google.am/url?q=https://bora-casino.com/
https://images.google.ad/url?q=https://bora-casino.com/
https://images.google.ac/url?q=https://bora-casino.com/
https://toolbarqueries.google.iq/url?q=https://bora-casino.com/
https://toolbarqueries.google.hu/url?q=https://bora-casino.com/
https://toolbarqueries.google.ht/url?q=https://bora-casino.com/
https://toolbarqueries.google.hr/url?q=https://bora-casino.com/
https://toolbarqueries.google.hn/url?q=https://bora-casino.com/
https://toolbarqueries.google.gy/url?q=https://bora-casino.com/
https://toolbarqueries.google.gr/url?q=https://bora-casino.com/
https://toolbarqueries.google.gp/url?q=https://bora-casino.com/
https://toolbarqueries.google.gm/url?q=https://bora-casino.com/
https://toolbarqueries.google.gl/url?q=https://bora-casino.com/
https://toolbarqueries.google.gg/url?q=https://bora-casino.com/
https://toolbarqueries.google.ge/url?q=https://bora-casino.com/
https://toolbarqueries.google.ga/url?q=https://bora-casino.com/
https://toolbarqueries.google.fr/url?q=https://bora-casino.com/
https://toolbarqueries.google.fm/url?q=https://bora-casino.com/
https://toolbarqueries.google.fi/url?q=https://bora-casino.com/
https://toolbarqueries.google.es/url?q=https://bora-casino.com/
https://toolbarqueries.google.ee/url?q=https://bora-casino.com/
https://toolbarqueries.google.dz/url?q=https://bora-casino.com/
https://toolbarqueries.google.dm/url?q=https://bora-casino.com/
https://toolbarqueries.google.dk/url?q=https://bora-casino.com/
https://toolbarqueries.google.dj/url?q=https://bora-casino.com/
https://toolbarqueries.google.de/url?q=https://bora-casino.com/
https://toolbarqueries.google.cz/url?q=https://bora-casino.com/
https://toolbarqueries.google.cv/url?q=https://bora-casino.com/
https://toolbarqueries.google.com/url?q=https://bora-casino.com/
https://toolbarqueries.google.com.kh/url?q=https://bora-casino.com/
https://toolbarqueries.google.com.hk/url?q=https://bora-casino.com/
https://toolbarqueries.google.com.gt/url?q=https://bora-casino.com/
https://toolbarqueries.google.com.gi/url?q=https://bora-casino.com/
https://toolbarqueries.google.com.gh/url?q=https://bora-casino.com/
https://toolbarqueries.google.com.fj/url?q=https://bora-casino.com/
https://toolbarqueries.google.com.et/url?q=https://bora-casino.com/
https://toolbarqueries.google.com.eg/url?q=https://bora-casino.com/
https://toolbarqueries.google.com.ec/url?q=https://bora-casino.com/
https://toolbarqueries.google.com.do/url?q=https://bora-casino.com/
https://toolbarqueries.google.com.cy/url?q=https://bora-casino.com/
https://toolbarqueries.google.com.cu/url?q=https://bora-casino.com/
https://toolbarqueries.google.com.co/url?q=https://bora-casino.com/
https://toolbarqueries.google.com.bz/url?q=https://bora-casino.com/
https://toolbarqueries.google.com.br/url?q=https://bora-casino.com/
https://toolbarqueries.google.com.bo/url?q=https://bora-casino.com/
https://toolbarqueries.google.com.bn/url?q=https://bora-casino.com/
https://toolbarqueries.google.com.bh/url?q=https://bora-casino.com/
https://toolbarqueries.google.com.bd/url?q=https://bora-casino.com/
https://toolbarqueries.google.com.au/url?q=https://bora-casino.com/
https://toolbarqueries.google.com.ar/url?sa=i&url=https://bora-casino.com/
https://toolbarqueries.google.com.ar/url?q=https://bora-casino.com/
https://toolbarqueries.google.com.ai/url?q=https://bora-casino.com/
https://toolbarqueries.google.com.ag/url?q=https://bora-casino.com/
https://toolbarqueries.google.com.af/url?q=https://bora-casino.com/
https://toolbarqueries.google.co.il/url?q=https://bora-casino.com/
https://toolbarqueries.google.co.id/url?q=https://bora-casino.com/
https://toolbarqueries.google.co.ck/url?q=https://bora-casino.com/
https://toolbarqueries.google.co.ao/url?q=https://bora-casino.com/
https://toolbarqueries.google.cn/url?q=https://bora-casino.com/
https://toolbarqueries.google.cm/url?q=https://bora-casino.com/
https://toolbarqueries.google.cl/url?q=https://bora-casino.com/
https://toolbarqueries.google.ci/url?q=https://bora-casino.com/
https://toolbarqueries.google.ch/url?q=https://bora-casino.com/
https://toolbarqueries.google.cg/url?q=https://bora-casino.com/
https://toolbarqueries.google.cf/url?q=https://bora-casino.com/
https://toolbarqueries.google.cd/url?q=https://bora-casino.com/
https://toolbarqueries.google.cc/url?q=https://bora-casino.com/
https://toolbarqueries.google.cat/url?q=https://bora-casino.com/
https://toolbarqueries.google.ca/url?q=https://bora-casino.com/
https://toolbarqueries.google.by/url?q=https://bora-casino.com/
https://toolbarqueries.google.bt/url?q=https://bora-casino.com/
https://toolbarqueries.google.bs/url?q=https://bora-casino.com/
https://toolbarqueries.google.bj/url?q=https://bora-casino.com/
https://toolbarqueries.google.bi/url?q=https://bora-casino.com/
https://toolbarqueries.google.bg/url?q=https://bora-casino.com/
https://toolbarqueries.google.bf/url?q=https://bora-casino.com/
https://toolbarqueries.google.be/url?q=https://bora-casino.com/
https://toolbarqueries.google.ba/url?q=https://bora-casino.com/
https://toolbarqueries.google.az/url?q=https://bora-casino.com/
https://toolbarqueries.google.at/url?q=https://bora-casino.com/
https://toolbarqueries.google.as/url?q=https://bora-casino.com/
https://toolbarqueries.google.am/url?q=https://bora-casino.com/
https://toolbarqueries.google.al/url?q=https://bora-casino.com/
https://toolbarqueries.google.ae/url?q=https://bora-casino.com/
https://toolbarqueries.google.ad/url?q=https://bora-casino.com/
https://toolbarqueries.google.ac/url?q=https://bora-casino.com/
http://maps.google.vu/url?q=https://bora-casino.com/
http://maps.google.vg/url?q=https://bora-casino.com/
http://maps.google.tt/url?q=https://bora-casino.com/
http://maps.google.sk/url?sa=t&url=https://bora-casino.com/
http://maps.google.si/url?sa=t&url=https://bora-casino.com/
http://maps.google.sc/url?q=https://bora-casino.com/
http://maps.google.ru/url?sa=t&url=https://bora-casino.com/
http://maps.google.ro/url?sa=t&url=https://bora-casino.com/
http://maps.google.pt/url?sa=t&url=https://bora-casino.com/
http://maps.google.pl/url?sa=t&url=https://bora-casino.com/
http://maps.google.nl/url?sa=t&url=https://bora-casino.com/
http://maps.google.mv/url?q=https://bora-casino.com/
http://maps.google.mn/url?q=https://bora-casino.com/
http://maps.google.ml/url?q=https://bora-casino.com/
http://maps.google.lv/url?sa=t&url=https://bora-casino.com/
http://maps.google.lt/url?sa=t&url=https://bora-casino.com/
http://maps.google.je/url?q=https://bora-casino.com/
http://maps.google.it/url?sa=t&url=https://bora-casino.com/
http://maps.google.im/url?q=https://bora-casino.com/
http://maps.google.ie/url?sa=t&url=https://bora-casino.com/
http://maps.google.ie/url?q=https://bora-casino.com/
http://maps.google.hu/url?sa=t&url=https://bora-casino.com/
http://maps.google.ht/url?q=https://bora-casino.com/
http://maps.google.hr/url?sa=t&url=https://bora-casino.com/
http://maps.google.gr/url?sa=t&url=https://bora-casino.com/
http://maps.google.gm/url?q=https://bora-casino.com/
http://maps.google.fr/url?sa=t&url=https://bora-casino.com/
http://maps.google.fm/url?q=https://bora-casino.com/
http://maps.google.fi/url?sa=t&url=https://bora-casino.com/
http://maps.google.es/url?sa=t&url=https://bora-casino.com/
http://maps.google.ee/url?sa=t&url=https://bora-casino.com/
http://maps.google.dk/url?sa=t&url=https://bora-casino.com/
http://maps.google.dj/url?q=https://bora-casino.com/
http://maps.google.cz/url?sa=t&url=https://bora-casino.com/
http://maps.google.com/url?sa=t&url=https://bora-casino.com/
http://maps.google.com.ua/url?sa=t&url=https://bora-casino.com/
http://maps.google.com.tw/url?sa=t&url=https://bora-casino.com/
http://maps.google.com.tr/url?sa=t&url=https://bora-casino.com/
http://maps.google.com.sg/url?sa=t&url=https://bora-casino.com/
http://maps.google.com.sa/url?sa=t&url=https://bora-casino.com/
http://maps.google.com.om/url?q=https://bora-casino.com/
http://maps.google.com.my/url?sa=t&url=https://bora-casino.com/
http://maps.google.com.mx/url?sa=t&url=https://bora-casino.com/
http://maps.google.com.mm/url?q=https://bora-casino.com/
http://maps.google.com.ly/url?q=https://bora-casino.com/
http://maps.google.com.hk/url?sa=t&url=https://bora-casino.com/
http://maps.google.com.gi/url?q=https://bora-casino.com/
http://maps.google.com.fj/url?q=https://bora-casino.com/
http://maps.google.com.eg/url?sa=t&url=https://bora-casino.com/
http://maps.google.com.do/url?sa=t&url=https://bora-casino.com/
http://maps.google.com.cu/url?q=https://bora-casino.com/
http://maps.google.com.co/url?sa=t&url=https://bora-casino.com/
http://maps.google.com.br/url?sa=t&url=https://bora-casino.com/
http://maps.google.com.bh/url?q=https://bora-casino.com/
http://maps.google.com.au/url?sa=t&url=https://bora-casino.com/
http://maps.google.co.zw/url?q=https://bora-casino.com/
http://maps.google.co.za/url?sa=t&url=https://bora-casino.com/
http://maps.google.co.ve/url?sa=t&url=https://bora-casino.com/
http://maps.google.co.uk/url?sa=t&url=https://bora-casino.com/
http://maps.google.co.th/url?sa=t&url=https://bora-casino.com/
http://maps.google.co.nz/url?sa=t&url=https://bora-casino.com/
http://maps.google.co.mz/url?q=https://bora-casino.com/
http://maps.google.co.jp/url?sa=t&url=https://bora-casino.com/
http://maps.google.co.in/url?sa=t&url=https://bora-casino.com/
http://maps.google.co.il/url?sa=t&url=https://bora-casino.com/
http://maps.google.co.id/url?sa=t&url=https://bora-casino.com/
http://maps.google.cl/url?sa=t&url=https://bora-casino.com/
http://maps.google.ch/url?sa=t&url=https://bora-casino.com/
http://maps.google.cg/url?q=https://bora-casino.com/
http://maps.google.ca/url?sa=t&url=https://bora-casino.com/
http://maps.google.bt/url?q=https://bora-casino.com/
http://maps.google.bi/url?q=https://bora-casino.com/
http://maps.google.bg/url?sa=t&url=https://bora-casino.com/
http://maps.google.be/url?sa=t&url=https://bora-casino.com/
http://maps.google.ba/url?sa=t&url=https://bora-casino.com/
http://maps.google.at/url?sa=t&url=https://bora-casino.com/
http://maps.google.as/url?q=https://bora-casino.com/
http://maps.google.ae/url?sa=t&url=https://bora-casino.com/
http://images.google.vu/url?q=https://bora-casino.com/
http://images.google.vg/url?q=https://bora-casino.com/
http://images.google.sr/url?q=https://bora-casino.com/
http://images.google.sn/url?q=https://bora-casino.com/
http://images.google.sm/url?q=https://bora-casino.com/
http://images.google.sk/url?sa=t&url=https://bora-casino.com/
http://images.google.si/url?sa=t&url=https://bora-casino.com/
http://images.google.sh/url?q=https://bora-casino.com/
http://images.google.sc/url?q=https://bora-casino.com/
http://images.google.rw/url?q=https://bora-casino.com/
http://images.google.ru/url?sa=t&url=https://bora-casino.com/
http://images.google.ro/url?sa=t&url=https://bora-casino.com/
http://images.google.pt/url?sa=t&url=https://bora-casino.com/
http://images.google.ps/url?q=https://bora-casino.com/
http://images.google.pn/url?q=https://bora-casino.com/
http://images.google.pl/url?sa=t&url=https://bora-casino.com/
http://images.google.nr/url?q=https://bora-casino.com/
http://images.google.nl/url?sa=t&url=https://bora-casino.com/
http://images.google.mw/url?q=https://bora-casino.com/
http://images.google.mv/url?q=https://bora-casino.com/
http://images.google.ms/url?q=https://bora-casino.com/
http://images.google.mn/url?q=https://bora-casino.com/
http://images.google.ml/url?q=https://bora-casino.com/
http://images.google.mg/url?q=https://bora-casino.com/
http://images.google.md/url?q=https://bora-casino.com/
http://images.google.lv/url?sa=t&url=https://bora-casino.com/
http://images.google.lk/url?sa=t&url=https://bora-casino.com/
http://images.google.li/url?q=https://bora-casino.com/
http://images.google.la/url?q=https://bora-casino.com/
http://images.google.kg/url?q=https://bora-casino.com/
http://images.google.je/url?q=https://bora-casino.com/
http://images.google.it/url?sa=t&url=https://bora-casino.com/
http://images.google.iq/url?q=https://bora-casino.com/
http://images.google.im/url?q=https://bora-casino.com/
http://images.google.ie/url?q=https://bora-casino.com/
http://images.google.hu/url?sa=t&url=https://bora-casino.com/
http://images.google.ht/url?q=https://bora-casino.com/
http://images.google.hr/url?sa=t&url=https://bora-casino.com/
http://images.google.gr/url?sa=t&url=https://bora-casino.com/
http://images.google.gm/url?q=https://bora-casino.com/
http://images.google.gg/url?q=https://bora-casino.com/
http://images.google.fr/url?sa=t&url=https://bora-casino.com/
http://images.google.fm/url?q=https://bora-casino.com/
http://images.google.fi/url?sa=t&url=https://bora-casino.com/
http://images.google.es/url?sa=t&url=https://bora-casino.com/
http://images.google.ee/url?sa=t&url=https://bora-casino.com/
http://images.google.dm/url?q=https://bora-casino.com/
http://images.google.dk/url?sa=t&url=https://bora-casino.com/
http://images.google.dj/url?q=https://bora-casino.com/
http://images.google.de/url?sa=t&url=https://bora-casino.com/
http://images.google.cz/url?sa=t&url=https://bora-casino.com/
http://images.google.com/url?sa=t&url=https://bora-casino.com/
http://images.google.com.vn/url?sa=t&url=https://bora-casino.com/
http://images.google.com.uy/url?sa=t&url=https://bora-casino.com/
http://images.google.com.ua/url?sa=t&url=https://bora-casino.com/
http://images.google.com.tw/url?sa=t&url=https://bora-casino.com/
http://images.google.com.tr/url?sa=t&url=https://bora-casino.com/
http://images.google.com.tj/url?q=https://bora-casino.com/
http://images.google.com.sg/url?sa=t&url=https://bora-casino.com/
http://images.google.com.sa/url?sa=t&url=https://bora-casino.com/
http://images.google.com.pk/url?sa=t&url=https://bora-casino.com/
http://images.google.com.pe/url?sa=t&url=https://bora-casino.com/
http://images.google.com.ng/url?sa=t&url=https://bora-casino.com/
http://images.google.com.na/url?q=https://bora-casino.com/
http://images.google.com.my/url?sa=t&url=https://bora-casino.com/
http://images.google.com.mx/url?sa=t&url=https://bora-casino.com/
http://images.google.com.mm/url?q=https://bora-casino.com/
http://images.google.com.jm/url?q=https://bora-casino.com/
http://images.google.com.hk/url?sa=t&url=https://bora-casino.com/
http://images.google.com.gi/url?q=https://bora-casino.com/
http://images.google.com.fj/url?q=https://bora-casino.com/
http://images.google.com.et/url?q=https://bora-casino.com/
http://images.google.com.eg/url?sa=t&url=https://bora-casino.com/
http://images.google.com.ec/url?sa=t&url=https://bora-casino.com/
http://images.google.com.do/url?sa=t&url=https://bora-casino.com/
http://images.google.com.cy/url?q=https://bora-casino.com/
http://images.google.com.cu/url?q=https://bora-casino.com/
http://images.google.com.co/url?sa=t&url=https://bora-casino.com/
http://images.google.com.bz/url?q=https://bora-casino.com/
http://images.google.com.br/url?sa=t&url=https://bora-casino.com/
http://images.google.com.bn/url?q=https://bora-casino.com/
http://images.google.com.bh/url?q=https://bora-casino.com/
http://images.google.com.bd/url?sa=t&url=https://bora-casino.com/
http://images.google.com.au/url?sa=t&url=https://bora-casino.com/
http://images.google.com.ag/url?q=https://bora-casino.com/
http://images.google.com.af/url?q=https://bora-casino.com/
http://images.google.co.zw/url?q=https://bora-casino.com/
http://images.google.co.zm/url?q=https://bora-casino.com/
http://images.google.co.za/url?sa=t&url=https://bora-casino.com/
http://images.google.co.vi/url?q=https://bora-casino.com/
http://images.google.co.ve/url?sa=t&url=https://bora-casino.com/
http://images.google.co.uk/url?sa=t&url=https://bora-casino.com/
http://images.google.co.tz/url?q=https://bora-casino.com/
http://images.google.co.th/url?sa=t&url=https://bora-casino.com/
http://images.google.co.nz/url?sa=t&url=https://bora-casino.com/
http://images.google.co.mz/url?q=https://bora-casino.com/
http://images.google.co.ma/url?q=https://bora-casino.com/
http://images.google.co.ls/url?q=https://bora-casino.com/
http://images.google.co.jp/url?sa=t&url=https://bora-casino.com/
http://images.google.co.in/url?sa=t&url=https://bora-casino.com/
http://images.google.co.il/url?sa=t&url=https://bora-casino.com/
http://images.google.co.id/url?sa=t&url=https://bora-casino.com/
http://images.google.co.ck/url?q=https://bora-casino.com/
http://images.google.co.bw/url?q=https://bora-casino.com/
http://images.google.cl/url?sa=t&url=https://bora-casino.com/
http://images.google.ci/url?q=https://bora-casino.com/
http://images.google.ch/url?sa=t&url=https://bora-casino.com/
http://images.google.cg/url?q=https://bora-casino.com/
http://images.google.cd/url?q=https://bora-casino.com/
http://images.google.ca/url?sa=t&url=https://bora-casino.com/
http://images.google.bt/url?q=https://bora-casino.com/
http://images.google.bs/url?q=https://bora-casino.com/
http://images.google.bj/url?q=https://bora-casino.com/
http://images.google.bi/url?q=https://bora-casino.com/
http://images.google.bg/url?sa=t&url=https://bora-casino.com/
http://images.google.be/url?sa=t&url=https://bora-casino.com/
http://images.google.az/url?q=https://bora-casino.com/
http://images.google.at/url?sa=t&url=https://bora-casino.com/
http://images.google.as/url?q=https://bora-casino.com/
http://images.google.al/url?q=https://bora-casino.com/
http://images.google.ae/url?sa=t&url=https://bora-casino.com/
http://images.google.ad/url?q=https://bora-casino.com/
http://cse.google.com.ly/url?sa=i&url=https://bora-casino.com/
http://cse.google.com.lb/url?sa=i&url=https://bora-casino.com/
http://cse.google.com.kw/url?sa=i&url=https://bora-casino.com/
http://cse.google.com.kh/url?sa=i&url=https://bora-casino.com/
http://cse.google.com.jm/url?sa=i&url=https://bora-casino.com/
http://cse.google.com.hk/url?sa=i&url=https://bora-casino.com/
http://cse.google.com.gt/url?sa=i&url=https://bora-casino.com/
http://cse.google.com.gi/url?sa=i&url=https://bora-casino.com/
http://cse.google.com.gh/url?sa=i&url=https://bora-casino.com/
http://cse.google.com.fj/url?sa=i&url=https://bora-casino.com/
http://cse.google.com.et/url?sa=i&url=https://bora-casino.com/
http://cse.google.com.eg/url?sa=i&url=https://bora-casino.com/
http://cse.google.com.ec/url?sa=i&url=https://bora-casino.com/
http://cse.google.com.do/url?sa=i&url=https://bora-casino.com/
http://cse.google.com.cy/url?sa=i&url=https://bora-casino.com/
http://cse.google.com.co/url?sa=i&url=https://bora-casino.com/
http://cse.google.com.bz/url?sa=i&url=https://bora-casino.com/
http://cse.google.com.br/url?sa=i&url=https://bora-casino.com/
http://cse.google.com.bo/url?sa=i&url=https://bora-casino.com/
http://cse.google.com.bn/url?sa=i&url=https://bora-casino.com/
http://cse.google.com.bh/url?sa=i&url=https://bora-casino.com/
http://cse.google.com.bd/url?sa=i&url=https://bora-casino.com/
http://cse.google.com.au/url?sa=i&url=https://bora-casino.com/
http://cse.google.com.ai/url?sa=i&url=https://bora-casino.com/
http://cse.google.com.ag/url?sa=i&url=https://bora-casino.com/
http://cse.google.com.af/url?sa=i&url=https://bora-casino.com/
http://cse.google.co.zw/url?sa=i&url=https://bora-casino.com/
http://cse.google.co.zm/url?sa=i&url=https://bora-casino.com/
http://cse.google.co.za/url?sa=i&url=https://bora-casino.com/
http://cse.google.co.vi/url?sa=i&url=https://bora-casino.com/
http://cse.google.co.ve/url?sa=i&url=https://bora-casino.com/
http://cse.google.co.uz/url?sa=i&url=https://bora-casino.com/
http://cse.google.co.uk/url?sa=i&url=https://bora-casino.com/
http://cse.google.co.ug/url?sa=i&url=https://bora-casino.com/
http://cse.google.co.tz/url?sa=i&url=https://bora-casino.com/
http://cse.google.co.th/url?sa=i&url=https://bora-casino.com/
http://cse.google.co.nz/url?sa=i&url=https://bora-casino.com/
http://cse.google.co.mz/url?sa=i&url=https://bora-casino.com/
http://cse.google.co.ma/url?sa=i&url=https://bora-casino.com/
http://cse.google.co.ls/url?sa=i&url=https://bora-casino.com/
http://cse.google.co.kr/url?sa=i&url=https://bora-casino.com/
http://cse.google.co.ke/url?sa=i&url=https://bora-casino.com/
http://cse.google.co.jp/url?sa=i&url=https://bora-casino.com/
http://cse.google.co.in/url?sa=i&url=https://bora-casino.com/
http://cse.google.co.il/url?sa=i&url=https://bora-casino.com/
http://cse.google.co.id/url?sa=i&url=https://bora-casino.com/
http://cse.google.co.cr/url?sa=i&url=https://bora-casino.com/
http://cse.google.co.ck/url?sa=i&url=https://bora-casino.com/
http://cse.google.co.bw/url?sa=i&url=https://bora-casino.com/
http://cse.google.co.ao/url?sa=i&url=https://bora-casino.com/
http://cse.google.cm/url?sa=i&url=https://bora-casino.com/
http://cse.google.cl/url?sa=i&url=https://bora-casino.com/
http://cse.google.ci/url?sa=i&url=https://bora-casino.com/
http://cse.google.ch/url?sa=i&url=https://bora-casino.com/
http://cse.google.cg/url?sa=i&url=https://bora-casino.com/
http://cse.google.cf/url?sa=i&url=https://bora-casino.com/
http://cse.google.cd/url?sa=i&url=https://bora-casino.com/
http://cse.google.cat/url?sa=i&url=https://bora-casino.com/
http://cse.google.ca/url?sa=i&url=https://bora-casino.com/
http://cse.google.by/url?sa=i&url=https://bora-casino.com/
http://cse.google.bt/url?sa=i&url=https://bora-casino.com/
http://cse.google.bs/url?sa=i&url=https://bora-casino.com/
http://cse.google.bj/url?sa=i&url=https://bora-casino.com/
http://cse.google.bi/url?sa=i&url=https://bora-casino.com/
http://cse.google.bg/url?sa=i&url=https://bora-casino.com/
http://cse.google.bf/url?sa=i&url=https://bora-casino.com/
http://cse.google.be/url?sa=i&url=https://bora-casino.com/
http://cse.google.ba/url?sa=i&url=https://bora-casino.com/
http://cse.google.az/url?sa=i&url=https://bora-casino.com/
http://cse.google.at/url?sa=i&url=https://bora-casino.com/
http://cse.google.as/url?sa=i&url=https://bora-casino.com/
http://cse.google.am/url?sa=i&url=https://bora-casino.com/
http://cse.google.al/url?sa=i&url=https://bora-casino.com/
http://cse.google.ae/url?sa=i&url=https://bora-casino.com/
http://cse.google.ad/url?sa=i&url=https://bora-casino.com/
http://cse.google.ac/url?sa=i&url=https://bora-casino.com/
https://google.ws/url?q=https://bora-casino.com/
https://google.vu/url?q=https://bora-casino.com/
https://google.vg/url?q=https://bora-casino.com/
https://google.tt/url?q=https://bora-casino.com/
https://google.to/url?q=https://bora-casino.com/
https://google.tm/url?q=https://bora-casino.com/
https://google.tl/url?q=https://bora-casino.com/
https://google.tk/url?q=https://bora-casino.com/
https://google.tg/url?q=https://bora-casino.com/
https://google.st/url?q=https://bora-casino.com/
https://google.sr/url?q=https://bora-casino.com/
https://google.so/url?q=https://bora-casino.com/
https://google.sm/url?q=https://bora-casino.com/
https://google.sh/url?q=https://bora-casino.com/
https://google.sc/url?q=https://bora-casino.com/
https://google.rw/url?q=https://bora-casino.com/
https://google.ps/url?q=https://bora-casino.com/
https://google.pn/url?q=https://bora-casino.com/
https://google.nu/url?q=https://bora-casino.com/
https://google.nr/url?q=https://bora-casino.com/
https://google.ne/url?q=https://bora-casino.com/
https://google.mw/url?q=https://bora-casino.com/
https://google.mv/url?q=https://bora-casino.com/
https://google.ms/url?q=https://bora-casino.com/
https://google.ml/url?q=https://bora-casino.com/
https://google.mg/url?q=https://bora-casino.com/
https://google.md/url?q=https://bora-casino.com/
https://google.lk/url?q=https://bora-casino.com/
https://google.la/url?q=https://bora-casino.com/
https://google.kz/url?q=https://bora-casino.com/
https://google.ki/url?q=https://bora-casino.com/
https://google.kg/url?q=https://bora-casino.com/
https://google.iq/url?q=https://bora-casino.com/
https://google.im/url?q=https://bora-casino.com/
https://google.ht/url?q=https://bora-casino.com/
https://google.hn/url?sa=t&url=https://bora-casino.com/
https://google.gm/url?q=https://bora-casino.com/
https://google.gl/url?q=https://bora-casino.com/
https://google.gg/url?q=https://bora-casino.com/
https://google.ge/url?q=https://bora-casino.com/
https://google.ga/url?q=https://bora-casino.com/
https://google.dz/url?q=https://bora-casino.com/
https://google.dm/url?q=https://bora-casino.com/
https://google.dj/url?q=https://bora-casino.com/
https://google.cv/url?q=https://bora-casino.com/
https://google.com.vc/url?q=https://bora-casino.com/
https://google.com.tj/url?q=https://bora-casino.com/
https://google.com.sv/url?sa=t&url=https://bora-casino.com/
https://google.com.sb/url?q=https://bora-casino.com/
https://google.com.pa/url?q=https://bora-casino.com/
https://google.com.om/url?q=https://bora-casino.com/
https://google.com.ni/url?q=https://bora-casino.com/
https://google.com.na/url?q=https://bora-casino.com/
https://google.com.kw/url?q=https://bora-casino.com/
https://google.com.kh/url?q=https://bora-casino.com/
https://google.com.jm/url?q=https://bora-casino.com/
https://google.com.gi/url?q=https://bora-casino.com/
https://google.com.gh/url?q=https://bora-casino.com/
https://google.com.fj/url?q=https://bora-casino.com/
https://google.com.et/url?q=https://bora-casino.com/
https://google.com.do/url?q=https://bora-casino.com/
https://google.com.bz/url?q=https://bora-casino.com/
https://google.com.ai/url?q=https://bora-casino.com/
https://google.com.ag/url?q=https://bora-casino.com/
https://google.com.af/url?q=https://bora-casino.com/
https://google.co.bw/url?sa=t&url=https://bora-casino.com/
https://google.cm/url?q=https://bora-casino.com/
https://google.ci/url?sa=t&url=https://bora-casino.com/
https://google.cg/url?q=https://bora-casino.com/
https://google.cf/url?q=https://bora-casino.com/
https://google.cd/url?q=https://bora-casino.com/
https://google.bt/url?q=https://bora-casino.com/
https://google.bj/url?q=https://bora-casino.com/
https://google.bf/url?q=https://bora-casino.com/
https://google.am/url?q=https://bora-casino.com/
https://google.al/url?q=https://bora-casino.com/
https://google.ad/url?q=https://bora-casino.com/
https://google.ac/url?q=https://bora-casino.com/
https://www.google.vg/url?q=https://bora-casino.com/
https://www.google.tt/url?sa=t&url=https://bora-casino.com/
https://www.google.tl/url?q=https://bora-casino.com/
https://www.google.st/url?q=https://bora-casino.com/
https://www.google.nu/url?q=https://bora-casino.com/
https://www.google.ms/url?sa=t&url=https://bora-casino.com/
https://www.google.it/url?sa=t&url=https://bora-casino.com/
https://www.google.it/url?q=https://bora-casino.com/
https://www.google.is/url?sa=t&url=https://bora-casino.com/
https://www.google.hr/url?sa=t&url=https://bora-casino.com/
https://www.google.gr/url?sa=t&url=https://bora-casino.com/
https://www.google.gl/url?q=https://bora-casino.com/
https://www.google.fm/url?sa=t&url=https://bora-casino.com/
https://www.google.es/url?q=https://bora-casino.com/
https://www.google.dm/url?q=https://bora-casino.com/
https://www.google.cz/url?q=https://bora-casino.com/
https://www.google.com/url?sa=t&url=https://bora-casino.com/
https://www.google.com.vn/url?sa=t&url=https://bora-casino.com/
https://www.google.com.uy/url?sa=t&url=https://bora-casino.com/
https://www.google.com.ua/url?q=https://bora-casino.com/
https://www.google.com.sl/url?q=https://bora-casino.com/
https://www.google.com.sg/url?q=https://bora-casino.com/
https://www.google.com.pr/url?sa=t&url=https://bora-casino.com/
https://www.google.com.pk/url?sa=t&url=https://bora-casino.com/
https://www.google.com.pe/url?sa=t&url=https://bora-casino.com/
https://www.google.com.om/url?q=https://bora-casino.com/
https://www.google.com.ng/url?sa=t&url=https://bora-casino.com/
https://www.google.com.my/url?sa=t&url=https://bora-casino.com/
https://www.google.com.kh/url?sa=t&url=https://bora-casino.com/
https://www.google.com.ec/url?sa=t&url=https://bora-casino.com/
https://www.google.com.bz/url?sa=t&url=https://bora-casino.com/
https://www.google.com.au/url?q=https://bora-casino.com/
https://www.google.co.uk/url?sa=t&url=https://bora-casino.com/
https://www.google.co.ma/url?sa=t&url=https://bora-casino.com/
https://www.google.co.ck/url?q=https://bora-casino.com/
https://www.google.co.bw/url?sa=t&url=https://bora-casino.com/
https://www.google.cl/url?sa=t&url=https://bora-casino.com/
https://www.google.ch/url?sa=t&url=https://bora-casino.com/
https://www.google.cd/url?q=https://bora-casino.com/
https://www.google.ca/url?sa=t&url=https://bora-casino.com/
https://www.google.by/url?sa=t&url=https://bora-casino.com/
https://www.google.bt/url?q=https://bora-casino.com/
https://www.google.be/url?q=https://bora-casino.com/
https://www.google.as/url?sa=t&url=https://bora-casino.com/
http://www.google.sk/url?q=https://bora-casino.com/
http://www.google.ro/url?q=https://bora-casino.com/
http://www.google.pt/url?q=https://bora-casino.com/
http://www.google.no/url?q=https://bora-casino.com/
http://www.google.lt/url?q=https://bora-casino.com/
http://www.google.ie/url?q=https://bora-casino.com/
http://www.google.com.vn/url?q=https://bora-casino.com/
http://www.google.com.ua/url?q=https://bora-casino.com/
http://www.google.com.tr/url?q=https://bora-casino.com/
http://www.google.com.ph/url?q=https://bora-casino.com/
http://www.google.com.ar/url?q=https://bora-casino.com/
http://www.google.co.za/url?q=https://bora-casino.com/
http://www.google.co.nz/url?q=https://bora-casino.com/
http://www.google.co.kr/url?q=https://bora-casino.com/
http://www.google.co.il/url?q=https://bora-casino.com/
http://www.google.co.id/url?q=https://bora-casino.com/
https://www.google.ac/url?q=https://bora-casino.com/
https://www.google.ad/url?q=https://bora-casino.com/
https://www.google.ae/url?q=https://bora-casino.com/
https://www.google.al/url?q=https://bora-casino.com/
https://www.google.am/url?q=https://bora-casino.com/
https://www.google.as/url?q=https://bora-casino.com/
https://www.google.at/url?q=https://bora-casino.com/
https://www.google.az/url?q=https://bora-casino.com/
https://www.google.bg/url?q=https://bora-casino.com/
https://www.google.bi/url?q=https://bora-casino.com/
https://www.google.bj/url?q=https://bora-casino.com/
https://www.google.bs/url?q=https://bora-casino.com/
https://www.google.by/url?q=https://bora-casino.com/
https://www.google.cf/url?q=https://bora-casino.com/
https://www.google.cg/url?q=https://bora-casino.com/
https://www.google.ch/url?q=https://bora-casino.com/
https://www.google.ci/url?q=https://bora-casino.com/
https://www.google.cm/url?q=https://bora-casino.com/
https://www.google.co.ao/url?q=https://bora-casino.com/
https://www.google.co.bw/url?q=https://bora-casino.com/
https://www.google.co.cr/url?q=https://bora-casino.com/
https://www.google.co.id/url?q=https://bora-casino.com/
https://www.google.co.in/url?q=https://bora-casino.com/
https://www.google.co.jp/url?q=https://bora-casino.com/
https://www.google.co.kr/url?sa=t&url=https://bora-casino.com/
https://www.google.co.ma/url?q=https://bora-casino.com/
https://www.google.co.mz/url?q=https://bora-casino.com/
https://www.google.co.nz/url?q=https://bora-casino.com/
https://www.google.co.th/url?q=https://bora-casino.com/
https://www.google.co.tz/url?q=https://bora-casino.com/
https://www.google.co.ug/url?q=https://bora-casino.com/
https://www.google.co.uk/url?q=https://bora-casino.com/
https://www.google.co.uz/url?q=https://bora-casino.com/
https://www.google.co.uz/url?sa=t&url=https://bora-casino.com/
https://www.google.co.ve/url?q=https://bora-casino.com/
https://www.google.co.vi/url?q=https://bora-casino.com/
https://www.google.co.za/url?q=https://bora-casino.com/
https://www.google.co.zm/url?q=https://bora-casino.com/
https://www.google.co.zw/url?q=https://bora-casino.com/
https://www.google.com.ai/url?q=https://bora-casino.com/
https://www.google.com.ar/url?q=https://bora-casino.com/
https://www.google.com.bd/url?q=https://bora-casino.com/
https://www.google.com.bh/url?sa=t&url=https://bora-casino.com/
https://www.google.com.bo/url?q=https://bora-casino.com/
https://www.google.com.br/url?q=https://bora-casino.com/
https://www.google.com.bz/url?rct=j&sa=t&url=https://bora-casino.com/
https://www.google.com.cu/url?q=https://bora-casino.com/
https://www.google.com.cy/url?q=https://bora-casino.com/
https://www.google.com.ec/url?q=https://bora-casino.com/
https://www.google.com.fj/url?q=https://bora-casino.com/
https://www.google.com.gh/url?q=https://bora-casino.com/
https://www.google.com.hk/url?q=https://bora-casino.com/
https://www.google.com.jm/url?q=https://bora-casino.com/
https://www.google.com.kh/url?q=https://bora-casino.com/
https://www.google.com.kw/url?q=https://bora-casino.com/
https://www.google.com.lb/url?q=https://bora-casino.com/
https://www.google.com.ly/url?q=https://bora-casino.com/
https://www.google.com.mm/url?q=https://bora-casino.com/
https://www.google.com.mt/url?q=https://bora-casino.com/
https://www.google.com.mx/url?q=https://bora-casino.com/
https://www.google.com.my/url?q=https://bora-casino.com/
https://www.google.com.nf/url?q=https://bora-casino.com/
https://www.google.com.ng/url?q=https://bora-casino.com/
https://www.google.com.ni/url?q=https://bora-casino.com/
https://www.google.com.pa/url?q=https://bora-casino.com/
https://www.google.com.pe/url?q=https://bora-casino.com/
https://www.google.com.pg/url?q=https://bora-casino.com/
https://www.google.com.ph/url?q=https://bora-casino.com/
https://www.google.com.pk/url?q=https://bora-casino.com/
https://www.google.com.pr/url?q=https://bora-casino.com/
https://www.google.com.py/url?q=https://bora-casino.com/
https://www.google.com.qa/url?q=https://bora-casino.com/
https://www.google.com.sa/url?q=https://bora-casino.com/
https://www.google.com.sb/url?q=https://bora-casino.com/
https://www.google.com.sv/url?q=https://bora-casino.com/
https://www.google.com.tj/url?sa=i&url=https://bora-casino.com/
https://www.google.com.tr/url?q=https://bora-casino.com/
https://www.google.com.tw/url?q=https://bora-casino.com/
https://www.google.com.ua/url?sa=t&url=https://bora-casino.com/
https://www.google.com.uy/url?q=https://bora-casino.com/
https://www.google.com.vn/url?q=https://bora-casino.com/
https://www.google.com/url?q=https://bora-casino.com/
https://www.google.com/url?sa=i&rct=j&url=https://bora-casino.com/
https://www.google.cz/url?sa=t&url=https://bora-casino.com/
https://www.google.de/url?q=https://bora-casino.com/
https://www.google.dj/url?q=https://bora-casino.com/
https://www.google.dk/url?q=https://bora-casino.com/
https://www.google.dz/url?q=https://bora-casino.com/
https://www.google.ee/url?q=https://bora-casino.com/
https://www.google.fi/url?q=https://bora-casino.com/
https://www.google.fm/url?q=https://bora-casino.com/
https://www.google.ga/url?q=https://bora-casino.com/
https://www.google.ge/url?q=https://bora-casino.com/
https://www.google.gg/url?q=https://bora-casino.com/
https://www.google.gm/url?q=https://bora-casino.com/
https://www.google.gp/url?q=https://bora-casino.com/
https://www.google.gr/url?q=https://bora-casino.com/
https://www.google.hn/url?q=https://bora-casino.com/
https://www.google.hr/url?q=https://bora-casino.com/
https://www.google.ht/url?q=https://bora-casino.com/
https://www.google.hu/url?q=https://bora-casino.com/
https://www.google.ie/url?q=https://bora-casino.com/
https://www.google.jo/url?q=https://bora-casino.com/
https://www.google.ki/url?q=https://bora-casino.com/
https://www.google.la/url?q=https://bora-casino.com/
https://www.google.lk/url?q=https://bora-casino.com/
https://www.google.lt/url?q=https://bora-casino.com/
https://www.google.lu/url?sa=t&url=https://bora-casino.com/
https://www.google.lv/url?q=https://bora-casino.com/
https://www.google.mg/url?sa=t&url=https://bora-casino.com/
https://www.google.mk/url?q=https://bora-casino.com/
https://www.google.ml/url?q=https://bora-casino.com/
https://www.google.mn/url?q=https://bora-casino.com/
https://www.google.ms/url?q=https://bora-casino.com/
https://www.google.mu/url?q=https://bora-casino.com/
https://www.google.mv/url?q=https://bora-casino.com/
https://www.google.mw/url?q=https://bora-casino.com/
https://www.google.ne/url?q=https://bora-casino.com/
https://www.google.nl/url?q=https://bora-casino.com/
https://www.google.no/url?q=https://bora-casino.com/
https://www.google.nr/url?q=https://bora-casino.com/
https://www.google.pl/url?q=https://bora-casino.com/
https://www.google.pt/url?q=https://bora-casino.com/
https://www.google.rs/url?q=https://bora-casino.com/
https://www.google.ru/url?q=https://bora-casino.com/
https://www.google.se/url?q=https://bora-casino.com/
https://www.google.sh/url?q=https://bora-casino.com/
https://www.google.si/url?q=https://bora-casino.com/
https://www.google.sk/url?q=https://bora-casino.com/
https://www.google.sm/url?q=https://bora-casino.com/
https://www.google.sr/url?q=https://bora-casino.com/
https://www.google.tg/url?q=https://bora-casino.com/
https://www.google.tk/url?q=https://bora-casino.com/
https://www.google.tn/url?q=https://bora-casino.com/
https://www.google.to/url?q=https://bora-casino.com/
https://www.google.tt/url?q=https://bora-casino.com/
https://www.google.vu/url?q=https://bora-casino.com/
https://www.google.ws/url?q=https://bora-casino.com/
https://toolbarqueries.google.co.uk/url?sa=i&url=https://bora-casino.com/
https://toolbarqueries.google.je/url?q=https://bora-casino.com/
https://toolbarqueries.google.ms/url?q=https://bora-casino.com/
https://toolbarqueries.google.vg/url?q=https://bora-casino.com/
https://toolbarqueries.google.vu/url?q=https://bora-casino.com/
http://toolbarqueries.google.com.tj/url?sa=t&url=https://bora-casino.com/
https://cse.google.ba/url?q=https://bora-casino.com/
https://cse.google.bj/url?q=https://bora-casino.com/
https://cse.google.cat/url?q=https://bora-casino.com/
https://cse.google.co.bw/url?q=https://bora-casino.com/
https://cse.google.co.kr/url?q=https://bora-casino.com/
https://cse.google.co.nz/url?q=https://bora-casino.com/
https://cse.google.co.zw/url?q=https://bora-casino.com/
https://cse.google.com.ai/url?q=https://bora-casino.com/
https://cse.google.com.cy/url?q=https://bora-casino.com/
https://cse.google.com.ly/url?q=https://bora-casino.com/
https://cse.google.com.sb/url?q=https://bora-casino.com/
https://cse.google.com.sv/url?q=https://bora-casino.com/
https://cse.google.com.vc/url?q=https://bora-casino.com/
https://cse.google.cz/url?q=https://bora-casino.com/
https://cse.google.ge/url?q=https://bora-casino.com/
https://cse.google.gy/url?q=https://bora-casino.com/
https://cse.google.hn/url?q=https://bora-casino.com/
https://cse.google.ht/url?q=https://bora-casino.com/
https://cse.google.iq/url?q=https://bora-casino.com/
https://cse.google.lk/url?q=https://bora-casino.com/
https://cse.google.no/url?q=https://bora-casino.com/
https://cse.google.se/url?q=https://bora-casino.com/
https://cse.google.sn/url?q=https://bora-casino.com/
https://cse.google.st/url?q=https://bora-casino.com/
https://cse.google.td/url?q=https://bora-casino.com/
https://cse.google.ws/url?q=https://bora-casino.com/
http://maps.google.ad/url?q=https://bora-casino.com/
http://maps.google.at/url?q=https://bora-casino.com/
http://maps.google.ba/url?q=https://bora-casino.com/
http://maps.google.be/url?q=https://bora-casino.com/
http://maps.google.bf/url?q=https://bora-casino.com/
http://maps.google.bg/url?q=https://bora-casino.com/
http://maps.google.bj/url?q=https://bora-casino.com/
http://maps.google.bs/url?q=https://bora-casino.com/
http://maps.google.by/url?q=https://bora-casino.com/
http://maps.google.cd/url?q=https://bora-casino.com/
http://maps.google.cf/url?q=https://bora-casino.com/
http://maps.google.ch/url?q=https://bora-casino.com/
http://maps.google.ci/url?q=https://bora-casino.com/
http://maps.google.cl/url?q=https://bora-casino.com/
http://maps.google.cm/url?q=https://bora-casino.com/
http://maps.google.co.ao/url?q=https://bora-casino.com/
http://maps.google.co.bw/url?q=https://bora-casino.com/
http://maps.google.co.ck/url?q=https://bora-casino.com/
http://maps.google.co.cr/url?q=https://bora-casino.com/
http://maps.google.co.il/url?q=https://bora-casino.com/
http://maps.google.co.kr/url?q=https://bora-casino.com/
http://maps.google.co.ls/url?q=https://bora-casino.com/
http://maps.google.co.nz/url?q=https://bora-casino.com/
http://maps.google.co.tz/url?q=https://bora-casino.com/
http://maps.google.co.ug/url?q=https://bora-casino.com/
http://maps.google.co.ve/url?q=https://bora-casino.com/
http://maps.google.co.vi/url?q=https://bora-casino.com/
http://maps.google.co.zm/url?q=https://bora-casino.com/
http://maps.google.com.ag/url?q=https://bora-casino.com/
http://maps.google.com.ai/url?q=https://bora-casino.com/
http://maps.google.com.ar/url?q=https://bora-casino.com/
http://maps.google.com.au/url?q=https://bora-casino.com/
http://maps.google.com.bn/url?q=https://bora-casino.com/
http://maps.google.com.bz/url?q=https://bora-casino.com/
http://maps.google.com.ec/url?q=https://bora-casino.com/
http://maps.google.com.eg/url?q=https://bora-casino.com/
http://maps.google.com.et/url?q=https://bora-casino.com/
http://maps.google.com.gh/url?q=https://bora-casino.com/
http://maps.google.com.gt/url?q=https://bora-casino.com/
http://maps.google.com.jm/url?q=https://bora-casino.com/
http://maps.google.com.mt/url?q=https://bora-casino.com/
http://maps.google.com.mx/url?q=https://bora-casino.com/
http://maps.google.com.na/url?q=https://bora-casino.com/
http://maps.google.com.ng/url?q=https://bora-casino.com/
http://maps.google.com.pe/url?q=https://bora-casino.com/
http://maps.google.com.ph/url?q=https://bora-casino.com/
http://maps.google.com.pr/url?q=https://bora-casino.com/
http://maps.google.com.py/url?q=https://bora-casino.com/
http://maps.google.com.qa/url?q=https://bora-casino.com/
http://maps.google.com.sb/url?q=https://bora-casino.com/
http://maps.google.com.sg/url?q=https://bora-casino.com/
http://maps.google.com.tw/url?q=https://bora-casino.com/
http://maps.google.com.uy/url?q=https://bora-casino.com/
http://maps.google.com.vc/url?q=https://bora-casino.com/
http://maps.google.cv/url?q=https://bora-casino.com/
http://maps.google.cz/url?q=https://bora-casino.com/
http://maps.google.dm/url?q=https://bora-casino.com/
http://maps.google.dz/url?q=https://bora-casino.com/
http://maps.google.ee/url?q=https://bora-casino.com/
http://maps.google.fr/url?q=https://bora-casino.com/
http://maps.google.ga/url?q=https://bora-casino.com/
http://maps.google.ge/url?q=https://bora-casino.com/
http://maps.google.gg/url?q=https://bora-casino.com/
http://maps.google.gp/url?q=https://bora-casino.com/
http://maps.google.hr/url?q=https://bora-casino.com/
http://maps.google.hu/url?q=https://bora-casino.com/
http://maps.google.iq/url?q=https://bora-casino.com/
http://maps.google.kg/url?q=https://bora-casino.com/
http://maps.google.ki/url?q=https://bora-casino.com/
http://maps.google.kz/url?q=https://bora-casino.com/
http://maps.google.la/url?q=https://bora-casino.com/
http://maps.google.li/url?q=https://bora-casino.com/
http://maps.google.lt/url?q=https://bora-casino.com/
http://maps.google.mg/url?q=https://bora-casino.com/
http://maps.google.mk/url?q=https://bora-casino.com/
http://maps.google.ms/url?q=https://bora-casino.com/
http://maps.google.mu/url?q=https://bora-casino.com/
http://maps.google.mw/url?q=https://bora-casino.com/
http://maps.google.ne/url?q=https://bora-casino.com/
http://maps.google.nr/url?q=https://bora-casino.com/
http://maps.google.pl/url?q=https://bora-casino.com/
http://maps.google.pn/url?q=https://bora-casino.com/
http://maps.google.pt/url?q=https://bora-casino.com/
http://maps.google.rs/url?q=https://bora-casino.com/
http://maps.google.ru/url?q=https://bora-casino.com/
http://maps.google.rw/url?q=https://bora-casino.com/
http://maps.google.se/url?q=https://bora-casino.com/
http://maps.google.sh/url?q=https://bora-casino.com/
http://maps.google.si/url?q=https://bora-casino.com/
http://maps.google.sm/url?q=https://bora-casino.com/
http://maps.google.sn/url?q=https://bora-casino.com/
http://maps.google.st/url?q=https://bora-casino.com/
http://maps.google.td/url?q=https://bora-casino.com/
http://maps.google.tl/url?q=https://bora-casino.com/
http://maps.google.tn/url?q=https://bora-casino.com/
http://maps.google.ws/url?q=https://bora-casino.com/
https://maps.google.ae/url?q=https://bora-casino.com/
https://maps.google.as/url?q=https://bora-casino.com/
https://maps.google.bi/url?q=https://bora-casino.com/
https://maps.google.bt/url?q=https://bora-casino.com/
https://maps.google.cat/url?q=https://bora-casino.com/
https://maps.google.co.ck/url?sa=t&source=web&rct=j&url=https://bora-casino.com/
https://maps.google.co.cr/url?q=https://bora-casino.com/
https://maps.google.co.id/url?sa=t&url=https://bora-casino.com/
https://maps.google.co.in/url?q=https://bora-casino.com/
https://maps.google.co.jp/url?q=https://bora-casino.com/
https://maps.google.co.ke/url?q=https://bora-casino.com/
https://maps.google.co.mz/url?q=https://bora-casino.com/
https://maps.google.co.th/url?q=https://bora-casino.com/
https://maps.google.co.ug/url?rct=j&sa=t&url=https://bora-casino.com/
https://maps.google.co.uk/url?q=https://bora-casino.com/
https://maps.google.co.za/url?q=https://bora-casino.com/
https://maps.google.co.zw/url?q=https://bora-casino.com/
https://maps.google.com.bd/url?q=https://bora-casino.com/
https://maps.google.com.bh/url?sa=t&url=https://bora-casino.com/
https://maps.google.com.bo/url?rct=j&sa=t&url=https://bora-casino.com/
https://maps.google.com.br/url?q=https://bora-casino.com/
https://maps.google.com.co/url?q=https://bora-casino.com/
https://maps.google.com.cu/url?q=https://bora-casino.com/
https://maps.google.com.do/url?q=https://bora-casino.com/
https://maps.google.com.fj/url?sa=t&rct=j&url=https://bora-casino.com/
https://maps.google.com.gi/url?q=https://bora-casino.com/
https://maps.google.com.hk/url?q=https://bora-casino.com/
https://maps.google.com.kh/url?sa=t&url=https://bora-casino.com/
https://maps.google.com.ly/url?sa=i&rct=j&url=https://bora-casino.com/
https://maps.google.com.mm/url?q=https://bora-casino.com/
https://maps.google.com.my/url?sa=t&url=https://bora-casino.com/
https://maps.google.com.np/url?q=https://bora-casino.com/
https://maps.google.com.om/url?sa=t&url=https://bora-casino.com/
https://maps.google.com.pa/url?sa=t&url=https://bora-casino.com/
https://maps.google.com.pg/url?q=https://bora-casino.com/
https://maps.google.com.sa/url?q=https://bora-casino.com/
https://maps.google.com.sl/url?q=https://bora-casino.com/
https://maps.google.com.sv/url?q=https://bora-casino.com/
https://maps.google.com.tr/url?q=https://bora-casino.com/
https://maps.google.de/url?q=https://bora-casino.com/
https://maps.google.dj/url?q=https://bora-casino.com/
https://maps.google.dk/url?sa=t&url=https://bora-casino.com/
https://maps.google.es/url?q=https://bora-casino.com/
https://maps.google.fi/url?q=https://bora-casino.com/
https://maps.google.fm/url?q=https://bora-casino.com/
https://maps.google.gl/url?q=https://bora-casino.com/
https://maps.google.gm/url?q=https://bora-casino.com/
https://maps.google.gr/url?q=https://bora-casino.com/
https://maps.google.gy/url?q=https://bora-casino.com/
https://maps.google.hn/url?q=https://bora-casino.com/
https://maps.google.ht/url?q=https://bora-casino.com/
https://maps.google.ie/url?q=https://bora-casino.com/
https://maps.google.ie/url?sa=j&rct=j&url=https://bora-casino.com/
https://maps.google.im/url?q=https://bora-casino.com/
https://maps.google.is/url?q=https://bora-casino.com/
https://maps.google.it/url?q=https://bora-casino.com/
https://maps.google.lk/url?rct=j&sa=t&url=https://bora-casino.com/
https://maps.google.lv/url?q=https://bora-casino.com/
https://maps.google.ml/url?sa=i&url=https://bora-casino.com/
https://maps.google.mn/url?q=https://bora-casino.com/
https://maps.google.mv/url?q=https://bora-casino.com/
https://maps.google.nl/url?q=https://bora-casino.com/
https://maps.google.no/url?sa=t&url=https://bora-casino.com/
https://maps.google.nu/url?q=https://bora-casino.com/
https://maps.google.ro/url?q=https://bora-casino.com/
https://maps.google.sc/url?q=https://bora-casino.com/
https://maps.google.sk/url?q=https://bora-casino.com/
https://maps.google.so/url?q=https://bora-casino.com/
https://maps.google.tg/url?q=https://bora-casino.com/
https://maps.google.to/url?q=https://bora-casino.com/
https://maps.google.tt/url?q=https://bora-casino.com/
https://maps.google.vg/url?q=https://bora-casino.com/
https://maps.google.vu/url?q=https://bora-casino.com/
http://www.google.be/url?q=https://bora-casino.com/
http://www.google.bf/url?q=https://bora-casino.com/
http://www.google.bt/url?q=https://bora-casino.com/
http://www.google.ca/url?q=https://bora-casino.com/
http://www.google.cd/url?q=https://bora-casino.com/
http://www.google.cl/url?q=https://bora-casino.com/
http://www.google.co.ck/url?q=https://bora-casino.com/
http://www.google.co.ls/url?q=https://bora-casino.com/
http://www.google.com.af/url?q=https://bora-casino.com/
http://www.google.com.au/url?q=https://bora-casino.com/
http://www.google.com.bn/url?q=https://bora-casino.com/
http://www.google.com.do/url?q=https://bora-casino.com/
http://www.google.com.eg/url?q=https://bora-casino.com/
http://www.google.com.et/url?q=https://bora-casino.com/
http://www.google.com.gi/url?q=https://bora-casino.com/
http://www.google.com.na/url?q=https://bora-casino.com/
http://www.google.com.np/url?q=https://bora-casino.com/
http://www.google.com.sg/url?q=https://bora-casino.com/
http://www.google.com/url?q=https://bora-casino.com/
http://www.google.cv/url?q=https://bora-casino.com/
http://www.google.dm/url?q=https://bora-casino.com/
http://www.google.es/url?q=https://bora-casino.com/
http://www.google.iq/url?q=https://bora-casino.com/
http://www.google.it/url?sa=t&rct=j&q=&esrc=s&source=web&cd=1&ved=0cdiqfjaa&url=https://bora-casino.com/
http://www.google.kg/url?q=https://bora-casino.com/
http://www.google.kz/url?q=https://bora-casino.com/
http://www.google.li/url?q=https://bora-casino.com/
http://www.google.me/url?q=https://bora-casino.com/
http://www.google.pn/url?q=https://bora-casino.com/
http://www.google.ps/url?q=https://bora-casino.com/
http://www.google.sn/url?q=https://bora-casino.com/
http://www.google.so/url?q=https://bora-casino.com/
http://www.google.st/url?q=https://bora-casino.com/
http://www.google.td/url?q=https://bora-casino.com/
http://www.google.tm/url?q=https://bora-casino.com/
https://image.google.com.kw/url?sa=t&rct=j&url=https://bora-casino.com/
https://image.google.com.nf/url?sa=j&url=https://bora-casino.com/
https://image.google.tn/url?q=j&sa=t&url=https://bora-casino.com/
https://images.google.ad/url?sa=t&url=https://bora-casino.com/
https://images.google.al/url?q=https://bora-casino.com/
https://images.google.as/url?q=https://bora-casino.com/
https://images.google.az/url?q=https://bora-casino.com/
https://images.google.be/url?q=https://bora-casino.com/
https://images.google.bg/url?q=https://bora-casino.com/
https://images.google.bi/url?q=https://bora-casino.com/
https://images.google.bs/url?sa=t&url=https://bora-casino.com/
https://images.google.cat/url?q=https://bora-casino.com/
https://images.google.cd/url?q=https://bora-casino.com/
https://images.google.cl/url?q=https://bora-casino.com/
https://images.google.co.bw/url?sa=t&url=https://bora-casino.com/
https://images.google.co.il/url?sa=t&url=https://bora-casino.com/
https://images.google.co.in/url?q=https://bora-casino.com/
https://images.google.co.ke/url?q=https://bora-casino.com/
https://images.google.co.kr/url?q=https://bora-casino.com/
https://images.google.co.ls/url?q=https://bora-casino.com/
https://images.google.co.th/url?q=https://bora-casino.com/
https://images.google.co.zm/url?sa=t&url=https://bora-casino.com/
https://images.google.com.af/url?q=https://bora-casino.com/
https://images.google.com.ai/url?q=https://bora-casino.com/
https://images.google.com.ar/url?q=https://bora-casino.com/
https://images.google.com.bd/url?sa=t&url=https://bora-casino.com/
https://images.google.com.bn/url?q=https://bora-casino.com/
https://images.google.com.bo/url?q=https://bora-casino.com/
https://images.google.com.br/url?q=https://bora-casino.com/
https://images.google.com.bz/url?sa=t&url=https://bora-casino.com/
https://images.google.com.cu/url?q=https://bora-casino.com/
https://images.google.com.do/url?q=https://bora-casino.com/
https://images.google.com.et/url?q=https://bora-casino.com/
https://images.google.com.gh/url?q=https://bora-casino.com/
https://images.google.com.hk/url?q=https://bora-casino.com/
https://images.google.com.lb/url?q=https://bora-casino.com/
https://images.google.com.mm/url?q=https://bora-casino.com/
https://images.google.com.mx/url?q=https://bora-casino.com/
https://images.google.com.my/url?q=https://bora-casino.com/
https://images.google.com.np/url?sa=t&url=https://bora-casino.com/
https://images.google.com.pa/url?sa=t&url=https://bora-casino.com/
https://images.google.com.pe/url?sa=t&url=https://bora-casino.com/
https://images.google.com.pg/url?q=https://bora-casino.com/
https://images.google.com.pk/url?q=https://bora-casino.com/
https://images.google.com.pr/url?q=https://bora-casino.com/
https://images.google.com.sa/url?sa=t&url=https://bora-casino.com/
https://images.google.com.sg/url?q=https://bora-casino.com/
https://images.google.com.sv/url?q=https://bora-casino.com/
https://images.google.com.tr/url?q=https://bora-casino.com/
https://images.google.com.tw/url?q=https://bora-casino.com/
https://images.google.com.ua/url?q=https://bora-casino.com/
https://images.google.cv/url?q=https://bora-casino.com/
https://images.google.cz/url?sa=i&url=https://bora-casino.com/
https://images.google.dj/url?q=https://bora-casino.com/
https://images.google.dk/url?q=https://bora-casino.com/
https://images.google.ee/url?q=https://bora-casino.com/
https://images.google.es/url?q=https://bora-casino.com/
https://images.google.fm/url?q=https://bora-casino.com/
https://images.google.fr/url?sa=t&url=https://bora-casino.com/
https://images.google.gl/url?q=https://bora-casino.com/
https://images.google.gr/url?q=https://bora-casino.com/
https://images.google.hr/url?q=https://bora-casino.com/
https://images.google.iq/url?q=https://bora-casino.com/
https://images.google.jo/url?q=https://bora-casino.com/
https://images.google.ki/url?q=https://bora-casino.com/
https://images.google.lk/url?sa=t&url=https://bora-casino.com/
https://images.google.lt/url?q=https://bora-casino.com/
https://images.google.lu/url?sa=t&url=https://bora-casino.com/
https://images.google.md/url?q=https://bora-casino.com/
https://images.google.mk/url?q=https://bora-casino.com/
https://images.google.mn/url?q=https://bora-casino.com/
https://images.google.ms/url?q=https://bora-casino.com/
https://images.google.ne/url?q=https://bora-casino.com/
https://images.google.ng/url?q=https://bora-casino.com/
https://images.google.nl/url?q=https://bora-casino.com/
https://images.google.nu/url?q=https://bora-casino.com/
https://images.google.ps/url?q=https://bora-casino.com/
https://images.google.ro/url?q=https://bora-casino.com/
https://images.google.ru/url?q=https://bora-casino.com/
https://images.google.rw/url?q=https://bora-casino.com/
https://images.google.sc/url?q=https://bora-casino.com/
https://images.google.si/url?q=https://bora-casino.com/
https://images.google.sk/url?q=https://bora-casino.com/
https://images.google.sm/url?q=https://bora-casino.com/
https://images.google.sn/url?q=https://bora-casino.com/
https://images.google.so/url?q=https://bora-casino.com/
https://images.google.sr/url?q=https://bora-casino.com/
https://images.google.st/url?q=https://bora-casino.com/
https://images.google.tl/url?q=https://bora-casino.com/
https://images.google.tn/url?sa=t&url=https://bora-casino.com/
https://images.google.to/url?q=https://bora-casino.com/
https://images.google.vu/url?q=https://bora-casino.com/
http://images.google.am/url?q=https://bora-casino.com/
http://images.google.ba/url?q=https://bora-casino.com/
http://images.google.bf/url?q=https://bora-casino.com/
http://images.google.co.ao/url?q=https://bora-casino.com/
http://images.google.co.jp/url?q=https://bora-casino.com/
http://images.google.co.nz/url?q=https://bora-casino.com/
http://images.google.co.ug/url?q=https://bora-casino.com/
http://images.google.co.uk/url?q=https://bora-casino.com/
http://images.google.co.uz/url?q=https://bora-casino.com/
http://images.google.co.ve/url?q=https://bora-casino.com/
http://images.google.com.co/url?q=https://bora-casino.com/
http://images.google.com.ly/url?q=https://bora-casino.com/
http://images.google.com.ng/url?q=https://bora-casino.com/
http://images.google.com.om/url?q=https://bora-casino.com/
http://images.google.com.qa/url?q=https://bora-casino.com/
http://images.google.com.sb/url?q=https://bora-casino.com/
http://images.google.com.sl/url?q=https://bora-casino.com/
http://images.google.com.uy/url?q=https://bora-casino.com/
http://images.google.com.vc/url?q=https://bora-casino.com/
http://images.google.de/url?q=https://bora-casino.com/
http://images.google.ie/url?sa=t&url=https://bora-casino.com/
http://images.google.is/url?q=https://bora-casino.com/
http://images.google.it/url?q=https://bora-casino.com/
http://images.google.lv/url?q=https://bora-casino.com/
http://images.google.me/url?q=https://bora-casino.com/
http://images.google.mu/url?q=https://bora-casino.com/
http://images.google.pl/url?q=https://bora-casino.com/
http://images.google.pn/url?sa=t&url=https://bora-casino.com/
http://images.google.pt/url?q=https://bora-casino.com/
http://images.google.rs/url?q=https://bora-casino.com/
http://images.google.td/url?q=https://bora-casino.com/
http://images.google.tm/url?q=https://bora-casino.com/
http://images.google.ws/url?q=https://bora-casino.com/
해외배팅사이트 추천_https://top3spo.com/
해외스포츠배팅사이트 추천_https://top3spo.com/
해외배팅사이트에이전시 추천_https://top3spo.com/
해외 온라인카지노 추천_https://top3spo.com/
해외 카지노사이트 추천_https://top3spo.com/
머니라인247_https://top3spo.com/moneyline247/
황룡카지노_https://top3spo.com/gdcasino/
아시안커넥트_https://top3spo.com/asian/
스보벳_https://top3spo.com/sbobet/
피나클_https://top3spo.com/pinnacle/
맥스벳_https://top3spo.com/maxbet/
파워볼_https://top3spo.com/powerball/
해외배팅사이트 추천
해외스포츠배팅사이트 추천
해외배팅사이트에이전시 추천
해외 온라인카지노 추천
해외 카지노사이트 추천
머니라인247
황룡카지노
아시안커넥트
스보벳
피나클
맥스벳
파워볼
https://yamcode.com/xuvvo86z9q
https://notes.io/qfG7H
https://pastebin.com/E6gFKzM7
http://pastehere.xyz/oFDIqbfvh/
http://paste.jp/a90e36af/
https://pastelink.net/ji9vsml3
https://paste.feed-the-beast.com/view/e812dbd1
https://pasteio.com/xZqvEfgcR0Gf
https://p.teknik.io/fqsyA
https://pastebin.freeswitch.org/view/9740b97e
http://pastebin.falz.net/2424521
https://justpaste.it/681p7
https://paste.laravel.io/7dff24c2-00ca-47b0-82e5-feafe3029ac2
https://paste2.org/wkjUJEhF
https://paste.firnsy.com/paste/H4we824zlW7
https://paste.md-5.net/qodulujomi.rb
https://paste.myst.rs/p19sqi13
https://controlc.com/7fae2df4
https://txt.fyi/-/22271/7e7cbaba/
https://paste.cutelyst.org/3m4hU9QXT
https://bitbin.it/OnIGxodQ/
http://pastehere.xyz/bLPBEbfvr/
https://rentry.co/oc4x5
https://paste.enginehub.org/YbJfDxCrN
https://sharetext.me/7htbi0unhi
http://nopaste.paefchen.net/1921036
http://www.topkam.ru/gtu/?url=https://top3spo.com/
https://torggrad.ru/bitrix/rk.php?goto=https://top3spo.com/
http://torgi-rybinsk.ru/bitrix/rk.php?goto=https://top3spo.com/
http://tpprt.ru/bitrix/rk.php?goto=https://top3spo.com/
https://www.tral.ru/images/get.php?go=https://top3spo.com/
https://turbazar.ru/url/index?url=https://top3spo.com/
http://stanko.tw1.ru/redirect.php?url=https://top3spo.com/
https://twilightrussia.ru/go?https://top3spo.com/
https://ulfishing.ru/forum/go.php?https://top3spo.com/
https://underwood.ru/away.html?url=https://top3spo.com/
https://unicom.ru/links.php?go=https://top3spo.com/
http://www.unifin.ru/bitrix/redirect.php?goto=https://top3spo.com/
https://uogorod.ru/feed/520?redirect=https://top3spo.com/
https://utmagazine.ru/r?url=https://top3spo.com/
http://uvbnb.ru/go?https://top3spo.com/
http://www.evrika41.ru/redirect?url=https://top3spo.com/
http://expomodel.ru/bitrix/redirect.php?goto=https://top3spo.com/
https://www.extrimdrive.ru/bitrix/rk.php?goto=https://top3spo.com/
https://facto.ru/bitrix/rk.php?goto=https://top3spo.com/
http://fallout3.ru/utils/ref.php?url=https://top3spo.com/
http://fbsearch.ru/away.php?url=https://top3spo.com/
https://fc-zenit.ru/bitrix/redirect.php?goto=https://top3spo.com/
http://forum-region.ru/forum/away.php?s=https://top3spo.com/
http://forumdate.ru/redirect-to/?redirect=https://top3spo.com/
https://fr-gtr.ru/go?https://top3spo.com/
http://shckp.ru/ext_link?url=https://top3spo.com/
https://sherif-karter.ru/bitrix/redirect.php?goto=https://top3spo.com/
https://shinglas.ru/bitrix/redirect.php?goto=https://top3spo.com/
https://www.shtrih-m.ru/bitrix/redirect.php?goto=https://top3spo.com/
https://sibran.ru/bitrix/redirect.php?goto=https://top3spo.com/
http://simvol-veri.ru/xp/?goto=https://top3spo.com/
http://sintez-oka.ru/bitrix/redirect.php?goto=https://top3spo.com/
https://lk.sistemagorod.ru/lk/away?to=https://top3spo.com/
https://skamata.ru/bitrix/redirect.php?goto=https://top3spo.com/
https://www.skamata.ru/bitrix/redirect.php?event1=cafesreda&event2=&event3=&goto=https://top3spo.com/
http://images.google.hu/url?q=https://top3spo.com/
http://maps.google.com.mx/url?q=https://top3spo.com/
http://images.google.com.mx/url?q=https://top3spo.com/
http://www.google.com.mx/url?q=https://top3spo.com/
http://images.google.com.hk/url?q=https://top3spo.com/
http://images.google.fi/url?q=https://top3spo.com/
http://maps.google.fi/url?q=https://top3spo.com/
http://images.google.pt/url?q=https://top3spo.com/
http://maps.google.pt/url?q=https://top3spo.com/
http://www.shinobi.jp/etc/goto.html?https://top3spo.com/
http://images.google.co.id/url?q=https://top3spo.com/
http://maps.google.co.id/url?q=https://top3spo.com/
http://images.google.no/url?q=https://top3spo.com/
http://maps.google.no/url?q=https://top3spo.com/
http://images.google.co.th/url?q=https://top3spo.com/
http://maps.google.co.th/url?q=https://top3spo.com/
http://www.google.co.th/url?q=https://top3spo.com/
http://maps.google.co.za/url?q=https://top3spo.com/
http://galter.northwestern.edu/exit?url=https://top3spo.com/
http://images.google.ro/url?q=https://top3spo.com/
http://maps.google.ro/url?q=https://top3spo.com/
http://cse.google.dk/url?q=https://top3spo.com/
http://cse.google.com.tr/url?q=https://top3spo.com/
http://cse.google.hu/url?q=https://top3spo.com/
http://www.astro.wisc.edu/?URL=https://top3spo.com/
http://cse.google.com.hk/url?q=https://top3spo.com/
http://cse.google.fi/url?q=https://top3spo.com/
http://images.google.com.sg/url?q=https://top3spo.com/
http://cse.google.pt/url?q=https://top3spo.com/
http://cse.google.co.nz/url?q=https://top3spo.com/
http://images.google.com.ar/url?q=https://top3spo.com/
http://cse.google.co.id/url?q=https://top3spo.com/
http://images.google.com.ua/url?q=https://top3spo.com/
http://cse.google.no/url?q=https://top3spo.com/
http://cse.google.co.th/url?q=https://top3spo.com/
http://cse.google.ro/url?q=https://top3spo.com/
http://maps.google.hu/url?q=https://top3spo.com/
http://maps.google.com.ar/url?q=https://top3spo.com/
http://maps.google.com.sg/url?q=https://top3spo.com/
http://images.google.com.tr/url?q=https://top3spo.com/
http://maps.google.dk/url?q=https://top3spo.com/
http://www.google.fi/url?q=https://top3spo.com/
https://skibaza.ru/bitrix/rk.php?goto=https://top3spo.com/
http://www.skladcom.ru/(S(qdiwhk55jkcyok45u4ti0a55))/banners.aspx?url=https://top3spo.com/
https://smartservices.ru/bitrix/rk.php?goto=https://top3spo.com/
https://www.flyingsamaritans.net/Startup/SetupSite.asp?RestartPage=https://top3spo.com/
https://www.ewind.cz/index.php?page=home/redirect&url=https://top3spo.com/
https://www.eas-racing.se/gbook/go.php?url=https://top3spo.com/
https://www.direkt-einkauf.de/includes/refer.php?id=170&url=https://top3spo.com/
https://www.dialogportal.com/Services/Forward.aspx?link=https://top3spo.com/
https://www.d-e-a.eu/newsletter/redirect.php?link=https://top3spo.com/
https://www.curseforge.com/linkout?remoteUrl=https://top3spo.com/
https://www.counterwelt.com/charts/click.php?user=14137&link=https://top3spo.com/
https://www.cossa.ru/bitrix/redirect.php?event1=click&event2=&event3=&goto=https://top3spo.com/
https://www.cheerunion.org/tracker/index.html?t=ad&pool_id=2&ad_id=5&url=https://top3spo.com/
https://www.bing.com/news/apiclick.aspx?ref=FexRss&aid=&tid=9BB77FDA801248A5AD23FDBDD5922800&url=https://top3spo.com/
https://www.bettnet.com/blog/?URL=https://top3spo.com/
https://www.bartaz.lt/wp-content/plugins/clikstats/ck.php?Ck_id=438&Ck_lnk=https://top3spo.com/
https://www.bandb.ru/redirect.php?URL=https://top3spo.com/
https://www.autopartskart.com/buyfromamzon.php?url=https://top3spo.com/
https://www.autoandrv.com/linkout.aspx?websiteurl=https://top3spo.com/
https://www.art-prizes.com/AdRedirector.aspx?ad=MelbPrizeSculpture_2017&target=https://top3spo.com/
https://www.adminer.org/redirect/?url=https://top3spo.com/
https://www.actualitesdroitbelge.be/click_newsletter.php?url=https://top3spo.com/
https://wirelessestimator.com/advertise/newsletter_redirect.php?url=https://top3spo.com/
https://webfeeds.brookings.edu/~/t/0/0/~top3spo.com/
https://wasitviewed.com/index.php?href=https://top3spo.com/
https://vinacorp.vn/go_url.php?w=https://top3spo.com/
https://uk.kindofbook.com/redirect.php/?red=https://top3spo.com/
https://tvtropes.org/pmwiki/no_outbounds.php?o=https://top3spo.com/
https://trello.com/add-card?source=mode=popup&name=click+here&desc=https://top3spo.com/
https://transtats.bts.gov/exit.asp?url=https://top3spo.com/
https://track.effiliation.com/servlet/effi.redir?id_compteur=13215059&url=https://top3spo.com/
https://temptationsaga.com/buy.php?url=https://top3spo.com/
https://tempechamber.glueup.com/track/redirect?type=campaign&lid=42&tracking_id=[trackingId]&redirect_url=https%3A%2F%2Fwww.top3spo.com/%2F
https://sutd.ru/links.php?go=https://top3spo.com/
https://supplier-portal-uat.daimler.com/external-link.jspa?url=https://top3spo.com/
https://stroim100.ru/redirect?url=https://top3spo.com/
https://strelmag.ru/bitrix/rk.php?goto=https://top3spo.com/
https://store-pro.ru/go?https://top3spo.com/
https://splash.hume.vic.gov.au/analytics/outbound?url=https://top3spo.com/
https://spb90.ru/bitrix/redirect.php?goto=https://top3spo.com/
https://spartak.ru/bitrix/redirect.php?goto=https://top3spo.com/
https://sovaisova.ru/bitrix/redirect.php?event1=2009_mainpage&event2=go_www&event3=&goto=https://top3spo.com/
https://socport.ru/redirect?url=https://top3spo.com/
https://slashwrestling.com/cgi-bin/redirect.cgi?https://top3spo.com/
https://sfwater.org/redirect.aspx?url=https://top3spo.com/
https://seoandme.ru/bitrix/redirect.php?goto=https://top3spo.com/
https://s-online.ru/bitrix/redirect.php?goto=https://top3spo.com/
https://ru.xhamster3.com/exit.php?url=https://top3spo.com/
https://rssfeeds.wtsp.com/~/t/0/0/wtsp/home/~top3spo.com/
https://rostovmama.ru/redirect?url=https://top3spo.com/
https://rev1.reversion.jp/redirect?url=https://top3spo.com/
https://relationshiphq.com/french.php?u=https://top3spo.com/
https://ref.gamer.com.tw/redir.php?url=https://top3spo.com/
https://ramset.com.au/document/url/?url=https://top3spo.com/
https://www.star174.ru/redir.php?url=https://top3spo.com/
https://staten.ru/bitrix/rk.php?goto=https://top3spo.com/
https://stav-geo.ru/go?https://top3spo.com/
http://stopcran.ru/go?https://top3spo.com/
http://studioad.ru/go?https://top3spo.com/
http://swepub.kb.se/setattribute?language=en&redirect=https://top3spo.com/
https://www.licnioglasi.org/index.php?thememode=full;redirect=https://top3spo.com/
http://www.rexart.com/cgi-rexart/al/affiliates.cgi?aid=872&redirect=https://top3spo.com/
http://www2.smartmail.com.ar/tl.php?p=hqf/f94/rs/1fp/4c0/rs//https://top3spo.com/
http://elsy.at/elearningdownload.php?link=https://top3spo.com/
http://old.roofnet.org/external.php?link=https://top3spo.com/
http://www.forum-wodociagi.pl/system/links/3a337d509d017c7ca398d1623dfedf85.html?link=https://top3spo.com/
http://www.bucatareasa.ro/link.php?url=https://top3spo.com/
http://maximov-design.ru/link.php?go=https://top3spo.com/
http://mosprogulka.ru/go?https://top3spo.com/
https://uniline.co.nz/Document/Url/?url=https://top3spo.com/
http://count.f-av.net/cgi/out.cgi?cd=fav&id=ranking_306&go=https://top3spo.com/
https://tracker.onrecruit.net/api/v1/redirect/?redirect_to=https://top3spo.com/
http://slipknot1.info/go.php?url=https://top3spo.com/
https://www.donbosco.it/common/mod_30_conta.asp?id=6&link=https://top3spo.com/
https://www.samovar-forum.ru/go?https://top3spo.com/
http://san-house.ru/bitrix/rk.php?goto=https://top3spo.com/
https://sbereg.ru/links.php?go=https://top3spo.com/
http://staldver.ru/go.php?go=https://top3spo.com/
https://posts.google.com/url?q=https://top3spo.com/
https://plus.google.com/url?q=https://top3spo.com/
https://passport.sfacg.com/LoginOut.aspx?Returnurl=https://top3spo.com/
https://offers.sidex.ru/stat_ym_new.php?redir=https://top3spo.com/&hash=1577762
https://naruto.su/link.ext.php?url=https://top3spo.com/
https://meguro.keizai.biz/banner.php?type=image_banner&position=right&id=13&uri=https://top3spo.com/
https://lekoufa.ru/banner/go?banner_id=4&link=https://top3spo.com/
https://kakaku-navi.net/items/detail.php?url=https://top3spo.com/
https://justpaste.it/redirect/172fy/https://top3spo.com/
https://jt-pr-dot-yamm-track.appspot.com/Redirect?ukey=1iXi3dF8AuzUIsgifbcVnqqx-anF4B8R-9PC3UGhHO3E-1131306248&key=YAMMID-79725512&link=https://top3spo.com/
https://ipv4.google.com/url?q=https://top3spo.com/
https://im.tonghopdeal.net/pic.php?q=https://top3spo.com/
https://heaven.porn/te3/out.php?u=https://top3spo.com/
https://good-surf.ru/r.php?g=https://top3spo.com/
https://golden-resort.ru/out.php?out=https://top3spo.com/
https://globalmedia51.ru/bitrix/redirect.php?goto=https://top3spo.com/
https://gektor-nsk.ru/bitrix/redirect.php?goto=https://top3spo.com/
https://gcup.ru/go?https://top3spo.com/
https://forum.solidworks.com/external-link.jspa?url=https://top3spo.com/
https://forsto.ru/bitrix/redirect.php?goto=https://top3spo.com/
https://foro.infojardin.com/proxy.php?link=https://top3spo.com/
https://es.catholic.net/ligas/ligasframe.phtml?liga=https://top3spo.com/
https://ditu.google.com/url?q=https://top3spo.com/
https://de.flavii.de/index.php?flavii=linker&link=https://top3spo.com/
https://dakke.co/redirect/?url=https://top3spo.com/
https://creativecommons.org/choose/results-one?q_1=2&q_1=1&field_attribute_to_url=https://top3spo.com/
https://contacts.google.com/url?sa=t&url=https://top3spo.com/
https://community.rsa.com/external-link.jspa?url=https://top3spo.com/
https://community.nxp.com/external-link.jspa?url=https://top3spo.com/
https://community.esri.com/external-link.jspa?url=https://top3spo.com/
https://community.cypress.com/external-link.jspa?url=https://top3spo.com/
https://club.panasonic.jp/member/terms/?siteId=B1&returnURL=https://top3spo.com/
https://cdn.iframe.ly/api/iframe?url=https://top3spo.com/
https://bukkit.org/proxy.php?link=https://top3spo.com/
https://branch.app.link/?$deeplink_path=article%2Fjan%2F123&$fallback_url=https%3A%2F%2Ftop3spo.com/&channel=facebook&feature=affiliate
https://boowiki.info/go.php?go=https://top3spo.com/
https://blaze.su/bitrix/redirect.php?event1=&event2=&event3=&goto=https://top3spo.com/
https://bbs.pku.edu.cn/v2/jump-to.php?url=https://top3spo.com/
https://bbs.hgyouxi.com/kf.php?u=https://top3spo.com/
https://bares.blog.idnes.cz/redir.aspx?url=https://top3spo.com/
https://analytics.bluekai.com/site/16231?phint=event=click&phint=campaign=BRAND-TAB&phint=platform=search&done=https://top3spo.com/
https://advisor.wmtransfer.com/SiteDetails.aspx?url=https://top3spo.com/
https://advisor.wmtransfer.com/SiteDetails.aspx?url=top3spo.com/
https://adengine.old.rt.ru/go.jsp?to=https://top3spo.com/
https://abiznes.com.ua/bitrix/redirect.php?event1=&event2=&event3=&goto=https://top3spo.com/
http://www.webclap.com/php/jump.php?url=https://top3spo.com/
http://www.torrent.ai/lt/redirect.php?url=https://top3spo.com/
http://www.sv-mama.ru/shared/go.php?url=https://top3spo.com/
http://www.sofion.ru/banner.php?r1=41&r2=2234&goto=https://top3spo.com/
http://www.shippingchina.com/pagead.php?id=RW4uU2hpcC5tYWluLjE=&tourl=https://top3spo.com/
http://www.sermemole.com/public/serbook/redirect.php?url=https://top3spo.com/
http://www.semtex.ru/go.php?a=https://top3spo.com/
http://www.runiwar.ru/go?https://top3spo.com/
http://www.rucem.ru/doska/redirect/?go=https://top3spo.com/
http://www.rss.geodles.com/fwd.php?url=https://top3spo.com/
http://www.paladiny.ru/go.php?url=https://top3spo.com/
http://www.nuttenzone.at/jump.php?url=https://top3spo.com/
http://www.myhottiewife.com/cgi-bin/arpro/out.cgi?id=Jojo&url=https://top3spo.com/
http://www.mix-choice.com/yomi/rank.cgi?mode=link&id=391&url=https://top3spo.com/
http://www.mistress-and-slave.com/cgi-bin/out.cgi?id=123crush&url=https://top3spo.com/
http://www.laosubenben.com/home/link.php?url=https://top3spo.com/
http://www.laopinpai.com/gourl.asp?url=/gourl.asp?url=https://top3spo.com/
http://www.kollabora.com/external?url=https://top3spo.com/
http://www.johnvorhees.com/gbook/go.php?url=https://top3spo.com/
http://www.jkes.tyc.edu.tw/dyna/webs/gotourl.php?id=357&url=https://top3spo.com/
http://www.internettrafficreport.com/cgi-bin/cgirdir.exe?https://top3spo.com/
http://www.interfacelift.com/goto.php?url=https://top3spo.com/
http://www.interempresas.net/estadisticas/r.asp?idsector=129&e=221083&c=195&d=https://top3spo.com/
http://www.imsnet.at/LangChange.aspx?uri=https://top3spo.com/
http://www.humanbrainmapping.org/i4a/etrack/track.cfm?rType=2&campaignID=3572&contactID=4524&origURL=https://top3spo.com/
http://www.hon-cafe.net/cgi-bin/re.cgi?lid=hmw&url=https://top3spo.com/
http://www.glorioustronics.com/redirect.php?link=https://top3spo.com/
http://www.global-flat.com/mobile/mobile_switch.php?dir=tofull&url=https://top3spo.com/
http://www.gigatran.ru/go?url=https://top3spo.com/
http://www.gigaalert.com/view.php?h=&s=https://top3spo.com/
http://www.gearguide.ru/phpbb/go.php?https://top3spo.com/
http://www.fertilab.net/background_manager.aspx?ajxname=link_banner&id_banner=50&url=https://top3spo.com/
http://www.etis.ford.com/externalURL.do?url=https://top3spo.com/
http://www.erotikplatz.at/redirect.php?id=939&mode=fuhrer&url=https://top3spo.com/
http://www.cyprus-net.com/banner_click.php?banid=4&link=https://top3spo.com/
http://www.compusystems.com/servlet/Et?x=270.-101.233736|%20https://top3spo.com/
http://www.chungshingelectronic.com/redirect.asp?url=https://top3spo.com/
http://www.beigebraunapartment.de/url?q=https://top3spo.com/
http://www.bdsmandfetish.com/cgi-bin/sites/out.cgi?id=mandymon&url=https://top3spo.com/
http://www.aurki.com/jarioa/redirect?id_feed=510&url=https://top3spo.com/
http://visits.seogaa.ru/redirect/?g=https://top3spo.com/
http://twindish-electronics.de/url?q=https://top3spo.com/
http://tido.al/vazhdo.php?url=https://top3spo.com/
http://tharp.me/?url_to_shorten=https://top3spo.com/
http://stroysoyuz.ru/bitrix/rk.php?goto=https://top3spo.com/
http://speakrus.ru/links.php?go=https://top3spo.com/
http://spbstroy.ru/bitrix/redirect.php?goto=https://top3spo.com/
http://solo-center.ru/links.php?go=https://top3spo.com/
http://smile.wjp.am/link-free/link3.cgi?mode=cnt&no=8&hpurl=https://top3spo.com/
http://seriesandtv.com/?wptouch_switch=desktop&redirect=https://top3spo.com/
http://sennheiserstore.ru/bitrix/rk.php?goto=https://top3spo.com/
http://school364.spb.ru/bitrix/rk.php?goto=https://top3spo.com/
http://sc.sie.gov.hk/TuniS/top3spo.com/
http://rzngmu.ru/go?https://top3spo.com/
http://rostovklad.ru/go.php?https://top3spo.com/
http://portalnp.snauka.ru/bitrix/redirect.php?goto=https://top3spo.com/
http://park3.wakwak.com/~yadoryuo/cgi-bin/click3/click3.cgi?cnt=chalet-main&url=https://top3spo.com/
http://page.yicha.cn/tp/j?url=https://top3spo.com/
http://onlinemanuals.txdot.gov/help/urlstatusgo.html?url=https://top3spo.com/
http://ms1.caps.ntct.edu.tw/school/netlink/hits.php?id=107&url=https://top3spo.com/
http://mbrf.ae/knowledgeaward/language/ar/?redirect_url=https://top3spo.com/
http://markiza.me/bitrix/rk.php?goto=https://top3spo.com/
http://m.17ll.com/apply/tourl/?url=https://top3spo.com/
http://landbidz.com/redirect.asp?url=https://top3spo.com/
http://kreepost.com/go/?https://top3spo.com/
http://jump.5ch.net/?https://top3spo.com/
http://imperialoptical.com/news-redirect.aspx?url=https://top3spo.com/
http://hellothai.com/wwwlink/wwwredirect.asp?hp_id=1242&url=https://top3spo.com/
http://guru.sanook.com/?URL=https://top3spo.com/
http://go.gomtv.com/rd?link_id=10805&code=SHARE_DREAMWIZ&send=https://top3spo.com/
http://gfmis.crru.ac.th/web/redirect.php?url=https://top3spo.com/
http://gfaq.ru/go?https://top3spo.com/
http://gbi-12.ru/links.php?go=https://top3spo.com/
http://frienddo.com/out.php?url=https://top3spo.com/
http://fr.knubic.com/redirect_to?url=https://top3spo.com/
http://ezproxy.lib.uh.edu/login?url=https://top3spo.com/
http://edcommunity.ru/bitrix/rk.php?goto=https://top3spo.com/
http://dvd24online.de/url?q=https://top3spo.com/
http://client.paltalk.com/client/webapp/client/External.wmt?url=https://top3spo.com/
http://chuanroi.com/Ajax/dl.aspx?u=https://top3spo.com/
http://branch.app.link/?$deeplink_path=article/jan/123&$fallback_url=https://top3spo.com/
http://biz-tech.org/bitrix/rk.php?goto=https://top3spo.com/
http://avalon.gondor.ru/away.php?link=https://top3spo.com/
http://ads.cars.cz/adclick.php?bannerid=333&zoneid=237&source=&dest=https://top3spo.com/
http://a.gongkong.com/db/adredir.asp?id=16757&url=https://top3spo.com/
http://2010.russianinternetweek.ru/bitrix/rk.php?goto=https://top3spo.com/
https://xat.com/web_gear/chat/linkvalidator.php?link=https://top3spo.com/
https://www.yeaah.com/disco/DiscoGo.asp?ID=3435&Site=https://top3spo.com/
https://www.woodlist.us/delete-company?nid=13964&element=https://top3spo.com/
https://www.viecngay.vn/go?to=https://top3spo.com/
https://www.vicsport.com.au/analytics/outbound?url=https://top3spo.com/
https://www.uts.edu.co/portal/externo.php?id=https://top3spo.com/
https://www.usjournal.com/go.php?campusID=190&url=https://top3spo.com/
https://www.talgov.com/Main/exit.aspx?url=https://top3spo.com/
https://www.spyro-realms.com/go?https://top3spo.com/
https://www.snek.ai/redirect?url=https://top3spo.com/
https://www.skoberne.si/knjiga/go.php?url=https://top3spo.com/
https://www.serie-a.ru/bitrix/redirect.php?goto=https://top3spo.com/
https://www.russianrobotics.ru/bitrix/rk.php?goto=https://top3spo.com/
https://www.ruchnoi.ru/ext_link?url=https://top3spo.com/
https://www.rprofi.ru/bitrix/rk.php?goto=https://top3spo.com/
https://www.roccotube.com/cgi-bin/at3/out.cgi?id=27&tag=toplist&trade=https://top3spo.com/
https://www.oebb.at/nightjet_newsletter/tc/xxxx?url=https://top3spo.com/
https://www.nyl0ns.com/cgi-bin/a2/out.cgi?id=43&l=btop&u=https://top3spo.com/
https://www.moonbbs.com/dm/dmlink.php?dmurl=https://top3spo.com/
https://www.moneydj.com/ads/adredir.aspx?bannerid=39863&url=https://top3spo.com/
https://www.meetme.com/apps/redirect/?url=https://top3spo.com/
https://www.lionscup.dk/?side_unique=4fb6493f-b9cf-11e0-8802-a9051d81306c&s_id=30&s_d_id=64&go=https://top3spo.com/
https://www.kath-kirche-kaernten.at/pfarren/pfarre/C3014?URL=https://top3spo.com/
https://www.interpals.net/url_redirect.php?href=https://top3spo.com/
https://www.interecm.com/interecm/tracker?op=click&id=5204.db2&url=https://top3spo.com/
https://www.info-realty.ru/bitrix/rk.php?goto=https://top3spo.com/
https://www.ibm.com/links/?cc=us&lc=en&prompt=1&url=https://top3spo.com/
https://www.hradycz.cz/redir.php?b=445&t=https://top3spo.com/
https://www.hottystop.com/cgi-bin/at3/out.cgi?id=12&trade=https://top3spo.com/
https://www.hobowars.com/game/linker.php?url=https://top3spo.com/
https://www.hentainiches.com/index.php?id=derris&tour=https://top3spo.com/
https://www.hachimantaishi.com/click3/click3.cgi?cnt=c5&url=https://top3spo.com/
https://www.gvomail.com/redir.php?k=1560a19819b8f93348a7bc7fc28d0168&url=https://top3spo.com/
https://www.gutscheinaffe.de/wp-content/plugins/AND-AntiBounce/redirector.php?url=https://top3spo.com/
https://www.gudarjavalambre.com/sections/miscelany/link.php?url=https://top3spo.com/
https://www.greencom.ru/catalog/irrigation_systems.html?jump_site=2008&url=https://top3spo.com/
https://www.girlznation.com/cgi-bin/atc/out.cgi?id=50&l=side&u=https://top3spo.com/
https://www.gaelchultur.com/changelang.aspx?url=https://top3spo.com/
https://www.funeralunion.org/delete-company?nid=39&element=https://top3spo.com/
https://www.fudbal91.com/tz.php?zone=America/Iqaluit&r=https://top3spo.com/
https://www.frodida.org/BannerClick.php?BannerID=29&LocationURL=https://top3spo.com/
https://www.freemusic123.com/karaoke/cgi-bin/out.cgi?id=castillo&url=https://top3spo.com/
https://chunk9.top/url?q=https://top3spo.com/
https://kryvbas.at.ua/go?https://top3spo.com/
https://google.cat/url?q=https://top3spo.com/
https://joomluck.com/go/?https://top3spo.com/
https://www.leefleming.com/?URL=top3spo.com/
https://www.anonymz.com/?https://top3spo.com/
https://weburg.net/redirect?url=top3spo.com/
https://tw6.jp/jump/?url=https://top3spo.com/
https://www.spainexpat.com/?URL=top3spo.com/
https://www.fotka.pl/link.php?u=top3spo.com/
https://www.lolinez.com/?https://top3spo.com/
https://ape.st/share?url=https://top3spo.com/
https://nanos.jp/jmp?url=https://top3spo.com/
https://www.fca.gov/?URL=https://top3spo.com/
https://savvylion.com/?bmDomain=top3spo.com/
https://www.soyyooestacaido.com/top3spo.com/
https://www.gta.ru/redirect/www.top3spo.com/
https://mintax.kz/go.php?https://top3spo.com/
https://directx10.org/go?https://top3spo.com/
https://mejeriet.dk/link.php?id=top3spo.com/
https://ezdihan.do.am/go?https://top3spo.com/
https://fishki.net/click?https://top3spo.com/
https://hiddenrefer.com/?https://top3spo.com/
https://kernmetal.ru/?go=https://top3spo.com/
https://romhacking.ru/go?https://top3spo.com/
https://turion.my1.ru/go?https://top3spo.com/
https://kassirs.ru/sweb.asp?url=top3spo.com/
https://www.allods.net/redirect/top3spo.com/
https://icook.ucoz.ru/go?https://top3spo.com/
https://megalodon.jp/?url=https://top3spo.com/
https://www.pasco.k12.fl.us/?URL=top3spo.com/
https://anybeats.jp/jump/?https://top3spo.com/
https://anolink.com/?link=https://top3spo.com/
https://www.questsociety.ca/?URL=top3spo.com/
https://www.disl.edu/?URL=https://top3spo.com/
https://holidaykitchens.com/?URL=top3spo.com/
https://www.mbcarolinas.org/?URL=top3spo.com/
https://ovatu.com/e/c?url=https://top3spo.com/
https://www.anibox.org/go?https://top3spo.com/
https://google.info/url?q=https://top3spo.com/
https://atlantis-tv.ru/go?https://top3spo.com/
https://otziv.ucoz.com/go?https://top3spo.com/
https://www.sgvavia.ru/go?https://top3spo.com/
https://element.lv/go?url=https://top3spo.com/
https://karanova.ru/?goto=https://top3spo.com/
https://789.ru/go.php?url=https://top3spo.com/
https://krasnoeselo.su/go?https://top3spo.com/
https://game-era.do.am/go?https://top3spo.com/
https://kudago.com/go/?to=https://top3spo.com/
https://after.ucoz.net/go?https://top3spo.com/
https://kinteatr.at.ua/go?https://top3spo.com/
https://nervetumours.org.uk/?URL=top3spo.com/
https://kopyten.clan.su/go?https://top3spo.com/
https://lrnews.ru/xgo.php?url=www.top3spo.com/
https://www.taker.im/go/?u=https://top3spo.com/
https://usehelp.clan.su/go?https://top3spo.com/
https://www.wow-game.ru/go?https://top3spo.com/
https://sepoa.fr/wp/go.php?https://top3spo.com/
https://world-source.ru/go?https://top3spo.com/
https://mail2.mclink.it/SRedirect/top3spo.com/
https://www.swleague.ru/go?https://top3spo.com/
https://nazgull.ucoz.ru/go?https://top3spo.com/
https://www.rosbooks.ru/go?https://top3spo.com/
https://infosort.ru/go?url=https://top3spo.com/
https://pavon.kz/proxy?url=https://top3spo.com/
https://beskuda.ucoz.ru/go?https://top3spo.com/
https://ma.by/away.php?url=https://top3spo.com/
https://cloud.squirrly.co/go34692/top3spo.com/
https://richmonkey.biz/go/?https://top3spo.com/
https://vlpacific.ru/?goto=https://top3spo.com/
https://google.co.ck/url?q=https://top3spo.com/
https://google.co.uz/url?q=https://top3spo.com/
https://google.co.ls/url?q=https://top3spo.com/
https://google.co.zm/url?q=https://top3spo.com/
https://google.co.ve/url?q=https://top3spo.com/
https://google.co.zw/url?q=https://top3spo.com/
https://google.co.uk/url?q=https://top3spo.com/
https://google.co.ao/url?q=https://top3spo.com/
https://google.co.cr/url?q=https://top3spo.com/
https://google.co.nz/url?q=https://top3spo.com/
https://google.co.th/url?q=https://top3spo.com/
https://google.co.ug/url?q=https://top3spo.com/
https://google.co.ma/url?q=https://top3spo.com/
https://google.co.za/url?q=https://top3spo.com/
https://google.co.kr/url?q=https://top3spo.com/
https://google.co.mz/url?q=https://top3spo.com/
https://google.co.vi/url?q=https://top3spo.com/
https://google.co.ke/url?q=https://top3spo.com/
https://google.co.hu/url?q=https://top3spo.com/
https://google.co.tz/url?q=https://top3spo.com/
https://gadgets.gearlive.com/?URL=top3spo.com/
https://google.co.jp/url?q=https://top3spo.com/
https://eric.ed.gov/?redir=https://top3spo.com/
https://www.usich.gov/?URL=https://top3spo.com/
https://sec.pn.to/jump.php?https://top3spo.com/
https://www.earth-policy.org/?URL=top3spo.com/
https://www.silverdart.co.uk/?URL=top3spo.com/
https://www.onesky.ca/?URL=https://top3spo.com/
https://pr-cy.ru/jump/?url=https://top3spo.com/
https://google.co.bw/url?q=https://top3spo.com/
https://google.co.id/url?q=https://top3spo.com/
https://google.co.in/url?q=https://top3spo.com/
https://google.co.il/url?q=https://top3spo.com/
https://pikmlm.ru/out.php?p=https://top3spo.com/
https://masculist.ru/go/url=https://top3spo.com/
https://regnopol.clan.su/go?https://top3spo.com/
https://tannarh.narod.ru/go?https://top3spo.com/
https://mss.in.ua/go.php?to=https://top3spo.com/
https://owohho.com/away?url=https://top3spo.com/
https://bel-kot.com/away?to=https://top3spo.com/
https://www.youa.eu/r.php?u=https://top3spo.com/
https://cool4you.ucoz.ru/go?https://top3spo.com/
https://gu-pdnp.narod.ru/go?https://top3spo.com/
https://rg4u.clan.su/go?https://top3spo.com/
https://dawnofwar.org.ru/go?https://top3spo.com/
https://tobiz.ru/on.php?url=https://top3spo.com/
https://www.de-online.ru/go?https://top3spo.com/
https://bglegal.ru/away/?to=https://top3spo.com/
https://www.allpn.ru/redirect/?url=top3spo.com/
https://nter.net.ua/go/?url=https://top3spo.com/
https://click.start.me/?url=https://top3spo.com/
https://prizraks.clan.su/go?https://top3spo.com/
https://flyd.ru/away.php?to=https://top3spo.com/
https://risunok.ucoz.com/go?https://top3spo.com/
https://www.google.ca/url?q=https://top3spo.com/
https://716.kz/redirect?url=https://top3spo.com/
https://www.google.rs/url?q=https://top3spo.com/
https://www.google.fr/url?q=https://top3spo.com/
https://www.google.pt/url?q=https://top3spo.com/
https://www.google.hu/url?q=https://top3spo.com/
https://cse.google.mk/url?q=https://top3spo.com/
https://www.google.si/url?q=https://top3spo.com/
https://cse.google.ki/url?q=https://top3spo.com/
https://www.google.sn/url?q=https://top3spo.com/
https://www.google.cf/url?q=https://top3spo.com/
https://www.google.ki/url?q=https://top3spo.com/
https://cse.google.sr/url?q=https://top3spo.com/
https://www.google.so/url?q=https://top3spo.com/
https://www.google.mn/url?q=https://top3spo.com/
https://www.google.fi/url?q=https://top3spo.com/
https://www.google.tt/url?q=https://top3spo.com/
https://www.google.cl/url?q=https://top3spo.com/
https://www.google.ci/url?q=https://top3spo.com/
https://www.google.hn/url?q=https://top3spo.com/
https://www.google.sc/url?q=https://top3spo.com/
https://www.google.al/url?q=https://top3spo.com/
https://www.google.nr/url?q=https://top3spo.com/
https://www.google.tn/url?q=https://top3spo.com/
https://www.google.iq/url?q=https://top3spo.com/
https://www.semanticjuice.com/site/top3spo.com/
https://www.google.sr/url?q=https://top3spo.com/
https://www.google.bi/url?q=https://top3spo.com/
https://cse.google.kz/url?q=https://top3spo.com/
https://www.google.tk/url?q=https://top3spo.com/
https://www.google.gy/url?q=https://top3spo.com/
https://www.google.ch/url?q=https://top3spo.com/
https://www.google.hr/url?q=https://top3spo.com/
https://www.google.bj/url?q=https://top3spo.com/
https://www.google.mv/url?q=https://top3spo.com/
https://www.google.ga/url?q=https://top3spo.com/
https://s79457.gridserver.com/?URL=top3spo.com/
https://cdl.su/redirect?url=https://top3spo.com/
https://www.fondbtvrtkovic.hr/?URL=top3spo.com/
https://lostnationarchery.com/?URL=top3spo.com/
https://www.google.sh/url?q=https://top3spo.com/
https://www.booktrix.com/live/?URL=top3spo.com/
https://www.google.ro/url?q=https://top3spo.com/
https://www.google.gr/url?q=https://top3spo.com/
https://www.google.tm/url?q=https://top3spo.com/
https://www.marcellusmatters.psu.edu/?URL=https://top3spo.com/
https://cse.google.vu/url?sa=i&url=https://top3spo.com/
https://cse.google.vg/url?sa=i&url=https://top3spo.com/
https://cse.google.tn/url?sa=i&url=https://top3spo.com/
https://cse.google.tl/url?sa=i&url=https://top3spo.com/
https://cse.google.tg/url?sa=i&url=https://top3spo.com/
https://cse.google.td/url?sa=i&url=https://top3spo.com/
https://cse.google.so/url?sa=i&url=https://top3spo.com/
https://cse.google.sn/url?sa=i&url=https://top3spo.com/
https://cse.google.se/url?sa=i&url=https://top3spo.com/
https://cse.google.ne/url?sa=i&url=https://top3spo.com/
https://cse.google.mu/url?sa=i&url=https://top3spo.com/
https://cse.google.ml/url?sa=i&url=https://top3spo.com/
https://cse.google.kz/url?sa=i&url=https://top3spo.com/
https://cse.google.hn/url?sa=i&url=https://top3spo.com/
https://cse.google.gy/url?sa=i&url=https://top3spo.com/
https://cse.google.gp/url?sa=i&url=https://top3spo.com/
https://cse.google.gl/url?sa=i&url=https://top3spo.com/
https://cse.google.ge/url?sa=i&url=https://top3spo.com/
https://cse.google.dj/url?sa=i&url=https://top3spo.com/
https://cse.google.cv/url?sa=i&url=https://top3spo.com/
https://cse.google.com/url?sa=i&url=https://top3spo.com/
https://cse.google.com/url?q=https://top3spo.com/
https://cse.google.com.vc/url?sa=i&url=https://top3spo.com/
https://cse.google.com.tj/url?sa=i&url=https://top3spo.com/
https://cse.google.com.sl/url?sa=i&url=https://top3spo.com/
https://cse.google.com.sb/url?sa=i&url=https://top3spo.com/
https://cse.google.com.py/url?sa=i&url=https://top3spo.com/
https://cse.google.com.ph/url?sa=i&url=https://top3spo.com/
https://cse.google.com.pg/url?sa=i&url=https://top3spo.com/
https://cse.google.com.np/url?sa=i&url=https://top3spo.com/
https://cse.google.com.nf/url?sa=i&url=https://top3spo.com/
https://cse.google.com.mt/url?sa=i&url=https://top3spo.com/
https://cse.google.com.ly/url?sa=i&url=https://top3spo.com/
https://cse.google.com.lb/url?sa=i&url=https://top3spo.com/
https://cse.google.com.kw/url?sa=i&url=https://top3spo.com/
https://cse.google.com.kh/url?sa=i&url=https://top3spo.com/
https://cse.google.com.jm/url?sa=i&url=https://top3spo.com/
https://cse.google.com.gi/url?sa=i&url=https://top3spo.com/
https://cse.google.com.gh/url?sa=i&url=https://top3spo.com/
https://cse.google.com.fj/url?sa=i&url=https://top3spo.com/
https://cse.google.com.et/url?sa=i&url=https://top3spo.com/
https://cse.google.com.do/url?sa=i&url=https://top3spo.com/
https://cse.google.com.cy/url?sa=i&url=https://top3spo.com/
https://cse.google.com.bz/url?sa=i&url=https://top3spo.com/
https://cse.google.com.bo/url?sa=i&url=https://top3spo.com/
https://cse.google.com.bn/url?sa=i&url=https://top3spo.com/
https://cse.google.com.ai/url?sa=i&url=https://top3spo.com/
https://cse.google.com.ag/url?sa=i&url=https://top3spo.com/
https://cse.google.com.af/url?sa=i&url=https://top3spo.com/
https://cse.google.co.zw/url?sa=i&url=https://top3spo.com/
https://cse.google.co.zm/url?sa=i&url=https://top3spo.com/
https://cse.google.co.vi/url?sa=i&url=https://top3spo.com/
https://cse.google.co.uz/url?sa=i&url=https://top3spo.com/
https://cse.google.co.tz/url?sa=i&url=https://top3spo.com/
https://cse.google.co.mz/url?sa=i&url=https://top3spo.com/
https://cse.google.co.ma/url?sa=i&url=https://top3spo.com/
https://cse.google.co.ls/url?sa=i&url=https://top3spo.com/
https://cse.google.co.ke/url?sa=i&url=https://top3spo.com/
https://cse.google.co.ck/url?sa=i&url=https://top3spo.com/
https://cse.google.co.bw/url?sa=i&url=https://top3spo.com/
https://cse.google.cm/url?sa=i&url=https://top3spo.com/
https://cse.google.ci/url?sa=i&url=https://top3spo.com/
https://cse.google.cg/url?sa=i&url=https://top3spo.com/
https://cse.google.cf/url?sa=i&url=https://top3spo.com/
https://cse.google.cd/url?sa=i&url=https://top3spo.com/
https://cse.google.cat/url?sa=i&url=https://top3spo.com/
https://cse.google.bt/url?sa=i&url=https://top3spo.com/
https://cse.google.bj/url?sa=i&url=https://top3spo.com/
https://cse.google.bf/url?sa=i&url=https://top3spo.com/
https://cse.google.am/url?sa=i&url=https://top3spo.com/
https://cse.google.al/url?sa=i&url=https://top3spo.com/
https://cse.google.ad/url?sa=i&url=https://top3spo.com/
https://cse.google.ac/url?sa=i&url=https://top3spo.com/
https://maps.google.ws/url?q=https://top3spo.com/
https://maps.google.vu/url?q=https://top3spo.com/
https://maps.google.vg/url?q=https://top3spo.com/
https://maps.google.tt/url?q=https://top3spo.com/
https://maps.google.to/url?q=https://top3spo.com/
https://maps.google.tn/url?q=https://top3spo.com/
https://maps.google.tl/url?q=https://top3spo.com/
https://maps.google.tk/url?q=https://top3spo.com/
https://maps.google.tg/url?q=https://top3spo.com/
https://maps.google.td/url?q=https://top3spo.com/
https://maps.google.st/url?q=https://top3spo.com/
https://maps.google.so/url?q=https://top3spo.com/
https://maps.google.sn/url?q=https://top3spo.com/
https://maps.google.sm/url?q=https://top3spo.com/
https://maps.google.si/url?sa=t&url=https://top3spo.com/
https://maps.google.sh/url?q=https://top3spo.com/
https://maps.google.se/url?q=https://top3spo.com/
https://maps.google.sc/url?q=https://top3spo.com/
https://maps.google.rw/url?q=https://top3spo.com/
https://maps.google.ru/url?sa=t&url=https://top3spo.com/
https://maps.google.ru/url?q=https://top3spo.com/
https://maps.google.rs/url?q=https://top3spo.com/
https://maps.google.ro/url?q=https://top3spo.com/
https://maps.google.pt/url?sa=t&url=https://top3spo.com/
https://maps.google.pt/url?q=https://top3spo.com/
https://maps.google.pn/url?q=https://top3spo.com/
https://maps.google.pl/url?sa=t&url=https://top3spo.com/
https://maps.google.pl/url?q=https://top3spo.com/
https://maps.google.nu/url?q=https://top3spo.com/
https://maps.google.nr/url?q=https://top3spo.com/
https://maps.google.no/url?q=https://top3spo.com/
https://maps.google.nl/url?sa=t&url=https://top3spo.com/
https://maps.google.nl/url?q=https://top3spo.com/
https://maps.google.ne/url?q=https://top3spo.com/
https://maps.google.mw/url?q=https://top3spo.com/
https://maps.google.mv/url?q=https://top3spo.com/
https://maps.google.mu/url?q=https://top3spo.com/
https://maps.google.ms/url?q=https://top3spo.com/
https://maps.google.mn/url?sa=t&url=https://top3spo.com/
https://maps.google.mn/url?q=https://top3spo.com/
https://maps.google.ml/url?q=https://top3spo.com/
https://maps.google.mk/url?q=https://top3spo.com/
https://maps.google.mg/url?q=https://top3spo.com/
https://maps.google.lv/url?sa=t&url=https://top3spo.com/
https://maps.google.lv/url?q=https://top3spo.com/
https://maps.google.lt/url?sa=t&url=https://top3spo.com/
https://maps.google.lt/url?q=https://top3spo.com/
https://maps.google.lk/url?q=https://top3spo.com/
https://maps.google.li/url?q=https://top3spo.com/
https://maps.google.la/url?q=https://top3spo.com/
https://maps.google.kz/url?q=https://top3spo.com/
https://maps.google.ki/url?q=https://top3spo.com/
https://maps.google.kg/url?q=https://top3spo.com/
https://maps.google.jo/url?q=https://top3spo.com/
https://maps.google.je/url?q=https://top3spo.com/
https://maps.google.it/url?q=https://top3spo.com/
https://maps.google.is/url?q=https://top3spo.com/
https://maps.google.iq/url?q=https://top3spo.com/
https://maps.google.im/url?q=https://top3spo.com/
https://maps.google.ie/url?sa=t&url=https://top3spo.com/
https://maps.google.hu/url?q=https://top3spo.com/
https://maps.google.ht/url?q=https://top3spo.com/
https://maps.google.hn/url?q=https://top3spo.com/
https://maps.google.gy/url?q=https://top3spo.com/
https://maps.google.gm/url?q=https://top3spo.com/
https://maps.google.gl/url?q=https://top3spo.com/
https://maps.google.gg/url?q=https://top3spo.com/
https://maps.google.ge/url?sa=t&url=https://top3spo.com/
https://maps.google.ge/url?q=https://top3spo.com/
https://maps.google.ga/url?q=https://top3spo.com/
https://maps.google.fr/url?sa=t&url=https://top3spo.com/
https://maps.google.fr/url?q=https://top3spo.com/
https://maps.google.fm/url?q=https://top3spo.com/
https://maps.google.fi/url?q=https://top3spo.com/
https://maps.google.es/url?sa=t&url=https://top3spo.com/
https://maps.google.es/url?q=https://top3spo.com/
https://maps.google.ee/url?q=https://top3spo.com/
https://maps.google.dz/url?q=https://top3spo.com/
https://maps.google.dm/url?q=https://top3spo.com/
https://maps.google.dk/url?sa=t&url=https://top3spo.com/
https://maps.google.dk/url?q=https://top3spo.com/
https://maps.google.dj/url?q=https://top3spo.com/
https://maps.google.de/url?sa=t&url=https://top3spo.com/
https://maps.google.de/url?q=https://top3spo.com/
https://maps.google.cz/url?sa=t&url=https://top3spo.com/
https://maps.google.cz/url?q=https://top3spo.com/
https://maps.google.cv/url?q=https://top3spo.com/
https://maps.google.com/url?sa=t&url=https://top3spo.com/
https://maps.google.com/url?q=https://top3spo.com/
https://maps.google.com.vc/url?q=https://top3spo.com/
https://maps.google.com.uy/url?q=https://top3spo.com/
https://maps.google.com.ua/url?q=https://top3spo.com/
https://maps.google.com.tw/url?sa=t&url=https://top3spo.com/
https://maps.google.com.tw/url?q=https://top3spo.com/
https://maps.google.com.tr/url?q=https://top3spo.com/
https://maps.google.com.sv/url?q=https://top3spo.com/
https://maps.google.com.sl/url?q=https://top3spo.com/
https://maps.google.com.sg/url?q=https://top3spo.com/
https://maps.google.com.sb/url?q=https://top3spo.com/
https://maps.google.com.sa/url?q=https://top3spo.com/
https://maps.google.com.qa/url?q=https://top3spo.com/
https://maps.google.com.py/url?q=https://top3spo.com/
https://maps.google.com.ph/url?q=https://top3spo.com/
https://maps.google.com.pg/url?q=https://top3spo.com/
https://maps.google.com.pa/url?sa=t&url=https://top3spo.com/
https://maps.google.com.pa/url?q=https://top3spo.com/
https://maps.google.com.om/url?sa=t&url=https://top3spo.com/
https://maps.google.com.om/url?q=https://top3spo.com/
https://maps.google.com.ni/url?sa=t&url=https://top3spo.com/
https://maps.google.com.ni/url?q=https://top3spo.com/
https://maps.google.com.na/url?q=https://top3spo.com/
https://maps.google.com.mx/url?q=https://top3spo.com/
https://maps.google.com.mt/url?sa=t&url=https://top3spo.com/
https://maps.google.com.mm/url?q=https://top3spo.com/
https://maps.google.com.ly/url?q=https://top3spo.com/
https://maps.google.com.lb/url?q=https://top3spo.com/
https://maps.google.com.kw/url?q=https://top3spo.com/
https://maps.google.com.kh/url?q=https://top3spo.com/
https://maps.google.com.jm/url?q=https://top3spo.com/
https://maps.google.com.hk/url?q=https://top3spo.com/
https://maps.google.com.gt/url?q=https://top3spo.com/
https://maps.google.com.gi/url?q=https://top3spo.com/
https://maps.google.com.gh/url?q=https://top3spo.com/
https://maps.google.com.fj/url?q=https://top3spo.com/
https://maps.google.com.et/url?q=https://top3spo.com/
https://maps.google.com.do/url?q=https://top3spo.com/
https://maps.google.com.cu/url?q=https://top3spo.com/
https://maps.google.com.bz/url?sa=t&url=https://top3spo.com/
https://maps.google.com.bz/url?q=https://top3spo.com/
https://maps.google.com.br/url?sa=t&url=https://top3spo.com/
https://maps.google.com.br/url?q=https://top3spo.com/
https://maps.google.com.bo/url?sa=t&url=https://top3spo.com/
https://maps.google.com.bo/url?q=https://top3spo.com/
https://maps.google.com.bn/url?q=https://top3spo.com/
https://maps.google.com.bh/url?sa=t&url=https://top3spo.com/
https://maps.google.com.au/url?sa=t&url=https://top3spo.com/
https://maps.google.com.au/url?q=https://top3spo.com/
https://maps.google.com.ar/url?q=https://top3spo.com/
https://maps.google.com.ai/url?q=https://top3spo.com/
https://maps.google.com.ag/url?q=https://top3spo.com/
https://maps.google.co.zw/url?q=https://top3spo.com/
https://maps.google.co.zm/url?q=https://top3spo.com/
https://maps.google.co.za/url?sa=t&url=https://top3spo.com/
https://maps.google.co.za/url?q=https://top3spo.com/
https://maps.google.co.vi/url?q=https://top3spo.com/
https://maps.google.co.uk/url?q=https://top3spo.com/
https://maps.google.co.ug/url?q=https://top3spo.com/
https://maps.google.co.tz/url?q=https://top3spo.com/
https://maps.google.co.th/url?sa=t&url=https://top3spo.com/
https://maps.google.co.th/url?q=https://top3spo.com/
https://maps.google.co.nz/url?sa=t&url=https://top3spo.com/
https://maps.google.co.nz/url?q=https://top3spo.com/
https://maps.google.co.mz/url?q=https://top3spo.com/
https://maps.google.co.ls/url?q=https://top3spo.com/
https://maps.google.co.kr/url?q=https://top3spo.com/
https://maps.google.co.ke/url?q=https://top3spo.com/
https://maps.google.co.jp/url?sa=t&url=https://top3spo.com/
https://maps.google.co.jp/url?q=https://top3spo.com/
https://maps.google.co.in/url?sa=t&url=https://top3spo.com/
https://maps.google.co.in/url?q=https://top3spo.com/
https://maps.google.co.il/url?sa=t&url=https://top3spo.com/
https://maps.google.co.il/url?q=https://top3spo.com/
https://maps.google.co.id/url?sa=t&url=https://top3spo.com/
https://maps.google.co.id/url?q=https://top3spo.com/
https://maps.google.co.cr/url?sa=t&url=https://top3spo.com/
https://maps.google.co.ck/url?q=https://top3spo.com/
https://maps.google.co.bw/url?q=https://top3spo.com/
https://maps.google.co.ao/url?q=https://top3spo.com/
https://maps.google.cm/url?q=https://top3spo.com/
https://maps.google.cl/url?sa=t&url=https://top3spo.com/
https://maps.google.ci/url?q=https://top3spo.com/
https://maps.google.ch/url?q=https://top3spo.com/
https://maps.google.cg/url?q=https://top3spo.com/
https://maps.google.cf/url?q=https://top3spo.com/
https://maps.google.cd/url?sa=t&url=https://top3spo.com/
https://maps.google.cd/url?q=https://top3spo.com/
https://maps.google.cat/url?q=https://top3spo.com/
https://maps.google.ca/url?q=https://top3spo.com/
https://maps.google.bt/url?q=https://top3spo.com/
https://maps.google.bs/url?q=https://top3spo.com/
https://maps.google.bj/url?q=https://top3spo.com/
https://maps.google.bi/url?sa=t&url=https://top3spo.com/
https://maps.google.bi/url?q=https://top3spo.com/
https://maps.google.bg/url?q=https://top3spo.com/
https://maps.google.bf/url?q=https://top3spo.com/
https://maps.google.be/url?q=https://top3spo.com/
https://maps.google.at/url?sa=t&url=https://top3spo.com/
https://maps.google.at/url?q=https://top3spo.com/
https://maps.google.as/url?q=https://top3spo.com/
https://maps.google.ae/url?q=https://top3spo.com/
https://maps.google.ad/url?q=https://top3spo.com/
https://images.google.ws/url?q=https://top3spo.com/
https://images.google.vu/url?q=https://top3spo.com/
https://images.google.vg/url?q=https://top3spo.com/
https://images.google.tt/url?q=https://top3spo.com/
https://images.google.to/url?q=https://top3spo.com/
https://images.google.tm/url?q=https://top3spo.com/
https://images.google.tl/url?q=https://top3spo.com/
https://images.google.tk/url?q=https://top3spo.com/
https://images.google.tg/url?q=https://top3spo.com/
https://images.google.st/url?q=https://top3spo.com/
https://images.google.sr/url?q=https://top3spo.com/
https://images.google.so/url?q=https://top3spo.com/
https://images.google.sm/url?q=https://top3spo.com/
https://images.google.sk/url?sa=t&url=https://top3spo.com/
https://images.google.si/url?sa=t&url=https://top3spo.com/
https://images.google.sh/url?q=https://top3spo.com/
https://images.google.se/url?q=https://top3spo.com/
https://images.google.sc/url?q=https://top3spo.com/
https://images.google.rw/url?q=https://top3spo.com/
https://images.google.ru/url?q=https://top3spo.com/
https://images.google.ro/url?q=https://top3spo.com/
https://images.google.pt/url?q=https://top3spo.com/
https://images.google.ps/url?sa=t&url=https://top3spo.com/
https://images.google.ps/url?q=https://top3spo.com/
https://images.google.pn/url?q=https://top3spo.com/
https://images.google.pl/url?q=https://top3spo.com/
https://images.google.nu/url?q=https://top3spo.com/
https://images.google.nr/url?q=https://top3spo.com/
https://images.google.no/url?q=https://top3spo.com/
https://images.google.nl/url?q=https://top3spo.com/
https://images.google.ne/url?q=https://top3spo.com/
https://images.google.mw/url?q=https://top3spo.com/
https://images.google.mv/url?q=https://top3spo.com/
https://images.google.ms/url?q=https://top3spo.com/
https://images.google.ml/url?q=https://top3spo.com/
https://images.google.mk/url?q=https://top3spo.com/
https://images.google.mg/url?q=https://top3spo.com/
https://images.google.me/url?q=https://top3spo.com/
https://images.google.md/url?q=https://top3spo.com/
https://images.google.lk/url?sa=t&url=https://top3spo.com/
https://images.google.lk/url?q=https://top3spo.com/
https://images.google.li/url?sa=t&url=https://top3spo.com/
https://images.google.la/url?q=https://top3spo.com/
https://images.google.kz/url?q=https://top3spo.com/
https://images.google.ki/url?q=https://top3spo.com/
https://images.google.kg/url?sa=t&url=https://top3spo.com/
https://images.google.kg/url?q=https://top3spo.com/
https://images.google.jo/url?q=https://top3spo.com/
https://images.google.je/url?q=https://top3spo.com/
https://images.google.it/url?sa=t&url=https://top3spo.com/
https://images.google.it/url?q=https://top3spo.com/
https://images.google.iq/url?q=https://top3spo.com/
https://images.google.im/url?q=https://top3spo.com/
https://images.google.ie/url?sa=t&url=https://top3spo.com/
https://images.google.hu/url?sa=t&url=https://top3spo.com/
https://images.google.hu/url?q=https://top3spo.com/
https://images.google.ht/url?q=https://top3spo.com/
https://images.google.hn/url?q=https://top3spo.com/
https://images.google.gy/url?q=https://top3spo.com/
https://images.google.gr/url?q=https://top3spo.com/
https://images.google.gp/url?q=https://top3spo.com/
https://images.google.gm/url?q=https://top3spo.com/
https://images.google.gl/url?q=https://top3spo.com/
https://images.google.gg/url?q=https://top3spo.com/
https://images.google.ge/url?q=https://top3spo.com/
https://images.google.ga/url?q=https://top3spo.com/
https://images.google.fr/url?q=https://top3spo.com/
https://images.google.fi/url?sa=t&url=https://top3spo.com/
https://images.google.fi/url?q=https://top3spo.com/
https://images.google.es/url?q=https://top3spo.com/
https://images.google.ee/url?sa=t&url=https://top3spo.com/
https://images.google.dz/url?q=https://top3spo.com/
https://images.google.dm/url?q=https://top3spo.com/
https://images.google.dk/url?q=https://top3spo.com/
https://images.google.dj/url?q=https://top3spo.com/
https://images.google.de/url?sa=t&url=https://top3spo.com/
https://images.google.de/url?q=https://top3spo.com/
https://images.google.cz/url?q=https://top3spo.com/
https://images.google.cv/url?q=https://top3spo.com/
https://images.google.com/url?sa=t&url=https://top3spo.com/
https://images.google.com/url?q=https://top3spo.com/
https://images.google.com.vn/url?q=https://top3spo.com/
https://images.google.com.vc/url?q=https://top3spo.com/
https://images.google.com.ua/url?sa=t&url=https://top3spo.com/
https://images.google.com.ua/url?q=https://top3spo.com/
https://images.google.com.tw/url?q=https://top3spo.com/
https://images.google.com.tr/url?q=https://top3spo.com/
https://images.google.com.tj/url?q=https://top3spo.com/
https://images.google.com.sv/url?q=https://top3spo.com/
https://images.google.com.sl/url?q=https://top3spo.com/
https://images.google.com.sg/url?q=https://top3spo.com/
https://images.google.com.sb/url?q=https://top3spo.com/
https://images.google.com.qa/url?sa=t&url=https://top3spo.com/
https://images.google.com.py/url?q=https://top3spo.com/
https://images.google.com.pk/url?sa=t&url=https://top3spo.com/
https://images.google.com.ph/url?q=https://top3spo.com/
https://images.google.com.pe/url?sa=t&url=https://top3spo.com/
https://images.google.com.pa/url?sa=t&url=https://top3spo.com/
https://images.google.com.pa/url?q=https://top3spo.com/
https://images.google.com.om/url?q=https://top3spo.com/
https://images.google.com.np/url?sa=t&url=https://top3spo.com/
https://images.google.com.ni/url?q=https://top3spo.com/
https://images.google.com.ng/url?sa=t&url=https://top3spo.com/
https://images.google.com.na/url?q=https://top3spo.com/
https://images.google.com.my/url?sa=t&url=https://top3spo.com/
https://images.google.com.mx/url?sa=t&url=https://top3spo.com/
https://images.google.com.mx/url?q=https://top3spo.com/
https://images.google.com.mm/url?sa=t&url=https://top3spo.com/
https://images.google.com.mm/url?q=https://top3spo.com/
https://images.google.com.ly/url?sa=t&url=https://top3spo.com/
https://images.google.com.ly/url?q=https://top3spo.com/
https://images.google.com.lb/url?sa=t&url=https://top3spo.com/
https://images.google.com.lb/url?q=https://top3spo.com/
https://images.google.com.kw/url?sa=t&url=https://top3spo.com/
https://images.google.com.kw/url?q=https://top3spo.com/
https://images.google.com.kh/url?sa=t&url=https://top3spo.com/
https://images.google.com.kh/url?q=https://top3spo.com/
https://images.google.com.jm/url?q=https://top3spo.com/
https://images.google.com.hk/url?sa=t&url=https://top3spo.com/
https://images.google.com.hk/url?q=https://top3spo.com/
https://images.google.com.gt/url?sa=t&url=https://top3spo.com/
https://images.google.com.gi/url?q=https://top3spo.com/
https://images.google.com.gh/url?sa=t&url=https://top3spo.com/
https://images.google.com.fj/url?q=https://top3spo.com/
https://images.google.com.et/url?q=https://top3spo.com/
https://images.google.com.eg/url?sa=t&url=https://top3spo.com/
https://images.google.com.eg/url?q=https://top3spo.com/
https://images.google.com.do/url?sa=t&url=https://top3spo.com/
https://images.google.com.cy/url?sa=t&url=https://top3spo.com/
https://images.google.com.cy/url?q=https://top3spo.com/
https://images.google.com.cu/url?q=https://top3spo.com/
https://images.google.com.bz/url?q=https://top3spo.com/
https://images.google.com.br/url?sa=t&url=https://top3spo.com/
https://images.google.com.br/url?q=https://top3spo.com/
https://images.google.com.bo/url?q=https://top3spo.com/
https://images.google.com.bn/url?sa=t&url=https://top3spo.com/
https://images.google.com.bn/url?q=https://top3spo.com/
https://images.google.com.bd/url?sa=t&url=https://top3spo.com/
https://images.google.com.bd/url?q=https://top3spo.com/
https://images.google.com.au/url?q=https://top3spo.com/
https://images.google.com.ar/url?q=https://top3spo.com/
https://images.google.com.ai/url?q=https://top3spo.com/
https://images.google.com.ag/url?sa=t&url=https://top3spo.com/
https://images.google.com.ag/url?q=https://top3spo.com/
https://images.google.com.af/url?q=https://top3spo.com/
https://images.google.co.zw/url?q=https://top3spo.com/
https://images.google.co.zm/url?q=https://top3spo.com/
https://images.google.co.za/url?q=https://top3spo.com/
https://images.google.co.vi/url?q=https://top3spo.com/
https://images.google.co.ve/url?sa=t&url=https://top3spo.com/
https://images.google.co.ve/url?q=https://top3spo.com/
https://images.google.co.uz/url?q=https://top3spo.com/
https://images.google.co.uk/url?q=https://top3spo.com/
https://images.google.co.ug/url?q=https://top3spo.com/
https://images.google.co.tz/url?q=https://top3spo.com/
https://images.google.co.th/url?q=https://top3spo.com/
https://images.google.co.nz/url?q=https://top3spo.com/
https://images.google.co.mz/url?q=https://top3spo.com/
https://images.google.co.ma/url?q=https://top3spo.com/
https://images.google.co.ls/url?q=https://top3spo.com/
https://images.google.co.kr/url?q=https://top3spo.com/
https://images.google.co.jp/url?q=https://top3spo.com/
https://images.google.co.in/url?q=https://top3spo.com/
https://images.google.co.id/url?q=https://top3spo.com/
https://images.google.co.cr/url?q=https://top3spo.com/
https://images.google.co.ck/url?q=https://top3spo.com/
https://images.google.co.bw/url?q=https://top3spo.com/
https://images.google.cm/url?q=https://top3spo.com/
https://images.google.ci/url?q=https://top3spo.com/
https://images.google.ch/url?q=https://top3spo.com/
https://images.google.cg/url?q=https://top3spo.com/
https://images.google.cf/url?q=https://top3spo.com/
https://images.google.cd/url?q=https://top3spo.com/
https://images.google.cat/url?sa=t&url=https://top3spo.com/
https://images.google.cat/url?q=https://top3spo.com/
https://images.google.ca/url?q=https://top3spo.com/
https://images.google.by/url?q=https://top3spo.com/
https://images.google.bt/url?q=https://top3spo.com/
https://images.google.bs/url?q=https://top3spo.com/
https://images.google.bj/url?q=https://top3spo.com/
https://images.google.bg/url?sa=t&url=https://top3spo.com/
https://images.google.bf/url?q=https://top3spo.com/
https://images.google.be/url?sa=t&url=https://top3spo.com/
https://images.google.be/url?q=https://top3spo.com/
https://images.google.ba/url?q=https://top3spo.com/
https://images.google.at/url?q=https://top3spo.com/
https://images.google.am/url?q=https://top3spo.com/
https://images.google.al/url?q=https://top3spo.com/
https://images.google.ad/url?q=https://top3spo.com/
https://images.google.ac/url?q=https://top3spo.com/
https://google.ws/url?q=https://top3spo.com/
https://google.vu/url?q=https://top3spo.com/
https://google.vg/url?q=https://top3spo.com/
https://google.tt/url?q=https://top3spo.com/
https://google.to/url?q=https://top3spo.com/
https://google.tm/url?q=https://top3spo.com/
https://google.tl/url?q=https://top3spo.com/
https://google.tk/url?q=https://top3spo.com/
https://google.tg/url?q=https://top3spo.com/
https://google.st/url?q=https://top3spo.com/
https://google.sr/url?q=https://top3spo.com/
https://google.so/url?q=https://top3spo.com/
https://google.sm/url?q=https://top3spo.com/
https://google.sh/url?q=https://top3spo.com/
https://google.sc/url?q=https://top3spo.com/
https://google.rw/url?q=https://top3spo.com/
https://google.ps/url?q=https://top3spo.com/
https://google.pn/url?q=https://top3spo.com/
https://google.nu/url?q=https://top3spo.com/
https://google.nr/url?q=https://top3spo.com/
https://google.ne/url?q=https://top3spo.com/
https://google.mw/url?q=https://top3spo.com/
https://google.mv/url?q=https://top3spo.com/
https://google.ms/url?q=https://top3spo.com/
https://google.ml/url?q=https://top3spo.com/
https://google.mg/url?q=https://top3spo.com/
https://google.md/url?q=https://top3spo.com/
https://google.lk/url?q=https://top3spo.com/
https://google.la/url?q=https://top3spo.com/
https://google.kz/url?q=https://top3spo.com/
https://google.ki/url?q=https://top3spo.com/
https://google.kg/url?q=https://top3spo.com/
https://google.iq/url?q=https://top3spo.com/
https://google.im/url?q=https://top3spo.com/
https://google.ht/url?q=https://top3spo.com/
https://google.hn/url?sa=t&url=https://top3spo.com/
https://google.gm/url?q=https://top3spo.com/
https://google.gl/url?q=https://top3spo.com/
https://google.gg/url?q=https://top3spo.com/
https://google.ge/url?q=https://top3spo.com/
https://google.ga/url?q=https://top3spo.com/
https://google.dz/url?q=https://top3spo.com/
https://google.dm/url?q=https://top3spo.com/
https://google.dj/url?q=https://top3spo.com/
https://google.cv/url?q=https://top3spo.com/
https://google.com.vc/url?q=https://top3spo.com/
https://google.com.tj/url?q=https://top3spo.com/
https://google.com.sv/url?sa=t&url=https://top3spo.com/
https://google.com.sb/url?q=https://top3spo.com/
https://google.com.pa/url?q=https://top3spo.com/
https://google.com.om/url?q=https://top3spo.com/
https://google.com.ni/url?q=https://top3spo.com/
https://google.com.na/url?q=https://top3spo.com/
https://google.com.kw/url?q=https://top3spo.com/
https://google.com.kh/url?q=https://top3spo.com/
https://google.com.jm/url?q=https://top3spo.com/
https://google.com.gi/url?q=https://top3spo.com/
https://google.com.gh/url?q=https://top3spo.com/
https://google.com.fj/url?q=https://top3spo.com/
https://google.com.et/url?q=https://top3spo.com/
https://google.com.do/url?q=https://top3spo.com/
https://google.com.bz/url?q=https://top3spo.com/
https://google.com.ai/url?q=https://top3spo.com/
https://google.com.ag/url?q=https://top3spo.com/
https://google.com.af/url?q=https://top3spo.com/
https://google.co.bw/url?sa=t&url=https://top3spo.com/
https://google.cm/url?q=https://top3spo.com/
https://google.ci/url?sa=t&url=https://top3spo.com/
https://google.cg/url?q=https://top3spo.com/
https://google.cf/url?q=https://top3spo.com/
https://google.cd/url?q=https://top3spo.com/
https://google.bt/url?q=https://top3spo.com/
https://google.bj/url?q=https://top3spo.com/
https://google.bf/url?q=https://top3spo.com/
https://google.am/url?q=https://top3spo.com/
https://google.al/url?q=https://top3spo.com/
https://google.ad/url?q=https://top3spo.com/
https://google.ac/url?q=https://top3spo.com/
https://www.google.ws/url?q=https://top3spo.com/
https://www.google.vg/url?q=https://top3spo.com/
https://www.google.tt/url?sa=t&url=https://top3spo.com/
https://www.google.tl/url?q=https://top3spo.com/
https://www.google.tg/url?q=https://top3spo.com/
https://www.google.st/url?q=https://top3spo.com/
https://www.google.se/url?q=https://top3spo.com/
https://www.google.ru/url?q=https://top3spo.com/
https://www.google.pl/url?q=https://top3spo.com/
https://www.google.nu/url?q=https://top3spo.com/
https://www.google.no/url?q=https://top3spo.com/
https://www.google.nl/url?q=https://top3spo.com/
https://www.google.ms/url?sa=t&url=https://top3spo.com/
https://www.google.lu/url?sa=t&url=https://top3spo.com/
https://www.google.la/url?q=https://top3spo.com/
https://www.google.it/url?sa=t&url=https://top3spo.com/
https://www.google.it/url?q=https://top3spo.com/
https://www.google.is/url?sa=t&url=https://top3spo.com/
https://www.google.hr/url?sa=t&url=https://top3spo.com/
https://www.google.gr/url?sa=t&url=https://top3spo.com/
https://www.google.gl/url?q=https://top3spo.com/
https://www.google.fm/url?sa=t&url=https://top3spo.com/
https://www.google.es/url?q=https://top3spo.com/
https://www.google.dm/url?q=https://top3spo.com/
https://www.google.dk/url?q=https://top3spo.com/
https://www.google.de/url?q=https://top3spo.com/
https://www.google.cz/url?sa=t&url=https://top3spo.com/
https://www.google.cz/url?q=https://top3spo.com/
https://www.google.com/url?sa=t&url=https://top3spo.com/
https://www.google.com/url?q=https://top3spo.com/
https://www.google.com.vn/url?sa=t&url=https://top3spo.com/
https://www.google.com.vn/url?q=https://top3spo.com/
https://www.google.com.uy/url?sa=t&url=https://top3spo.com/
https://www.google.com.ua/url?q=https://top3spo.com/
https://www.google.com.tw/url?q=https://top3spo.com/
https://www.google.com.tr/url?q=https://top3spo.com/
https://www.google.com.sl/url?q=https://top3spo.com/
https://www.google.com.sg/url?q=https://top3spo.com/
https://www.google.com.pr/url?sa=t&url=https://top3spo.com/
https://www.google.com.pk/url?sa=t&url=https://top3spo.com/
https://www.google.com.ph/url?q=https://top3spo.com/
https://www.google.com.pe/url?sa=t&url=https://top3spo.com/
https://www.google.com.om/url?q=https://top3spo.com/
https://www.google.com.ng/url?sa=t&url=https://top3spo.com/
https://www.google.com.my/url?sa=t&url=https://top3spo.com/
https://www.google.com.mx/url?q=https://top3spo.com/
https://www.google.com.kh/url?sa=t&url=https://top3spo.com/
https://www.google.com.hk/url?q=https://top3spo.com/
https://www.google.com.ec/url?sa=t&url=https://top3spo.com/
https://www.google.com.bz/url?sa=t&url=https://top3spo.com/
https://www.google.com.br/url?q=https://top3spo.com/
https://www.google.com.bh/url?sa=t&url=https://top3spo.com/
https://www.google.com.au/url?q=https://top3spo.com/
https://www.google.com.ar/url?q=https://top3spo.com/
https://www.google.co.za/url?q=https://top3spo.com/
https://www.google.co.uk/url?sa=t&url=https://top3spo.com/
https://www.google.co.uk/url?q=https://top3spo.com/
https://www.google.co.th/url?q=https://top3spo.com/
https://www.google.co.nz/url?q=https://top3spo.com/
https://www.google.co.ma/url?sa=t&url=https://top3spo.com/
https://www.google.co.jp/url?q=https://top3spo.com/
https://www.google.co.in/url?q=https://top3spo.com/
https://www.google.co.id/url?q=https://top3spo.com/
https://www.google.co.ck/url?q=https://top3spo.com/
https://www.google.co.bw/url?sa=t&url=https://top3spo.com/
https://www.google.cl/url?sa=t&url=https://top3spo.com/
https://www.google.ch/url?sa=t&url=https://top3spo.com/
https://www.google.cd/url?q=https://top3spo.com/
https://www.google.ca/url?sa=t&url=https://top3spo.com/
https://www.google.by/url?sa=t&url=https://top3spo.com/
https://www.google.bt/url?q=https://top3spo.com/
https://www.google.be/url?q=https://top3spo.com/
https://www.google.at/url?q=https://top3spo.com/
https://www.google.as/url?sa=t&url=https://top3spo.com/
https://www.google.ac/url?q=https://top3spo.com/
http://www.google.sk/url?q=https://top3spo.com/
http://www.google.ro/url?q=https://top3spo.com/
http://www.google.pt/url?q=https://top3spo.com/
http://www.google.no/url?q=https://top3spo.com/
http://www.google.lt/url?q=https://top3spo.com/
http://www.google.kg/url?q=https://top3spo.com/
http://www.google.ie/url?q=https://top3spo.com/
http://www.google.com.vn/url?q=https://top3spo.com/
http://www.google.com.ua/url?q=https://top3spo.com/
http://www.google.com.tr/url?q=https://top3spo.com/
http://www.google.com.sg/url?q=https://top3spo.com/
http://www.google.com.ph/url?q=https://top3spo.com/
http://www.google.com.ar/url?q=https://top3spo.com/
http://www.google.co.za/url?q=https://top3spo.com/
http://www.google.co.nz/url?q=https://top3spo.com/
http://www.google.co.kr/url?q=https://top3spo.com/
http://www.google.co.il/url?q=https://top3spo.com/
http://www.google.co.id/url?q=https://top3spo.com/
http://www.google.cl/url?q=https://top3spo.com/
http://cse.google.com.ly/url?sa=i&url=https://top3spo.com/
http://cse.google.com.lb/url?sa=i&url=https://top3spo.com/
http://cse.google.com.kw/url?sa=i&url=https://top3spo.com/
http://cse.google.com.kh/url?sa=i&url=https://top3spo.com/
http://cse.google.com.jm/url?sa=i&url=https://top3spo.com/
http://cse.google.com.hk/url?sa=i&url=https://top3spo.com/
http://cse.google.com.gt/url?sa=i&url=https://top3spo.com/
http://cse.google.com.gi/url?sa=i&url=https://top3spo.com/
http://cse.google.com.gh/url?sa=i&url=https://top3spo.com/
http://cse.google.com.fj/url?sa=i&url=https://top3spo.com/
http://cse.google.com.et/url?sa=i&url=https://top3spo.com/
http://cse.google.com.eg/url?sa=i&url=https://top3spo.com/
http://cse.google.com.ec/url?sa=i&url=https://top3spo.com/
http://cse.google.com.do/url?sa=i&url=https://top3spo.com/
http://cse.google.com.cy/url?sa=i&url=https://top3spo.com/
http://cse.google.com.co/url?sa=i&url=https://top3spo.com/
http://cse.google.com.bz/url?sa=i&url=https://top3spo.com/
http://cse.google.com.br/url?sa=i&url=https://top3spo.com/
http://cse.google.com.bo/url?sa=i&url=https://top3spo.com/
http://cse.google.com.bn/url?sa=i&url=https://top3spo.com/
http://cse.google.com.bh/url?sa=i&url=https://top3spo.com/
http://cse.google.com.bd/url?sa=i&url=https://top3spo.com/
http://cse.google.com.au/url?sa=i&url=https://top3spo.com/
http://cse.google.com.ai/url?sa=i&url=https://top3spo.com/
http://cse.google.com.ag/url?sa=i&url=https://top3spo.com/
http://cse.google.com.af/url?sa=i&url=https://top3spo.com/
http://cse.google.co.zw/url?sa=i&url=https://top3spo.com/
http://cse.google.co.zm/url?sa=i&url=https://top3spo.com/
http://cse.google.co.za/url?sa=i&url=https://top3spo.com/
http://cse.google.co.vi/url?sa=i&url=https://top3spo.com/
http://cse.google.co.ve/url?sa=i&url=https://top3spo.com/
http://cse.google.co.uz/url?sa=i&url=https://top3spo.com/
http://cse.google.co.uk/url?sa=i&url=https://top3spo.com/
http://cse.google.co.ug/url?sa=i&url=https://top3spo.com/
http://cse.google.co.tz/url?sa=i&url=https://top3spo.com/
http://cse.google.co.th/url?sa=i&url=https://top3spo.com/
http://cse.google.co.nz/url?sa=i&url=https://top3spo.com/
http://cse.google.co.mz/url?sa=i&url=https://top3spo.com/
http://cse.google.co.ma/url?sa=i&url=https://top3spo.com/
http://cse.google.co.ls/url?sa=i&url=https://top3spo.com/
http://cse.google.co.kr/url?sa=i&url=https://top3spo.com/
http://cse.google.co.ke/url?sa=i&url=https://top3spo.com/
http://cse.google.co.jp/url?sa=i&url=https://top3spo.com/
http://cse.google.co.in/url?sa=i&url=https://top3spo.com/
http://cse.google.co.il/url?sa=i&url=https://top3spo.com/
http://cse.google.co.id/url?sa=i&url=https://top3spo.com/
http://cse.google.co.cr/url?sa=i&url=https://top3spo.com/
http://cse.google.co.ck/url?sa=i&url=https://top3spo.com/
http://cse.google.co.bw/url?sa=i&url=https://top3spo.com/
http://cse.google.co.ao/url?sa=i&url=https://top3spo.com/
http://cse.google.cm/url?sa=i&url=https://top3spo.com/
http://cse.google.cl/url?sa=i&url=https://top3spo.com/
http://cse.google.ci/url?sa=i&url=https://top3spo.com/
http://cse.google.ch/url?sa=i&url=https://top3spo.com/
http://cse.google.cg/url?sa=i&url=https://top3spo.com/
http://cse.google.cf/url?sa=i&url=https://top3spo.com/
http://cse.google.cd/url?sa=i&url=https://top3spo.com/
http://cse.google.cat/url?sa=i&url=https://top3spo.com/
http://cse.google.ca/url?sa=i&url=https://top3spo.com/
http://cse.google.by/url?sa=i&url=https://top3spo.com/
http://cse.google.bt/url?sa=i&url=https://top3spo.com/
http://cse.google.bs/url?sa=i&url=https://top3spo.com/
http://cse.google.bj/url?sa=i&url=https://top3spo.com/
http://cse.google.bi/url?sa=i&url=https://top3spo.com/
http://cse.google.bg/url?sa=i&url=https://top3spo.com/
http://cse.google.bf/url?sa=i&url=https://top3spo.com/
http://cse.google.be/url?sa=i&url=https://top3spo.com/
http://cse.google.ba/url?sa=i&url=https://top3spo.com/
http://cse.google.az/url?sa=i&url=https://top3spo.com/
http://cse.google.at/url?sa=i&url=https://top3spo.com/
http://cse.google.as/url?sa=i&url=https://top3spo.com/
http://cse.google.am/url?sa=i&url=https://top3spo.com/
http://cse.google.al/url?sa=i&url=https://top3spo.com/
http://cse.google.ae/url?sa=i&url=https://top3spo.com/
http://cse.google.ad/url?sa=i&url=https://top3spo.com/
http://cse.google.ac/url?sa=i&url=https://top3spo.com/
https://toolbarqueries.google.iq/url?q=https://top3spo.com/
https://toolbarqueries.google.hu/url?q=https://top3spo.com/
https://toolbarqueries.google.ht/url?q=https://top3spo.com/
https://toolbarqueries.google.hr/url?q=https://top3spo.com/
https://toolbarqueries.google.hn/url?q=https://top3spo.com/
https://toolbarqueries.google.gy/url?q=https://top3spo.com/
https://toolbarqueries.google.gr/url?q=https://top3spo.com/
https://toolbarqueries.google.gp/url?q=https://top3spo.com/
https://toolbarqueries.google.gm/url?q=https://top3spo.com/
https://toolbarqueries.google.gl/url?q=https://top3spo.com/
https://toolbarqueries.google.gg/url?q=https://top3spo.com/
https://toolbarqueries.google.ge/url?q=https://top3spo.com/
https://toolbarqueries.google.ga/url?q=https://top3spo.com/
https://toolbarqueries.google.fr/url?q=https://top3spo.com/
https://toolbarqueries.google.fm/url?q=https://top3spo.com/
https://toolbarqueries.google.fi/url?q=https://top3spo.com/
https://toolbarqueries.google.es/url?q=https://top3spo.com/
https://toolbarqueries.google.ee/url?q=https://top3spo.com/
https://toolbarqueries.google.dz/url?q=https://top3spo.com/
https://toolbarqueries.google.dm/url?q=https://top3spo.com/
https://toolbarqueries.google.dk/url?q=https://top3spo.com/
https://toolbarqueries.google.dj/url?q=https://top3spo.com/
https://toolbarqueries.google.de/url?q=https://top3spo.com/
https://toolbarqueries.google.cz/url?q=https://top3spo.com/
https://toolbarqueries.google.cv/url?q=https://top3spo.com/
https://toolbarqueries.google.com/url?q=https://top3spo.com/
https://toolbarqueries.google.com.kh/url?q=https://top3spo.com/
https://toolbarqueries.google.com.hk/url?q=https://top3spo.com/
https://toolbarqueries.google.com.gt/url?q=https://top3spo.com/
https://toolbarqueries.google.com.gi/url?q=https://top3spo.com/
https://toolbarqueries.google.com.gh/url?q=https://top3spo.com/
https://toolbarqueries.google.com.fj/url?q=https://top3spo.com/
https://toolbarqueries.google.com.et/url?q=https://top3spo.com/
https://toolbarqueries.google.com.eg/url?q=https://top3spo.com/
https://toolbarqueries.google.com.ec/url?q=https://top3spo.com/
https://toolbarqueries.google.com.do/url?q=https://top3spo.com/
https://toolbarqueries.google.com.cy/url?q=https://top3spo.com/
https://toolbarqueries.google.com.cu/url?q=https://top3spo.com/
https://toolbarqueries.google.com.co/url?q=https://top3spo.com/
https://toolbarqueries.google.com.bz/url?q=https://top3spo.com/
https://toolbarqueries.google.com.br/url?q=https://top3spo.com/
https://toolbarqueries.google.com.bo/url?q=https://top3spo.com/
https://toolbarqueries.google.com.bn/url?q=https://top3spo.com/
https://toolbarqueries.google.com.bh/url?q=https://top3spo.com/
https://toolbarqueries.google.com.bd/url?q=https://top3spo.com/
https://toolbarqueries.google.com.au/url?q=https://top3spo.com/
https://toolbarqueries.google.com.ar/url?sa=i&url=https://top3spo.com/
https://toolbarqueries.google.com.ar/url?q=https://top3spo.com/
https://toolbarqueries.google.com.ai/url?q=https://top3spo.com/
https://toolbarqueries.google.com.ag/url?q=https://top3spo.com/
https://toolbarqueries.google.com.af/url?q=https://top3spo.com/
https://toolbarqueries.google.co.il/url?q=https://top3spo.com/
https://toolbarqueries.google.co.id/url?q=https://top3spo.com/
https://toolbarqueries.google.co.ck/url?q=https://top3spo.com/
https://toolbarqueries.google.co.ao/url?q=https://top3spo.com/
https://toolbarqueries.google.cn/url?q=https://top3spo.com/
https://toolbarqueries.google.cm/url?q=https://top3spo.com/
https://toolbarqueries.google.cl/url?q=https://top3spo.com/
https://toolbarqueries.google.ci/url?q=https://top3spo.com/
https://toolbarqueries.google.ch/url?q=https://top3spo.com/
https://toolbarqueries.google.cg/url?q=https://top3spo.com/
https://toolbarqueries.google.cf/url?q=https://top3spo.com/
https://toolbarqueries.google.cd/url?q=https://top3spo.com/
https://toolbarqueries.google.cc/url?q=https://top3spo.com/
https://toolbarqueries.google.cat/url?q=https://top3spo.com/
https://toolbarqueries.google.ca/url?q=https://top3spo.com/
https://toolbarqueries.google.by/url?q=https://top3spo.com/
https://toolbarqueries.google.bt/url?q=https://top3spo.com/
https://toolbarqueries.google.bs/url?q=https://top3spo.com/
https://toolbarqueries.google.bj/url?q=https://top3spo.com/
https://toolbarqueries.google.bi/url?q=https://top3spo.com/
https://toolbarqueries.google.bg/url?q=https://top3spo.com/
https://toolbarqueries.google.bf/url?q=https://top3spo.com/
https://toolbarqueries.google.be/url?q=https://top3spo.com/
https://toolbarqueries.google.ba/url?q=https://top3spo.com/
https://toolbarqueries.google.az/url?q=https://top3spo.com/
https://toolbarqueries.google.at/url?q=https://top3spo.com/
https://toolbarqueries.google.as/url?q=https://top3spo.com/
https://toolbarqueries.google.am/url?q=https://top3spo.com/
https://toolbarqueries.google.al/url?q=https://top3spo.com/
https://toolbarqueries.google.ae/url?q=https://top3spo.com/
https://toolbarqueries.google.ad/url?q=https://top3spo.com/
https://toolbarqueries.google.ac/url?q=https://top3spo.com/
http://maps.google.ws/url?q=https://top3spo.com/
http://maps.google.vu/url?q=https://top3spo.com/
http://maps.google.vg/url?q=https://top3spo.com/
http://maps.google.tt/url?q=https://top3spo.com/
http://maps.google.sn/url?q=https://top3spo.com/
http://maps.google.sm/url?q=https://top3spo.com/
http://maps.google.sk/url?sa=t&url=https://top3spo.com/
http://maps.google.si/url?sa=t&url=https://top3spo.com/
http://maps.google.sh/url?q=https://top3spo.com/
http://maps.google.sc/url?q=https://top3spo.com/
http://maps.google.rw/url?q=https://top3spo.com/
http://maps.google.ru/url?sa=t&url=https://top3spo.com/
http://maps.google.ro/url?sa=t&url=https://top3spo.com/
http://maps.google.pt/url?sa=t&url=https://top3spo.com/
http://maps.google.pn/url?q=https://top3spo.com/
http://maps.google.pl/url?sa=t&url=https://top3spo.com/
http://maps.google.nr/url?q=https://top3spo.com/
http://maps.google.nl/url?sa=t&url=https://top3spo.com/
http://maps.google.mw/url?q=https://top3spo.com/
http://maps.google.mv/url?q=https://top3spo.com/
http://maps.google.ms/url?q=https://top3spo.com/
http://maps.google.mn/url?q=https://top3spo.com/
http://maps.google.ml/url?q=https://top3spo.com/
http://maps.google.mg/url?q=https://top3spo.com/
http://maps.google.lv/url?sa=t&url=https://top3spo.com/
http://maps.google.lt/url?sa=t&url=https://top3spo.com/
http://maps.google.li/url?q=https://top3spo.com/
http://maps.google.la/url?q=https://top3spo.com/
http://maps.google.kg/url?q=https://top3spo.com/
http://maps.google.je/url?q=https://top3spo.com/
http://maps.google.it/url?sa=t&url=https://top3spo.com/
http://maps.google.iq/url?q=https://top3spo.com/
http://maps.google.im/url?q=https://top3spo.com/
http://maps.google.ie/url?sa=t&url=https://top3spo.com/
http://maps.google.ie/url?q=https://top3spo.com/
http://maps.google.hu/url?sa=t&url=https://top3spo.com/
http://maps.google.ht/url?q=https://top3spo.com/
http://maps.google.hr/url?sa=t&url=https://top3spo.com/
http://maps.google.gr/url?sa=t&url=https://top3spo.com/
http://maps.google.gm/url?q=https://top3spo.com/
http://maps.google.gg/url?q=https://top3spo.com/
http://maps.google.fr/url?sa=t&url=https://top3spo.com/
http://maps.google.fm/url?q=https://top3spo.com/
http://maps.google.fi/url?sa=t&url=https://top3spo.com/
http://maps.google.es/url?sa=t&url=https://top3spo.com/
http://maps.google.ee/url?sa=t&url=https://top3spo.com/
http://maps.google.dm/url?q=https://top3spo.com/
http://maps.google.dk/url?sa=t&url=https://top3spo.com/
http://maps.google.dj/url?q=https://top3spo.com/
http://maps.google.cz/url?sa=t&url=https://top3spo.com/
http://maps.google.com/url?sa=t&url=https://top3spo.com/
http://maps.google.com.ua/url?sa=t&url=https://top3spo.com/
http://maps.google.com.tw/url?sa=t&url=https://top3spo.com/
http://maps.google.com.tr/url?sa=t&url=https://top3spo.com/
http://maps.google.com.sg/url?sa=t&url=https://top3spo.com/
http://maps.google.com.sa/url?sa=t&url=https://top3spo.com/
http://maps.google.com.qa/url?q=https://top3spo.com/
http://maps.google.com.om/url?q=https://top3spo.com/
http://maps.google.com.na/url?q=https://top3spo.com/
http://maps.google.com.my/url?sa=t&url=https://top3spo.com/
http://maps.google.com.mx/url?sa=t&url=https://top3spo.com/
http://maps.google.com.mm/url?q=https://top3spo.com/
http://maps.google.com.ly/url?q=https://top3spo.com/
http://maps.google.com.jm/url?q=https://top3spo.com/
http://maps.google.com.hk/url?sa=t&url=https://top3spo.com/
http://maps.google.com.gi/url?q=https://top3spo.com/
http://maps.google.com.fj/url?q=https://top3spo.com/
http://maps.google.com.et/url?q=https://top3spo.com/
http://maps.google.com.eg/url?sa=t&url=https://top3spo.com/
http://maps.google.com.do/url?sa=t&url=https://top3spo.com/
http://maps.google.com.cu/url?q=https://top3spo.com/
http://maps.google.com.co/url?sa=t&url=https://top3spo.com/
http://maps.google.com.bz/url?q=https://top3spo.com/
http://maps.google.com.br/url?sa=t&url=https://top3spo.com/
http://maps.google.com.bn/url?q=https://top3spo.com/
http://maps.google.com.bh/url?q=https://top3spo.com/
http://maps.google.com.au/url?sa=t&url=https://top3spo.com/
http://maps.google.com.ag/url?q=https://top3spo.com/
http://maps.google.co.zw/url?q=https://top3spo.com/
http://maps.google.co.zm/url?q=https://top3spo.com/
http://maps.google.co.za/url?sa=t&url=https://top3spo.com/
http://maps.google.co.vi/url?q=https://top3spo.com/
http://maps.google.co.ve/url?sa=t&url=https://top3spo.com/
http://maps.google.co.uk/url?sa=t&url=https://top3spo.com/
http://maps.google.co.ug/url?q=https://top3spo.com/
http://maps.google.co.tz/url?q=https://top3spo.com/
http://maps.google.co.th/url?sa=t&url=https://top3spo.com/
http://maps.google.co.nz/url?sa=t&url=https://top3spo.com/
http://maps.google.co.mz/url?q=https://top3spo.com/
http://maps.google.co.ls/url?q=https://top3spo.com/
http://maps.google.co.jp/url?sa=t&url=https://top3spo.com/
http://maps.google.co.in/url?sa=t&url=https://top3spo.com/
http://maps.google.co.il/url?sa=t&url=https://top3spo.com/
http://maps.google.co.id/url?sa=t&url=https://top3spo.com/
http://maps.google.co.ck/url?q=https://top3spo.com/
http://maps.google.co.bw/url?q=https://top3spo.com/
http://maps.google.co.ao/url?q=https://top3spo.com/
http://maps.google.cm/url?q=https://top3spo.com/
http://maps.google.cl/url?sa=t&url=https://top3spo.com/
http://maps.google.ci/url?q=https://top3spo.com/
http://maps.google.ch/url?sa=t&url=https://top3spo.com/
http://maps.google.cg/url?q=https://top3spo.com/
http://maps.google.cd/url?q=https://top3spo.com/
http://maps.google.ca/url?sa=t&url=https://top3spo.com/
http://maps.google.bt/url?q=https://top3spo.com/
http://maps.google.bs/url?q=https://top3spo.com/
http://maps.google.bj/url?q=https://top3spo.com/
http://maps.google.bi/url?q=https://top3spo.com/
http://maps.google.bg/url?sa=t&url=https://top3spo.com/
http://maps.google.be/url?sa=t&url=https://top3spo.com/
http://maps.google.ba/url?sa=t&url=https://top3spo.com/
http://maps.google.at/url?sa=t&url=https://top3spo.com/
http://maps.google.as/url?q=https://top3spo.com/
http://maps.google.ae/url?sa=t&url=https://top3spo.com/
http://maps.google.ad/url?q=https://top3spo.com/
http://images.google.ws/url?q=https://top3spo.com/
http://images.google.vu/url?q=https://top3spo.com/
http://images.google.vg/url?q=https://top3spo.com/
http://images.google.tm/url?q=https://top3spo.com/
http://images.google.sr/url?q=https://top3spo.com/
http://images.google.sn/url?q=https://top3spo.com/
http://images.google.sm/url?q=https://top3spo.com/
http://images.google.sk/url?sa=t&url=https://top3spo.com/
http://images.google.si/url?sa=t&url=https://top3spo.com/
http://images.google.sh/url?q=https://top3spo.com/
http://images.google.sc/url?q=https://top3spo.com/
http://images.google.rw/url?q=https://top3spo.com/
http://images.google.ru/url?sa=t&url=https://top3spo.com/
http://images.google.ro/url?sa=t&url=https://top3spo.com/
http://images.google.pt/url?sa=t&url=https://top3spo.com/
http://images.google.ps/url?q=https://top3spo.com/
http://images.google.pn/url?q=https://top3spo.com/
http://images.google.pl/url?sa=t&url=https://top3spo.com/
http://images.google.nr/url?q=https://top3spo.com/
http://images.google.nl/url?sa=t&url=https://top3spo.com/
http://images.google.mw/url?q=https://top3spo.com/
http://images.google.mv/url?q=https://top3spo.com/
http://images.google.ms/url?q=https://top3spo.com/
http://images.google.mn/url?q=https://top3spo.com/
http://images.google.ml/url?q=https://top3spo.com/
http://images.google.mg/url?q=https://top3spo.com/
http://images.google.me/url?q=https://top3spo.com/
http://images.google.md/url?q=https://top3spo.com/
http://images.google.lv/url?sa=t&url=https://top3spo.com/
http://images.google.lk/url?sa=t&url=https://top3spo.com/
http://images.google.li/url?q=https://top3spo.com/
http://images.google.la/url?q=https://top3spo.com/
http://images.google.kg/url?q=https://top3spo.com/
http://images.google.je/url?q=https://top3spo.com/
http://images.google.it/url?sa=t&url=https://top3spo.com/
http://images.google.iq/url?q=https://top3spo.com/
http://images.google.im/url?q=https://top3spo.com/
http://images.google.ie/url?sa=t&url=https://top3spo.com/
http://images.google.ie/url?q=https://top3spo.com/
http://images.google.hu/url?sa=t&url=https://top3spo.com/
http://images.google.ht/url?q=https://top3spo.com/
http://images.google.hr/url?sa=t&url=https://top3spo.com/
http://images.google.gr/url?sa=t&url=https://top3spo.com/
http://images.google.gm/url?q=https://top3spo.com/
http://images.google.gg/url?q=https://top3spo.com/
http://images.google.fr/url?sa=t&url=https://top3spo.com/
http://images.google.fm/url?q=https://top3spo.com/
http://images.google.fi/url?sa=t&url=https://top3spo.com/
http://images.google.es/url?sa=t&url=https://top3spo.com/
http://images.google.ee/url?sa=t&url=https://top3spo.com/
http://images.google.dm/url?q=https://top3spo.com/
http://images.google.dk/url?sa=t&url=https://top3spo.com/
http://images.google.dj/url?q=https://top3spo.com/
http://images.google.de/url?sa=t&url=https://top3spo.com/
http://images.google.cz/url?sa=t&url=https://top3spo.com/
http://images.google.com/url?sa=t&url=https://top3spo.com/
http://images.google.com.vn/url?sa=t&url=https://top3spo.com/
http://images.google.com.uy/url?sa=t&url=https://top3spo.com/
http://images.google.com.ua/url?sa=t&url=https://top3spo.com/
http://images.google.com.tw/url?sa=t&url=https://top3spo.com/
http://images.google.com.tr/url?sa=t&url=https://top3spo.com/
http://images.google.com.tj/url?q=https://top3spo.com/
http://images.google.com.sg/url?sa=t&url=https://top3spo.com/
http://images.google.com.sa/url?sa=t&url=https://top3spo.com/
http://images.google.com.qa/url?q=https://top3spo.com/
http://images.google.com.pk/url?sa=t&url=https://top3spo.com/
http://images.google.com.pe/url?sa=t&url=https://top3spo.com/
http://images.google.com.om/url?q=https://top3spo.com/
http://images.google.com.ng/url?sa=t&url=https://top3spo.com/
http://images.google.com.na/url?q=https://top3spo.com/
http://images.google.com.my/url?sa=t&url=https://top3spo.com/
http://images.google.com.mx/url?sa=t&url=https://top3spo.com/
http://images.google.com.mm/url?q=https://top3spo.com/
http://images.google.com.ly/url?q=https://top3spo.com/
http://images.google.com.jm/url?q=https://top3spo.com/
http://images.google.com.hk/url?sa=t&url=https://top3spo.com/
http://images.google.com.gi/url?q=https://top3spo.com/
http://images.google.com.fj/url?q=https://top3spo.com/
http://images.google.com.et/url?q=https://top3spo.com/
http://images.google.com.eg/url?sa=t&url=https://top3spo.com/
http://images.google.com.ec/url?sa=t&url=https://top3spo.com/
http://images.google.com.do/url?sa=t&url=https://top3spo.com/
http://images.google.com.cy/url?q=https://top3spo.com/
http://images.google.com.cu/url?q=https://top3spo.com/
http://images.google.com.co/url?sa=t&url=https://top3spo.com/
http://images.google.com.bz/url?q=https://top3spo.com/
http://images.google.com.br/url?sa=t&url=https://top3spo.com/
http://images.google.com.bn/url?q=https://top3spo.com/
http://images.google.com.bh/url?q=https://top3spo.com/
http://images.google.com.bd/url?sa=t&url=https://top3spo.com/
http://images.google.com.au/url?sa=t&url=https://top3spo.com/
http://images.google.com.ag/url?q=https://top3spo.com/
http://images.google.com.af/url?q=https://top3spo.com/
http://images.google.co.zw/url?q=https://top3spo.com/
http://images.google.co.zm/url?q=https://top3spo.com/
http://images.google.co.za/url?sa=t&url=https://top3spo.com/
http://images.google.co.vi/url?q=https://top3spo.com/
http://images.google.co.ve/url?sa=t&url=https://top3spo.com/
http://images.google.co.uz/url?q=https://top3spo.com/
http://images.google.co.uk/url?sa=t&url=https://top3spo.com/
http://images.google.co.tz/url?q=https://top3spo.com/
http://images.google.co.th/url?sa=t&url=https://top3spo.com/
http://images.google.co.nz/url?sa=t&url=https://top3spo.com/
http://images.google.co.mz/url?q=https://top3spo.com/
http://images.google.co.ma/url?q=https://top3spo.com/
http://images.google.co.ls/url?q=https://top3spo.com/
http://images.google.co.jp/url?sa=t&url=https://top3spo.com/
http://images.google.co.in/url?sa=t&url=https://top3spo.com/
http://images.google.co.il/url?sa=t&url=https://top3spo.com/
http://images.google.co.id/url?sa=t&url=https://top3spo.com/
http://images.google.co.ck/url?q=https://top3spo.com/
http://images.google.co.bw/url?q=https://top3spo.com/
http://images.google.co.ao/url?q=https://top3spo.com/
http://images.google.cl/url?sa=t&url=https://top3spo.com/
http://images.google.ci/url?q=https://top3spo.com/
http://images.google.ch/url?sa=t&url=https://top3spo.com/
http://images.google.cg/url?q=https://top3spo.com/
http://images.google.cd/url?q=https://top3spo.com/
http://images.google.ca/url?sa=t&url=https://top3spo.com/
http://images.google.bt/url?q=https://top3spo.com/
http://images.google.bs/url?q=https://top3spo.com/
http://images.google.bj/url?q=https://top3spo.com/
http://images.google.bi/url?q=https://top3spo.com/
http://images.google.bg/url?sa=t&url=https://top3spo.com/
http://images.google.be/url?sa=t&url=https://top3spo.com/
http://images.google.az/url?q=https://top3spo.com/
http://images.google.at/url?sa=t&url=https://top3spo.com/
http://images.google.as/url?q=https://top3spo.com/
http://images.google.al/url?q=https://top3spo.com/
http://images.google.ae/url?sa=t&url=https://top3spo.com/
http://images.google.ad/url?q=https://top3spo.com/
https://joinlive77.com/
http://joinlive77.com/
www.joinlive77.com/
https://joinlive77.com/pharaohcasino/
https://joinlive77.com/evolutioncasino/
https://joinlive77.com/쿨카지노/
온라인바카라
에볼루션라이트닝카지노
안전 카지노사이트 추천
안전 온라인카지노 추천
안전 바카라사이트 추천
파라오카지노_https://joinlive77.com/
쿨카지노_http://joinlive77.com/
뉴헤븐카지노_www.joinlive77.com/
솔레어카지노_https://joinlive77.com/pharaohcasino/
샹그릴라카지노_https://joinlive77.com/evolutioncasino/
오렌지카지노_https://joinlive77.com/쿨카지노/
https://yamcode.com/32ux7apm8o
https://notes.io/qfG7T
https://pastebin.com/kWsvLxEJ
http://pastehere.xyz/e8urmbfvi/
http://paste.jp/a73101fc/
https://pastelink.net/avt3dp4x
https://paste.feed-the-beast.com/view/513a4869
https://pasteio.com/xXFmrR2Ljps3
https://p.teknik.io/Xqhxx
https://pastebin.freeswitch.org/view/9d6829f0
http://pastebin.falz.net/2424522
https://justpaste.it/81u3g
https://paste.laravel.io/61d431df-362d-4ae8-a423-51344e0c1f6e
https://paste2.org/AkEB4hyA
https://paste.firnsy.com/paste/yF3oMy8nBDI
https://paste.md-5.net/ireyojekuc.rb
https://paste.myst.rs/vuwmadm2
https://controlc.com/5a9fc697
https://txt.fyi/-/22271/e03a8732/
https://paste.cutelyst.org/x4ABR4D2T
https://bitbin.it/fsjgImgs/
http://pastehere.xyz/goDIobfvp/
https://rentry.co/kxqv6
https://paste.enginehub.org/AGvVXVa3N
https://sharetext.me/qggkimoqtm
http://nopaste.paefchen.net/1921035
https://skibaza.ru/bitrix/rk.php?goto=https://joinlive77.com/
http://www.skladcom.ru/(S(qdiwhk55jkcyok45u4ti0a55))/banners.aspx?url=https://joinlive77.com/
https://smartservices.ru/bitrix/rk.php?goto=https://joinlive77.com/
https://www.flyingsamaritans.net/Startup/SetupSite.asp?RestartPage=https://joinlive77.com/
https://www.ewind.cz/index.php?page=home/redirect&url=https://joinlive77.com/
https://www.eas-racing.se/gbook/go.php?url=https://joinlive77.com/
https://www.direkt-einkauf.de/includes/refer.php?id=170&url=https://joinlive77.com/
https://www.dialogportal.com/Services/Forward.aspx?link=https://joinlive77.com/
https://www.d-e-a.eu/newsletter/redirect.php?link=https://joinlive77.com/
https://www.curseforge.com/linkout?remoteUrl=https://joinlive77.com/
https://www.counterwelt.com/charts/click.php?user=14137&link=https://joinlive77.com/
https://www.cossa.ru/bitrix/redirect.php?event1=click&event2=&event3=&goto=https://joinlive77.com/
https://www.cheerunion.org/tracker/index.html?t=ad&pool_id=2&ad_id=5&url=https://joinlive77.com/
https://www.bing.com/news/apiclick.aspx?ref=FexRss&aid=&tid=9BB77FDA801248A5AD23FDBDD5922800&url=https://joinlive77.com/
https://www.bettnet.com/blog/?URL=https://joinlive77.com/
https://www.bartaz.lt/wp-content/plugins/clikstats/ck.php?Ck_id=438&Ck_lnk=https://joinlive77.com/
https://www.bandb.ru/redirect.php?URL=https://joinlive77.com/
https://www.autopartskart.com/buyfromamzon.php?url=https://joinlive77.com/
https://www.autoandrv.com/linkout.aspx?websiteurl=https://joinlive77.com/
https://www.art-prizes.com/AdRedirector.aspx?ad=MelbPrizeSculpture_2017&target=https://joinlive77.com/
https://www.adminer.org/redirect/?url=https://joinlive77.com/
https://www.actualitesdroitbelge.be/click_newsletter.php?url=https://joinlive77.com/
https://wirelessestimator.com/advertise/newsletter_redirect.php?url=https://joinlive77.com/
https://webfeeds.brookings.edu/~/t/0/0/~joinlive77.com/
https://wasitviewed.com/index.php?href=https://joinlive77.com/
https://vinacorp.vn/go_url.php?w=https://joinlive77.com/
https://uk.kindofbook.com/redirect.php/?red=https://joinlive77.com/
https://tvtropes.org/pmwiki/no_outbounds.php?o=https://joinlive77.com/
https://trello.com/add-card?source=mode=popup&name=click+here&desc=https://joinlive77.com/
https://transtats.bts.gov/exit.asp?url=https://joinlive77.com/
https://track.effiliation.com/servlet/effi.redir?id_compteur=13215059&url=https://joinlive77.com/
https://temptationsaga.com/buy.php?url=https://joinlive77.com/
https://tempechamber.glueup.com/track/redirect?type=campaign&lid=42&tracking_id=[trackingId]&redirect_url=https%3A%2F%2Fwww.joinlive77.com/%2F
https://sutd.ru/links.php?go=https://joinlive77.com/
https://supplier-portal-uat.daimler.com/external-link.jspa?url=https://joinlive77.com/
https://stroim100.ru/redirect?url=https://joinlive77.com/
https://strelmag.ru/bitrix/rk.php?goto=https://joinlive77.com/
https://store-pro.ru/go?https://joinlive77.com/
https://splash.hume.vic.gov.au/analytics/outbound?url=https://joinlive77.com/
https://spb90.ru/bitrix/redirect.php?goto=https://joinlive77.com/
https://spartak.ru/bitrix/redirect.php?goto=https://joinlive77.com/
https://sovaisova.ru/bitrix/redirect.php?event1=2009_mainpage&event2=go_www&event3=&goto=https://joinlive77.com/
https://socport.ru/redirect?url=https://joinlive77.com/
https://slashwrestling.com/cgi-bin/redirect.cgi?https://joinlive77.com/
https://sfwater.org/redirect.aspx?url=https://joinlive77.com/
https://seoandme.ru/bitrix/redirect.php?goto=https://joinlive77.com/
https://s-online.ru/bitrix/redirect.php?goto=https://joinlive77.com/
https://ru.xhamster3.com/exit.php?url=https://joinlive77.com/
https://rssfeeds.wtsp.com/~/t/0/0/wtsp/home/~joinlive77.com/
https://rostovmama.ru/redirect?url=https://joinlive77.com/
https://rev1.reversion.jp/redirect?url=https://joinlive77.com/
https://relationshiphq.com/french.php?u=https://joinlive77.com/
https://ref.gamer.com.tw/redir.php?url=https://joinlive77.com/
https://ramset.com.au/document/url/?url=https://joinlive77.com/
https://www.star174.ru/redir.php?url=https://joinlive77.com/
https://staten.ru/bitrix/rk.php?goto=https://joinlive77.com/
https://stav-geo.ru/go?https://joinlive77.com/
http://stopcran.ru/go?https://joinlive77.com/
http://studioad.ru/go?https://joinlive77.com/
http://swepub.kb.se/setattribute?language=en&redirect=https://joinlive77.com/
https://www.licnioglasi.org/index.php?thememode=full;redirect=https://joinlive77.com/
http://www.rexart.com/cgi-rexart/al/affiliates.cgi?aid=872&redirect=https://joinlive77.com/
http://www2.smartmail.com.ar/tl.php?p=hqf/f94/rs/1fp/4c0/rs//https://joinlive77.com/
http://elsy.at/elearningdownload.php?link=https://joinlive77.com/
http://old.roofnet.org/external.php?link=https://joinlive77.com/
http://www.forum-wodociagi.pl/system/links/3a337d509d017c7ca398d1623dfedf85.html?link=https://joinlive77.com/
http://www.bucatareasa.ro/link.php?url=https://joinlive77.com/
http://maximov-design.ru/link.php?go=https://joinlive77.com/
http://mosprogulka.ru/go?https://joinlive77.com/
https://uniline.co.nz/Document/Url/?url=https://joinlive77.com/
http://count.f-av.net/cgi/out.cgi?cd=fav&id=ranking_306&go=https://joinlive77.com/
https://tracker.onrecruit.net/api/v1/redirect/?redirect_to=https://joinlive77.com/
http://slipknot1.info/go.php?url=https://joinlive77.com/
https://www.donbosco.it/common/mod_30_conta.asp?id=6&link=https://joinlive77.com/
https://www.samovar-forum.ru/go?https://joinlive77.com/
http://san-house.ru/bitrix/rk.php?goto=https://joinlive77.com/
https://sbereg.ru/links.php?go=https://joinlive77.com/
http://staldver.ru/go.php?go=https://joinlive77.com/
http://www.topkam.ru/gtu/?url=https://joinlive77.com/
https://torggrad.ru/bitrix/rk.php?goto=https://joinlive77.com/
http://torgi-rybinsk.ru/bitrix/rk.php?goto=https://joinlive77.com/
http://tpprt.ru/bitrix/rk.php?goto=https://joinlive77.com/
https://www.tral.ru/images/get.php?go=https://joinlive77.com/
https://turbazar.ru/url/index?url=https://joinlive77.com/
http://stanko.tw1.ru/redirect.php?url=https://joinlive77.com/
https://twilightrussia.ru/go?https://joinlive77.com/
https://ulfishing.ru/forum/go.php?https://joinlive77.com/
https://underwood.ru/away.html?url=https://joinlive77.com/
https://unicom.ru/links.php?go=https://joinlive77.com/
http://www.unifin.ru/bitrix/redirect.php?goto=https://joinlive77.com/
https://uogorod.ru/feed/520?redirect=https://joinlive77.com/
https://utmagazine.ru/r?url=https://joinlive77.com/
http://uvbnb.ru/go?https://joinlive77.com/
http://www.evrika41.ru/redirect?url=https://joinlive77.com/
http://expomodel.ru/bitrix/redirect.php?goto=https://joinlive77.com/
https://www.extrimdrive.ru/bitrix/rk.php?goto=https://joinlive77.com/
https://facto.ru/bitrix/rk.php?goto=https://joinlive77.com/
http://fallout3.ru/utils/ref.php?url=https://joinlive77.com/
http://fbsearch.ru/away.php?url=https://joinlive77.com/
https://fc-zenit.ru/bitrix/redirect.php?goto=https://joinlive77.com/
http://forum-region.ru/forum/away.php?s=https://joinlive77.com/
http://forumdate.ru/redirect-to/?redirect=https://joinlive77.com/
https://fr-gtr.ru/go?https://joinlive77.com/
http://shckp.ru/ext_link?url=https://joinlive77.com/
https://sherif-karter.ru/bitrix/redirect.php?goto=https://joinlive77.com/
https://shinglas.ru/bitrix/redirect.php?goto=https://joinlive77.com/
https://www.shtrih-m.ru/bitrix/redirect.php?goto=https://joinlive77.com/
https://sibran.ru/bitrix/redirect.php?goto=https://joinlive77.com/
http://simvol-veri.ru/xp/?goto=https://joinlive77.com/
http://sintez-oka.ru/bitrix/redirect.php?goto=https://joinlive77.com/
https://lk.sistemagorod.ru/lk/away?to=https://joinlive77.com/
https://skamata.ru/bitrix/redirect.php?goto=https://joinlive77.com/
https://www.skamata.ru/bitrix/redirect.php?event1=cafesreda&event2=&event3=&goto=https://joinlive77.com/
http://images.google.hu/url?q=https://joinlive77.com/
http://maps.google.com.mx/url?q=https://joinlive77.com/
http://images.google.com.mx/url?q=https://joinlive77.com/
http://www.google.com.mx/url?q=https://joinlive77.com/
http://images.google.com.hk/url?q=https://joinlive77.com/
http://images.google.fi/url?q=https://joinlive77.com/
http://maps.google.fi/url?q=https://joinlive77.com/
http://images.google.pt/url?q=https://joinlive77.com/
http://maps.google.pt/url?q=https://joinlive77.com/
http://www.shinobi.jp/etc/goto.html?https://joinlive77.com/
http://images.google.co.id/url?q=https://joinlive77.com/
http://maps.google.co.id/url?q=https://joinlive77.com/
http://images.google.no/url?q=https://joinlive77.com/
http://maps.google.no/url?q=https://joinlive77.com/
http://images.google.co.th/url?q=https://joinlive77.com/
http://maps.google.co.th/url?q=https://joinlive77.com/
http://www.google.co.th/url?q=https://joinlive77.com/
http://maps.google.co.za/url?q=https://joinlive77.com/
http://galter.northwestern.edu/exit?url=https://joinlive77.com/
http://images.google.ro/url?q=https://joinlive77.com/
http://maps.google.ro/url?q=https://joinlive77.com/
http://cse.google.dk/url?q=https://joinlive77.com/
http://cse.google.com.tr/url?q=https://joinlive77.com/
http://cse.google.hu/url?q=https://joinlive77.com/
http://www.astro.wisc.edu/?URL=https://joinlive77.com/
http://cse.google.com.hk/url?q=https://joinlive77.com/
http://cse.google.fi/url?q=https://joinlive77.com/
http://images.google.com.sg/url?q=https://joinlive77.com/
http://cse.google.pt/url?q=https://joinlive77.com/
http://cse.google.co.nz/url?q=https://joinlive77.com/
http://images.google.com.ar/url?q=https://joinlive77.com/
http://cse.google.co.id/url?q=https://joinlive77.com/
http://images.google.com.ua/url?q=https://joinlive77.com/
http://cse.google.no/url?q=https://joinlive77.com/
http://cse.google.co.th/url?q=https://joinlive77.com/
http://cse.google.ro/url?q=https://joinlive77.com/
http://maps.google.hu/url?q=https://joinlive77.com/
http://maps.google.com.ar/url?q=https://joinlive77.com/
http://maps.google.com.sg/url?q=https://joinlive77.com/
http://images.google.com.tr/url?q=https://joinlive77.com/
http://maps.google.dk/url?q=https://joinlive77.com/
http://www.google.fi/url?q=https://joinlive77.com/
https://posts.google.com/url?q=https://joinlive77.com/
https://plus.google.com/url?q=https://joinlive77.com/
https://passport.sfacg.com/LoginOut.aspx?Returnurl=https://joinlive77.com/
https://offers.sidex.ru/stat_ym_new.php?redir=https://joinlive77.com/&hash=1577762
https://naruto.su/link.ext.php?url=https://joinlive77.com/
https://meguro.keizai.biz/banner.php?type=image_banner&position=right&id=13&uri=https://joinlive77.com/
https://lekoufa.ru/banner/go?banner_id=4&link=https://joinlive77.com/
https://kakaku-navi.net/items/detail.php?url=https://joinlive77.com/
https://justpaste.it/redirect/172fy/https://joinlive77.com/
https://jt-pr-dot-yamm-track.appspot.com/Redirect?ukey=1iXi3dF8AuzUIsgifbcVnqqx-anF4B8R-9PC3UGhHO3E-1131306248&key=YAMMID-79725512&link=https://joinlive77.com/
https://ipv4.google.com/url?q=https://joinlive77.com/
https://im.tonghopdeal.net/pic.php?q=https://joinlive77.com/
https://heaven.porn/te3/out.php?u=https://joinlive77.com/
https://good-surf.ru/r.php?g=https://joinlive77.com/
https://golden-resort.ru/out.php?out=https://joinlive77.com/
https://globalmedia51.ru/bitrix/redirect.php?goto=https://joinlive77.com/
https://gektor-nsk.ru/bitrix/redirect.php?goto=https://joinlive77.com/
https://gcup.ru/go?https://joinlive77.com/
https://forum.solidworks.com/external-link.jspa?url=https://joinlive77.com/
https://forsto.ru/bitrix/redirect.php?goto=https://joinlive77.com/
https://foro.infojardin.com/proxy.php?link=https://joinlive77.com/
https://es.catholic.net/ligas/ligasframe.phtml?liga=https://joinlive77.com/
https://ditu.google.com/url?q=https://joinlive77.com/
https://de.flavii.de/index.php?flavii=linker&link=https://joinlive77.com/
https://dakke.co/redirect/?url=https://joinlive77.com/
https://creativecommons.org/choose/results-one?q_1=2&q_1=1&field_attribute_to_url=https://joinlive77.com/
https://contacts.google.com/url?sa=t&url=https://joinlive77.com/
https://community.rsa.com/external-link.jspa?url=https://joinlive77.com/
https://community.nxp.com/external-link.jspa?url=https://joinlive77.com/
https://community.esri.com/external-link.jspa?url=https://joinlive77.com/
https://community.cypress.com/external-link.jspa?url=https://joinlive77.com/
https://club.panasonic.jp/member/terms/?siteId=B1&returnURL=https://joinlive77.com/
https://cdn.iframe.ly/api/iframe?url=https://joinlive77.com/
https://bukkit.org/proxy.php?link=https://joinlive77.com/
https://branch.app.link/?$deeplink_path=article%2Fjan%2F123&$fallback_url=https%3A%2F%2Fjoinlive77.com/&channel=facebook&feature=affiliate
https://boowiki.info/go.php?go=https://joinlive77.com/
https://blaze.su/bitrix/redirect.php?event1=&event2=&event3=&goto=https://joinlive77.com/
https://bbs.pku.edu.cn/v2/jump-to.php?url=https://joinlive77.com/
https://bbs.hgyouxi.com/kf.php?u=https://joinlive77.com/
https://bares.blog.idnes.cz/redir.aspx?url=https://joinlive77.com/
https://analytics.bluekai.com/site/16231?phint=event=click&phint=campaign=BRAND-TAB&phint=platform=search&done=https://joinlive77.com/
https://advisor.wmtransfer.com/SiteDetails.aspx?url=https://joinlive77.com/
https://advisor.wmtransfer.com/SiteDetails.aspx?url=joinlive77.com/
https://adengine.old.rt.ru/go.jsp?to=https://joinlive77.com/
https://abiznes.com.ua/bitrix/redirect.php?event1=&event2=&event3=&goto=https://joinlive77.com/
http://www.webclap.com/php/jump.php?url=https://joinlive77.com/
http://www.torrent.ai/lt/redirect.php?url=https://joinlive77.com/
http://www.sv-mama.ru/shared/go.php?url=https://joinlive77.com/
http://www.sofion.ru/banner.php?r1=41&r2=2234&goto=https://joinlive77.com/
http://www.shippingchina.com/pagead.php?id=RW4uU2hpcC5tYWluLjE=&tourl=https://joinlive77.com/
http://www.sermemole.com/public/serbook/redirect.php?url=https://joinlive77.com/
http://www.semtex.ru/go.php?a=https://joinlive77.com/
http://www.runiwar.ru/go?https://joinlive77.com/
http://www.rucem.ru/doska/redirect/?go=https://joinlive77.com/
http://www.rss.geodles.com/fwd.php?url=https://joinlive77.com/
http://www.paladiny.ru/go.php?url=https://joinlive77.com/
http://www.nuttenzone.at/jump.php?url=https://joinlive77.com/
http://www.myhottiewife.com/cgi-bin/arpro/out.cgi?id=Jojo&url=https://joinlive77.com/
http://www.mix-choice.com/yomi/rank.cgi?mode=link&id=391&url=https://joinlive77.com/
http://www.mistress-and-slave.com/cgi-bin/out.cgi?id=123crush&url=https://joinlive77.com/
http://www.laosubenben.com/home/link.php?url=https://joinlive77.com/
http://www.laopinpai.com/gourl.asp?url=/gourl.asp?url=https://joinlive77.com/
http://www.kollabora.com/external?url=https://joinlive77.com/
http://www.johnvorhees.com/gbook/go.php?url=https://joinlive77.com/
http://www.jkes.tyc.edu.tw/dyna/webs/gotourl.php?id=357&url=https://joinlive77.com/
http://www.internettrafficreport.com/cgi-bin/cgirdir.exe?https://joinlive77.com/
http://www.interfacelift.com/goto.php?url=https://joinlive77.com/
http://www.interempresas.net/estadisticas/r.asp?idsector=129&e=221083&c=195&d=https://joinlive77.com/
http://www.imsnet.at/LangChange.aspx?uri=https://joinlive77.com/
http://www.humanbrainmapping.org/i4a/etrack/track.cfm?rType=2&campaignID=3572&contactID=4524&origURL=https://joinlive77.com/
http://www.hon-cafe.net/cgi-bin/re.cgi?lid=hmw&url=https://joinlive77.com/
http://www.glorioustronics.com/redirect.php?link=https://joinlive77.com/
http://www.global-flat.com/mobile/mobile_switch.php?dir=tofull&url=https://joinlive77.com/
http://www.gigatran.ru/go?url=https://joinlive77.com/
http://www.gigaalert.com/view.php?h=&s=https://joinlive77.com/
http://www.gearguide.ru/phpbb/go.php?https://joinlive77.com/
http://www.fertilab.net/background_manager.aspx?ajxname=link_banner&id_banner=50&url=https://joinlive77.com/
http://www.etis.ford.com/externalURL.do?url=https://joinlive77.com/
http://www.erotikplatz.at/redirect.php?id=939&mode=fuhrer&url=https://joinlive77.com/
http://www.cyprus-net.com/banner_click.php?banid=4&link=https://joinlive77.com/
http://www.compusystems.com/servlet/Et?x=270.-101.233736|%20https://joinlive77.com/
http://www.chungshingelectronic.com/redirect.asp?url=https://joinlive77.com/
http://www.beigebraunapartment.de/url?q=https://joinlive77.com/
http://www.bdsmandfetish.com/cgi-bin/sites/out.cgi?id=mandymon&url=https://joinlive77.com/
http://www.aurki.com/jarioa/redirect?id_feed=510&url=https://joinlive77.com/
http://visits.seogaa.ru/redirect/?g=https://joinlive77.com/
http://twindish-electronics.de/url?q=https://joinlive77.com/
http://tido.al/vazhdo.php?url=https://joinlive77.com/
http://tharp.me/?url_to_shorten=https://joinlive77.com/
http://stroysoyuz.ru/bitrix/rk.php?goto=https://joinlive77.com/
http://speakrus.ru/links.php?go=https://joinlive77.com/
http://spbstroy.ru/bitrix/redirect.php?goto=https://joinlive77.com/
http://solo-center.ru/links.php?go=https://joinlive77.com/
http://smile.wjp.am/link-free/link3.cgi?mode=cnt&no=8&hpurl=https://joinlive77.com/
http://seriesandtv.com/?wptouch_switch=desktop&redirect=https://joinlive77.com/
http://sennheiserstore.ru/bitrix/rk.php?goto=https://joinlive77.com/
http://school364.spb.ru/bitrix/rk.php?goto=https://joinlive77.com/
http://sc.sie.gov.hk/TuniS/joinlive77.com/
http://rzngmu.ru/go?https://joinlive77.com/
http://rostovklad.ru/go.php?https://joinlive77.com/
http://portalnp.snauka.ru/bitrix/redirect.php?goto=https://joinlive77.com/
http://park3.wakwak.com/~yadoryuo/cgi-bin/click3/click3.cgi?cnt=chalet-main&url=https://joinlive77.com/
http://page.yicha.cn/tp/j?url=https://joinlive77.com/
http://onlinemanuals.txdot.gov/help/urlstatusgo.html?url=https://joinlive77.com/
http://ms1.caps.ntct.edu.tw/school/netlink/hits.php?id=107&url=https://joinlive77.com/
http://mbrf.ae/knowledgeaward/language/ar/?redirect_url=https://joinlive77.com/
http://markiza.me/bitrix/rk.php?goto=https://joinlive77.com/
http://m.17ll.com/apply/tourl/?url=https://joinlive77.com/
http://landbidz.com/redirect.asp?url=https://joinlive77.com/
http://kreepost.com/go/?https://joinlive77.com/
http://jump.5ch.net/?https://joinlive77.com/
http://imperialoptical.com/news-redirect.aspx?url=https://joinlive77.com/
http://hellothai.com/wwwlink/wwwredirect.asp?hp_id=1242&url=https://joinlive77.com/
http://guru.sanook.com/?URL=https://joinlive77.com/
http://go.gomtv.com/rd?link_id=10805&code=SHARE_DREAMWIZ&send=https://joinlive77.com/
http://gfmis.crru.ac.th/web/redirect.php?url=https://joinlive77.com/
http://gfaq.ru/go?https://joinlive77.com/
http://gbi-12.ru/links.php?go=https://joinlive77.com/
http://frienddo.com/out.php?url=https://joinlive77.com/
http://fr.knubic.com/redirect_to?url=https://joinlive77.com/
http://ezproxy.lib.uh.edu/login?url=https://joinlive77.com/
http://edcommunity.ru/bitrix/rk.php?goto=https://joinlive77.com/
http://dvd24online.de/url?q=https://joinlive77.com/
http://client.paltalk.com/client/webapp/client/External.wmt?url=https://joinlive77.com/
http://chuanroi.com/Ajax/dl.aspx?u=https://joinlive77.com/
http://branch.app.link/?$deeplink_path=article/jan/123&$fallback_url=https://joinlive77.com/
http://biz-tech.org/bitrix/rk.php?goto=https://joinlive77.com/
http://avalon.gondor.ru/away.php?link=https://joinlive77.com/
http://ads.cars.cz/adclick.php?bannerid=333&zoneid=237&source=&dest=https://joinlive77.com/
http://a.gongkong.com/db/adredir.asp?id=16757&url=https://joinlive77.com/
http://2010.russianinternetweek.ru/bitrix/rk.php?goto=https://joinlive77.com/
https://xat.com/web_gear/chat/linkvalidator.php?link=https://joinlive77.com/
https://www.yeaah.com/disco/DiscoGo.asp?ID=3435&Site=https://joinlive77.com/
https://www.woodlist.us/delete-company?nid=13964&element=https://joinlive77.com/
https://www.viecngay.vn/go?to=https://joinlive77.com/
https://www.vicsport.com.au/analytics/outbound?url=https://joinlive77.com/
https://www.uts.edu.co/portal/externo.php?id=https://joinlive77.com/
https://www.usjournal.com/go.php?campusID=190&url=https://joinlive77.com/
https://www.talgov.com/Main/exit.aspx?url=https://joinlive77.com/
https://www.spyro-realms.com/go?https://joinlive77.com/
https://www.snek.ai/redirect?url=https://joinlive77.com/
https://www.skoberne.si/knjiga/go.php?url=https://joinlive77.com/
https://www.serie-a.ru/bitrix/redirect.php?goto=https://joinlive77.com/
https://www.russianrobotics.ru/bitrix/rk.php?goto=https://joinlive77.com/
https://www.ruchnoi.ru/ext_link?url=https://joinlive77.com/
https://www.rprofi.ru/bitrix/rk.php?goto=https://joinlive77.com/
https://www.roccotube.com/cgi-bin/at3/out.cgi?id=27&tag=toplist&trade=https://joinlive77.com/
https://www.oebb.at/nightjet_newsletter/tc/xxxx?url=https://joinlive77.com/
https://www.nyl0ns.com/cgi-bin/a2/out.cgi?id=43&l=btop&u=https://joinlive77.com/
https://www.moonbbs.com/dm/dmlink.php?dmurl=https://joinlive77.com/
https://www.moneydj.com/ads/adredir.aspx?bannerid=39863&url=https://joinlive77.com/
https://www.meetme.com/apps/redirect/?url=https://joinlive77.com/
https://www.lionscup.dk/?side_unique=4fb6493f-b9cf-11e0-8802-a9051d81306c&s_id=30&s_d_id=64&go=https://joinlive77.com/
https://www.kath-kirche-kaernten.at/pfarren/pfarre/C3014?URL=https://joinlive77.com/
https://www.interpals.net/url_redirect.php?href=https://joinlive77.com/
https://www.interecm.com/interecm/tracker?op=click&id=5204.db2&url=https://joinlive77.com/
https://www.info-realty.ru/bitrix/rk.php?goto=https://joinlive77.com/
https://www.ibm.com/links/?cc=us&lc=en&prompt=1&url=https://joinlive77.com/
https://www.hradycz.cz/redir.php?b=445&t=https://joinlive77.com/
https://www.hottystop.com/cgi-bin/at3/out.cgi?id=12&trade=https://joinlive77.com/
https://www.hobowars.com/game/linker.php?url=https://joinlive77.com/
https://www.hentainiches.com/index.php?id=derris&tour=https://joinlive77.com/
https://www.hachimantaishi.com/click3/click3.cgi?cnt=c5&url=https://joinlive77.com/
https://www.gvomail.com/redir.php?k=1560a19819b8f93348a7bc7fc28d0168&url=https://joinlive77.com/
https://www.gutscheinaffe.de/wp-content/plugins/AND-AntiBounce/redirector.php?url=https://joinlive77.com/
https://www.gudarjavalambre.com/sections/miscelany/link.php?url=https://joinlive77.com/
https://www.greencom.ru/catalog/irrigation_systems.html?jump_site=2008&url=https://joinlive77.com/
https://www.girlznation.com/cgi-bin/atc/out.cgi?id=50&l=side&u=https://joinlive77.com/
https://www.gaelchultur.com/changelang.aspx?url=https://joinlive77.com/
https://www.funeralunion.org/delete-company?nid=39&element=https://joinlive77.com/
https://www.fudbal91.com/tz.php?zone=America/Iqaluit&r=https://joinlive77.com/
https://www.frodida.org/BannerClick.php?BannerID=29&LocationURL=https://joinlive77.com/
https://www.freemusic123.com/karaoke/cgi-bin/out.cgi?id=castillo&url=https://joinlive77.com/
https://chunk9.top/url?q=https://joinlive77.com/
https://kryvbas.at.ua/go?https://joinlive77.com/
https://google.cat/url?q=https://joinlive77.com/
https://joomluck.com/go/?https://joinlive77.com/
https://www.leefleming.com/?URL=joinlive77.com/
https://www.anonymz.com/?https://joinlive77.com/
https://weburg.net/redirect?url=joinlive77.com/
https://tw6.jp/jump/?url=https://joinlive77.com/
https://www.spainexpat.com/?URL=joinlive77.com/
https://www.fotka.pl/link.php?u=joinlive77.com/
https://www.lolinez.com/?https://joinlive77.com/
https://ape.st/share?url=https://joinlive77.com/
https://nanos.jp/jmp?url=https://joinlive77.com/
https://www.fca.gov/?URL=https://joinlive77.com/
https://savvylion.com/?bmDomain=joinlive77.com/
https://www.soyyooestacaido.com/joinlive77.com/
https://www.gta.ru/redirect/www.joinlive77.com/
https://mintax.kz/go.php?https://joinlive77.com/
https://directx10.org/go?https://joinlive77.com/
https://mejeriet.dk/link.php?id=joinlive77.com/
https://ezdihan.do.am/go?https://joinlive77.com/
https://fishki.net/click?https://joinlive77.com/
https://hiddenrefer.com/?https://joinlive77.com/
https://kernmetal.ru/?go=https://joinlive77.com/
https://romhacking.ru/go?https://joinlive77.com/
https://turion.my1.ru/go?https://joinlive77.com/
https://kassirs.ru/sweb.asp?url=joinlive77.com/
https://www.allods.net/redirect/joinlive77.com/
https://icook.ucoz.ru/go?https://joinlive77.com/
https://megalodon.jp/?url=https://joinlive77.com/
https://www.pasco.k12.fl.us/?URL=joinlive77.com/
https://anybeats.jp/jump/?https://joinlive77.com/
https://anolink.com/?link=https://joinlive77.com/
https://www.questsociety.ca/?URL=joinlive77.com/
https://www.disl.edu/?URL=https://joinlive77.com/
https://holidaykitchens.com/?URL=joinlive77.com/
https://www.mbcarolinas.org/?URL=joinlive77.com/
https://ovatu.com/e/c?url=https://joinlive77.com/
https://www.anibox.org/go?https://joinlive77.com/
https://google.info/url?q=https://joinlive77.com/
https://atlantis-tv.ru/go?https://joinlive77.com/
https://otziv.ucoz.com/go?https://joinlive77.com/
https://www.sgvavia.ru/go?https://joinlive77.com/
https://element.lv/go?url=https://joinlive77.com/
https://karanova.ru/?goto=https://joinlive77.com/
https://789.ru/go.php?url=https://joinlive77.com/
https://krasnoeselo.su/go?https://joinlive77.com/
https://game-era.do.am/go?https://joinlive77.com/
https://kudago.com/go/?to=https://joinlive77.com/
https://after.ucoz.net/go?https://joinlive77.com/
https://kinteatr.at.ua/go?https://joinlive77.com/
https://nervetumours.org.uk/?URL=joinlive77.com/
https://kopyten.clan.su/go?https://joinlive77.com/
https://lrnews.ru/xgo.php?url=www.joinlive77.com/
https://www.taker.im/go/?u=https://joinlive77.com/
https://usehelp.clan.su/go?https://joinlive77.com/
https://www.wow-game.ru/go?https://joinlive77.com/
https://sepoa.fr/wp/go.php?https://joinlive77.com/
https://world-source.ru/go?https://joinlive77.com/
https://mail2.mclink.it/SRedirect/joinlive77.com/
https://www.swleague.ru/go?https://joinlive77.com/
https://nazgull.ucoz.ru/go?https://joinlive77.com/
https://www.rosbooks.ru/go?https://joinlive77.com/
https://infosort.ru/go?url=https://joinlive77.com/
https://pavon.kz/proxy?url=https://joinlive77.com/
https://beskuda.ucoz.ru/go?https://joinlive77.com/
https://ma.by/away.php?url=https://joinlive77.com/
https://cloud.squirrly.co/go34692/joinlive77.com/
https://richmonkey.biz/go/?https://joinlive77.com/
https://vlpacific.ru/?goto=https://joinlive77.com/
https://google.co.ck/url?q=https://joinlive77.com/
https://google.co.uz/url?q=https://joinlive77.com/
https://google.co.ls/url?q=https://joinlive77.com/
https://google.co.zm/url?q=https://joinlive77.com/
https://google.co.ve/url?q=https://joinlive77.com/
https://google.co.zw/url?q=https://joinlive77.com/
https://google.co.uk/url?q=https://joinlive77.com/
https://google.co.ao/url?q=https://joinlive77.com/
https://google.co.cr/url?q=https://joinlive77.com/
https://google.co.nz/url?q=https://joinlive77.com/
https://google.co.th/url?q=https://joinlive77.com/
https://google.co.ug/url?q=https://joinlive77.com/
https://google.co.ma/url?q=https://joinlive77.com/
https://google.co.za/url?q=https://joinlive77.com/
https://google.co.kr/url?q=https://joinlive77.com/
https://google.co.mz/url?q=https://joinlive77.com/
https://google.co.vi/url?q=https://joinlive77.com/
https://google.co.ke/url?q=https://joinlive77.com/
https://google.co.hu/url?q=https://joinlive77.com/
https://google.co.tz/url?q=https://joinlive77.com/
https://gadgets.gearlive.com/?URL=joinlive77.com/
https://google.co.jp/url?q=https://joinlive77.com/
https://eric.ed.gov/?redir=https://joinlive77.com/
https://www.usich.gov/?URL=https://joinlive77.com/
https://sec.pn.to/jump.php?https://joinlive77.com/
https://www.earth-policy.org/?URL=joinlive77.com/
https://www.silverdart.co.uk/?URL=joinlive77.com/
https://www.onesky.ca/?URL=https://joinlive77.com/
https://pr-cy.ru/jump/?url=https://joinlive77.com/
https://google.co.bw/url?q=https://joinlive77.com/
https://google.co.id/url?q=https://joinlive77.com/
https://google.co.in/url?q=https://joinlive77.com/
https://google.co.il/url?q=https://joinlive77.com/
https://pikmlm.ru/out.php?p=https://joinlive77.com/
https://masculist.ru/go/url=https://joinlive77.com/
https://regnopol.clan.su/go?https://joinlive77.com/
https://tannarh.narod.ru/go?https://joinlive77.com/
https://mss.in.ua/go.php?to=https://joinlive77.com/
https://owohho.com/away?url=https://joinlive77.com/
https://bel-kot.com/away?to=https://joinlive77.com/
https://www.youa.eu/r.php?u=https://joinlive77.com/
https://cool4you.ucoz.ru/go?https://joinlive77.com/
https://gu-pdnp.narod.ru/go?https://joinlive77.com/
https://rg4u.clan.su/go?https://joinlive77.com/
https://dawnofwar.org.ru/go?https://joinlive77.com/
https://tobiz.ru/on.php?url=https://joinlive77.com/
https://www.de-online.ru/go?https://joinlive77.com/
https://bglegal.ru/away/?to=https://joinlive77.com/
https://www.allpn.ru/redirect/?url=joinlive77.com/
https://nter.net.ua/go/?url=https://joinlive77.com/
https://click.start.me/?url=https://joinlive77.com/
https://prizraks.clan.su/go?https://joinlive77.com/
https://flyd.ru/away.php?to=https://joinlive77.com/
https://risunok.ucoz.com/go?https://joinlive77.com/
https://www.google.ca/url?q=https://joinlive77.com/
https://716.kz/redirect?url=https://joinlive77.com/
https://www.google.rs/url?q=https://joinlive77.com/
https://www.google.fr/url?q=https://joinlive77.com/
https://www.google.pt/url?q=https://joinlive77.com/
https://www.google.hu/url?q=https://joinlive77.com/
https://cse.google.mk/url?q=https://joinlive77.com/
https://www.google.si/url?q=https://joinlive77.com/
https://cse.google.ki/url?q=https://joinlive77.com/
https://www.google.sn/url?q=https://joinlive77.com/
https://www.google.cf/url?q=https://joinlive77.com/
https://www.google.ki/url?q=https://joinlive77.com/
https://cse.google.sr/url?q=https://joinlive77.com/
https://www.google.so/url?q=https://joinlive77.com/
https://www.google.mn/url?q=https://joinlive77.com/
https://www.google.fi/url?q=https://joinlive77.com/
https://www.google.tt/url?q=https://joinlive77.com/
https://www.google.cl/url?q=https://joinlive77.com/
https://www.google.ci/url?q=https://joinlive77.com/
https://www.google.hn/url?q=https://joinlive77.com/
https://www.google.sc/url?q=https://joinlive77.com/
https://www.google.al/url?q=https://joinlive77.com/
https://www.google.nr/url?q=https://joinlive77.com/
https://www.google.tn/url?q=https://joinlive77.com/
https://www.google.iq/url?q=https://joinlive77.com/
https://www.semanticjuice.com/site/joinlive77.com/
https://www.google.sr/url?q=https://joinlive77.com/
https://www.google.bi/url?q=https://joinlive77.com/
https://cse.google.kz/url?q=https://joinlive77.com/
https://www.google.tk/url?q=https://joinlive77.com/
https://www.google.gy/url?q=https://joinlive77.com/
https://www.google.ch/url?q=https://joinlive77.com/
https://www.google.hr/url?q=https://joinlive77.com/
https://www.google.bj/url?q=https://joinlive77.com/
https://www.google.mv/url?q=https://joinlive77.com/
https://www.google.ga/url?q=https://joinlive77.com/
https://s79457.gridserver.com/?URL=joinlive77.com/
https://cdl.su/redirect?url=https://joinlive77.com/
https://www.fondbtvrtkovic.hr/?URL=joinlive77.com/
https://lostnationarchery.com/?URL=joinlive77.com/
https://www.google.sh/url?q=https://joinlive77.com/
https://www.booktrix.com/live/?URL=joinlive77.com/
https://www.google.ro/url?q=https://joinlive77.com/
https://www.google.gr/url?q=https://joinlive77.com/
https://www.google.tm/url?q=https://joinlive77.com/
https://www.marcellusmatters.psu.edu/?URL=https://joinlive77.com/
https://cse.google.vu/url?sa=i&url=https://joinlive77.com/
https://cse.google.vg/url?sa=i&url=https://joinlive77.com/
https://cse.google.tn/url?sa=i&url=https://joinlive77.com/
https://cse.google.tl/url?sa=i&url=https://joinlive77.com/
https://cse.google.tg/url?sa=i&url=https://joinlive77.com/
https://cse.google.td/url?sa=i&url=https://joinlive77.com/
https://cse.google.so/url?sa=i&url=https://joinlive77.com/
https://cse.google.sn/url?sa=i&url=https://joinlive77.com/
https://cse.google.se/url?sa=i&url=https://joinlive77.com/
https://cse.google.ne/url?sa=i&url=https://joinlive77.com/
https://cse.google.mu/url?sa=i&url=https://joinlive77.com/
https://cse.google.ml/url?sa=i&url=https://joinlive77.com/
https://cse.google.kz/url?sa=i&url=https://joinlive77.com/
https://cse.google.hn/url?sa=i&url=https://joinlive77.com/
https://cse.google.gy/url?sa=i&url=https://joinlive77.com/
https://cse.google.gp/url?sa=i&url=https://joinlive77.com/
https://cse.google.gl/url?sa=i&url=https://joinlive77.com/
https://cse.google.ge/url?sa=i&url=https://joinlive77.com/
https://cse.google.dj/url?sa=i&url=https://joinlive77.com/
https://cse.google.cv/url?sa=i&url=https://joinlive77.com/
https://cse.google.com/url?sa=i&url=https://joinlive77.com/
https://cse.google.com/url?q=https://joinlive77.com/
https://cse.google.com.vc/url?sa=i&url=https://joinlive77.com/
https://cse.google.com.tj/url?sa=i&url=https://joinlive77.com/
https://cse.google.com.sl/url?sa=i&url=https://joinlive77.com/
https://cse.google.com.sb/url?sa=i&url=https://joinlive77.com/
https://cse.google.com.py/url?sa=i&url=https://joinlive77.com/
https://cse.google.com.ph/url?sa=i&url=https://joinlive77.com/
https://cse.google.com.pg/url?sa=i&url=https://joinlive77.com/
https://cse.google.com.np/url?sa=i&url=https://joinlive77.com/
https://cse.google.com.nf/url?sa=i&url=https://joinlive77.com/
https://cse.google.com.mt/url?sa=i&url=https://joinlive77.com/
https://cse.google.com.ly/url?sa=i&url=https://joinlive77.com/
https://cse.google.com.lb/url?sa=i&url=https://joinlive77.com/
https://cse.google.com.kw/url?sa=i&url=https://joinlive77.com/
https://cse.google.com.kh/url?sa=i&url=https://joinlive77.com/
https://cse.google.com.jm/url?sa=i&url=https://joinlive77.com/
https://cse.google.com.gi/url?sa=i&url=https://joinlive77.com/
https://cse.google.com.gh/url?sa=i&url=https://joinlive77.com/
https://cse.google.com.fj/url?sa=i&url=https://joinlive77.com/
https://cse.google.com.et/url?sa=i&url=https://joinlive77.com/
https://cse.google.com.do/url?sa=i&url=https://joinlive77.com/
https://cse.google.com.cy/url?sa=i&url=https://joinlive77.com/
https://cse.google.com.bz/url?sa=i&url=https://joinlive77.com/
https://cse.google.com.bo/url?sa=i&url=https://joinlive77.com/
https://cse.google.com.bn/url?sa=i&url=https://joinlive77.com/
https://cse.google.com.ai/url?sa=i&url=https://joinlive77.com/
https://cse.google.com.ag/url?sa=i&url=https://joinlive77.com/
https://cse.google.com.af/url?sa=i&url=https://joinlive77.com/
https://cse.google.co.zw/url?sa=i&url=https://joinlive77.com/
https://cse.google.co.zm/url?sa=i&url=https://joinlive77.com/
https://cse.google.co.vi/url?sa=i&url=https://joinlive77.com/
https://cse.google.co.uz/url?sa=i&url=https://joinlive77.com/
https://cse.google.co.tz/url?sa=i&url=https://joinlive77.com/
https://cse.google.co.mz/url?sa=i&url=https://joinlive77.com/
https://cse.google.co.ma/url?sa=i&url=https://joinlive77.com/
https://cse.google.co.ls/url?sa=i&url=https://joinlive77.com/
https://cse.google.co.ke/url?sa=i&url=https://joinlive77.com/
https://cse.google.co.ck/url?sa=i&url=https://joinlive77.com/
https://cse.google.co.bw/url?sa=i&url=https://joinlive77.com/
https://cse.google.cm/url?sa=i&url=https://joinlive77.com/
https://cse.google.ci/url?sa=i&url=https://joinlive77.com/
https://cse.google.cg/url?sa=i&url=https://joinlive77.com/
https://cse.google.cf/url?sa=i&url=https://joinlive77.com/
https://cse.google.cd/url?sa=i&url=https://joinlive77.com/
https://cse.google.cat/url?sa=i&url=https://joinlive77.com/
https://cse.google.bt/url?sa=i&url=https://joinlive77.com/
https://cse.google.bj/url?sa=i&url=https://joinlive77.com/
https://cse.google.bf/url?sa=i&url=https://joinlive77.com/
https://cse.google.am/url?sa=i&url=https://joinlive77.com/
https://cse.google.al/url?sa=i&url=https://joinlive77.com/
https://cse.google.ad/url?sa=i&url=https://joinlive77.com/
https://cse.google.ac/url?sa=i&url=https://joinlive77.com/
https://maps.google.ws/url?q=https://joinlive77.com/
https://maps.google.vu/url?q=https://joinlive77.com/
https://maps.google.vg/url?q=https://joinlive77.com/
https://maps.google.tt/url?q=https://joinlive77.com/
https://maps.google.to/url?q=https://joinlive77.com/
https://maps.google.tn/url?q=https://joinlive77.com/
https://maps.google.tl/url?q=https://joinlive77.com/
https://maps.google.tk/url?q=https://joinlive77.com/
https://maps.google.tg/url?q=https://joinlive77.com/
https://maps.google.td/url?q=https://joinlive77.com/
https://maps.google.st/url?q=https://joinlive77.com/
https://maps.google.so/url?q=https://joinlive77.com/
https://maps.google.sn/url?q=https://joinlive77.com/
https://maps.google.sm/url?q=https://joinlive77.com/
https://maps.google.si/url?sa=t&url=https://joinlive77.com/
https://maps.google.sh/url?q=https://joinlive77.com/
https://maps.google.se/url?q=https://joinlive77.com/
https://maps.google.sc/url?q=https://joinlive77.com/
https://maps.google.rw/url?q=https://joinlive77.com/
https://maps.google.ru/url?sa=t&url=https://joinlive77.com/
https://maps.google.ru/url?q=https://joinlive77.com/
https://maps.google.rs/url?q=https://joinlive77.com/
https://maps.google.ro/url?q=https://joinlive77.com/
https://maps.google.pt/url?sa=t&url=https://joinlive77.com/
https://maps.google.pt/url?q=https://joinlive77.com/
https://maps.google.pn/url?q=https://joinlive77.com/
https://maps.google.pl/url?sa=t&url=https://joinlive77.com/
https://maps.google.pl/url?q=https://joinlive77.com/
https://maps.google.nu/url?q=https://joinlive77.com/
https://maps.google.nr/url?q=https://joinlive77.com/
https://maps.google.no/url?q=https://joinlive77.com/
https://maps.google.nl/url?sa=t&url=https://joinlive77.com/
https://maps.google.nl/url?q=https://joinlive77.com/
https://maps.google.ne/url?q=https://joinlive77.com/
https://maps.google.mw/url?q=https://joinlive77.com/
https://maps.google.mv/url?q=https://joinlive77.com/
https://maps.google.mu/url?q=https://joinlive77.com/
https://maps.google.ms/url?q=https://joinlive77.com/
https://maps.google.mn/url?sa=t&url=https://joinlive77.com/
https://maps.google.mn/url?q=https://joinlive77.com/
https://maps.google.ml/url?q=https://joinlive77.com/
https://maps.google.mk/url?q=https://joinlive77.com/
https://maps.google.mg/url?q=https://joinlive77.com/
https://maps.google.lv/url?sa=t&url=https://joinlive77.com/
https://maps.google.lv/url?q=https://joinlive77.com/
https://maps.google.lt/url?sa=t&url=https://joinlive77.com/
https://maps.google.lt/url?q=https://joinlive77.com/
https://maps.google.lk/url?q=https://joinlive77.com/
https://maps.google.li/url?q=https://joinlive77.com/
https://maps.google.la/url?q=https://joinlive77.com/
https://maps.google.kz/url?q=https://joinlive77.com/
https://maps.google.ki/url?q=https://joinlive77.com/
https://maps.google.kg/url?q=https://joinlive77.com/
https://maps.google.jo/url?q=https://joinlive77.com/
https://maps.google.je/url?q=https://joinlive77.com/
https://maps.google.it/url?q=https://joinlive77.com/
https://maps.google.is/url?q=https://joinlive77.com/
https://maps.google.iq/url?q=https://joinlive77.com/
https://maps.google.im/url?q=https://joinlive77.com/
https://maps.google.ie/url?sa=t&url=https://joinlive77.com/
https://maps.google.hu/url?q=https://joinlive77.com/
https://maps.google.ht/url?q=https://joinlive77.com/
https://maps.google.hn/url?q=https://joinlive77.com/
https://maps.google.gy/url?q=https://joinlive77.com/
https://maps.google.gm/url?q=https://joinlive77.com/
https://maps.google.gl/url?q=https://joinlive77.com/
https://maps.google.gg/url?q=https://joinlive77.com/
https://maps.google.ge/url?sa=t&url=https://joinlive77.com/
https://maps.google.ge/url?q=https://joinlive77.com/
https://maps.google.ga/url?q=https://joinlive77.com/
https://maps.google.fr/url?sa=t&url=https://joinlive77.com/
https://maps.google.fr/url?q=https://joinlive77.com/
https://maps.google.fm/url?q=https://joinlive77.com/
https://maps.google.fi/url?q=https://joinlive77.com/
https://maps.google.es/url?sa=t&url=https://joinlive77.com/
https://maps.google.es/url?q=https://joinlive77.com/
https://maps.google.ee/url?q=https://joinlive77.com/
https://maps.google.dz/url?q=https://joinlive77.com/
https://maps.google.dm/url?q=https://joinlive77.com/
https://maps.google.dk/url?sa=t&url=https://joinlive77.com/
https://maps.google.dk/url?q=https://joinlive77.com/
https://maps.google.dj/url?q=https://joinlive77.com/
https://maps.google.de/url?sa=t&url=https://joinlive77.com/
https://maps.google.de/url?q=https://joinlive77.com/
https://maps.google.cz/url?sa=t&url=https://joinlive77.com/
https://maps.google.cz/url?q=https://joinlive77.com/
https://maps.google.cv/url?q=https://joinlive77.com/
https://maps.google.com/url?sa=t&url=https://joinlive77.com/
https://maps.google.com/url?q=https://joinlive77.com/
https://maps.google.com.vc/url?q=https://joinlive77.com/
https://maps.google.com.uy/url?q=https://joinlive77.com/
https://maps.google.com.ua/url?q=https://joinlive77.com/
https://maps.google.com.tw/url?sa=t&url=https://joinlive77.com/
https://maps.google.com.tw/url?q=https://joinlive77.com/
https://maps.google.com.tr/url?q=https://joinlive77.com/
https://maps.google.com.sv/url?q=https://joinlive77.com/
https://maps.google.com.sl/url?q=https://joinlive77.com/
https://maps.google.com.sg/url?q=https://joinlive77.com/
https://maps.google.com.sb/url?q=https://joinlive77.com/
https://maps.google.com.sa/url?q=https://joinlive77.com/
https://maps.google.com.qa/url?q=https://joinlive77.com/
https://maps.google.com.py/url?q=https://joinlive77.com/
https://maps.google.com.ph/url?q=https://joinlive77.com/
https://maps.google.com.pg/url?q=https://joinlive77.com/
https://maps.google.com.pa/url?sa=t&url=https://joinlive77.com/
https://maps.google.com.pa/url?q=https://joinlive77.com/
https://maps.google.com.om/url?sa=t&url=https://joinlive77.com/
https://maps.google.com.om/url?q=https://joinlive77.com/
https://maps.google.com.ni/url?sa=t&url=https://joinlive77.com/
https://maps.google.com.ni/url?q=https://joinlive77.com/
https://maps.google.com.na/url?q=https://joinlive77.com/
https://maps.google.com.mx/url?q=https://joinlive77.com/
https://maps.google.com.mt/url?sa=t&url=https://joinlive77.com/
https://maps.google.com.mm/url?q=https://joinlive77.com/
https://maps.google.com.ly/url?q=https://joinlive77.com/
https://maps.google.com.lb/url?q=https://joinlive77.com/
https://maps.google.com.kw/url?q=https://joinlive77.com/
https://maps.google.com.kh/url?q=https://joinlive77.com/
https://maps.google.com.jm/url?q=https://joinlive77.com/
https://maps.google.com.hk/url?q=https://joinlive77.com/
https://maps.google.com.gt/url?q=https://joinlive77.com/
https://maps.google.com.gi/url?q=https://joinlive77.com/
https://maps.google.com.gh/url?q=https://joinlive77.com/
https://maps.google.com.fj/url?q=https://joinlive77.com/
https://maps.google.com.et/url?q=https://joinlive77.com/
https://maps.google.com.do/url?q=https://joinlive77.com/
https://maps.google.com.cu/url?q=https://joinlive77.com/
https://maps.google.com.bz/url?sa=t&url=https://joinlive77.com/
https://maps.google.com.bz/url?q=https://joinlive77.com/
https://maps.google.com.br/url?sa=t&url=https://joinlive77.com/
https://maps.google.com.br/url?q=https://joinlive77.com/
https://maps.google.com.bo/url?sa=t&url=https://joinlive77.com/
https://maps.google.com.bo/url?q=https://joinlive77.com/
https://maps.google.com.bn/url?q=https://joinlive77.com/
https://maps.google.com.bh/url?sa=t&url=https://joinlive77.com/
https://maps.google.com.au/url?sa=t&url=https://joinlive77.com/
https://maps.google.com.au/url?q=https://joinlive77.com/
https://maps.google.com.ar/url?q=https://joinlive77.com/
https://maps.google.com.ai/url?q=https://joinlive77.com/
https://maps.google.com.ag/url?q=https://joinlive77.com/
https://maps.google.co.zw/url?q=https://joinlive77.com/
https://maps.google.co.zm/url?q=https://joinlive77.com/
https://maps.google.co.za/url?sa=t&url=https://joinlive77.com/
https://maps.google.co.za/url?q=https://joinlive77.com/
https://maps.google.co.vi/url?q=https://joinlive77.com/
https://maps.google.co.uk/url?q=https://joinlive77.com/
https://maps.google.co.ug/url?q=https://joinlive77.com/
https://maps.google.co.tz/url?q=https://joinlive77.com/
https://maps.google.co.th/url?sa=t&url=https://joinlive77.com/
https://maps.google.co.th/url?q=https://joinlive77.com/
https://maps.google.co.nz/url?sa=t&url=https://joinlive77.com/
https://maps.google.co.nz/url?q=https://joinlive77.com/
https://maps.google.co.mz/url?q=https://joinlive77.com/
https://maps.google.co.ls/url?q=https://joinlive77.com/
https://maps.google.co.kr/url?q=https://joinlive77.com/
https://maps.google.co.ke/url?q=https://joinlive77.com/
https://maps.google.co.jp/url?sa=t&url=https://joinlive77.com/
https://maps.google.co.jp/url?q=https://joinlive77.com/
https://maps.google.co.in/url?sa=t&url=https://joinlive77.com/
https://maps.google.co.in/url?q=https://joinlive77.com/
https://maps.google.co.il/url?sa=t&url=https://joinlive77.com/
https://maps.google.co.il/url?q=https://joinlive77.com/
https://maps.google.co.id/url?sa=t&url=https://joinlive77.com/
https://maps.google.co.id/url?q=https://joinlive77.com/
https://maps.google.co.cr/url?sa=t&url=https://joinlive77.com/
https://maps.google.co.ck/url?q=https://joinlive77.com/
https://maps.google.co.bw/url?q=https://joinlive77.com/
https://maps.google.co.ao/url?q=https://joinlive77.com/
https://maps.google.cm/url?q=https://joinlive77.com/
https://maps.google.cl/url?sa=t&url=https://joinlive77.com/
https://maps.google.ci/url?q=https://joinlive77.com/
https://maps.google.ch/url?q=https://joinlive77.com/
https://maps.google.cg/url?q=https://joinlive77.com/
https://maps.google.cf/url?q=https://joinlive77.com/
https://maps.google.cd/url?sa=t&url=https://joinlive77.com/
https://maps.google.cd/url?q=https://joinlive77.com/
https://maps.google.cat/url?q=https://joinlive77.com/
https://maps.google.ca/url?q=https://joinlive77.com/
https://maps.google.bt/url?q=https://joinlive77.com/
https://maps.google.bs/url?q=https://joinlive77.com/
https://maps.google.bj/url?q=https://joinlive77.com/
https://maps.google.bi/url?sa=t&url=https://joinlive77.com/
https://maps.google.bi/url?q=https://joinlive77.com/
https://maps.google.bg/url?q=https://joinlive77.com/
https://maps.google.bf/url?q=https://joinlive77.com/
https://maps.google.be/url?q=https://joinlive77.com/
https://maps.google.at/url?sa=t&url=https://joinlive77.com/
https://maps.google.at/url?q=https://joinlive77.com/
https://maps.google.as/url?q=https://joinlive77.com/
https://maps.google.ae/url?q=https://joinlive77.com/
https://maps.google.ad/url?q=https://joinlive77.com/
https://images.google.ws/url?q=https://joinlive77.com/
https://images.google.vu/url?q=https://joinlive77.com/
https://images.google.vg/url?q=https://joinlive77.com/
https://images.google.tt/url?q=https://joinlive77.com/
https://images.google.to/url?q=https://joinlive77.com/
https://images.google.tm/url?q=https://joinlive77.com/
https://images.google.tl/url?q=https://joinlive77.com/
https://images.google.tk/url?q=https://joinlive77.com/
https://images.google.tg/url?q=https://joinlive77.com/
https://images.google.st/url?q=https://joinlive77.com/
https://images.google.sr/url?q=https://joinlive77.com/
https://images.google.so/url?q=https://joinlive77.com/
https://images.google.sm/url?q=https://joinlive77.com/
https://images.google.sk/url?sa=t&url=https://joinlive77.com/
https://images.google.si/url?sa=t&url=https://joinlive77.com/
https://images.google.sh/url?q=https://joinlive77.com/
https://images.google.se/url?q=https://joinlive77.com/
https://images.google.sc/url?q=https://joinlive77.com/
https://images.google.rw/url?q=https://joinlive77.com/
https://images.google.ru/url?q=https://joinlive77.com/
https://images.google.ro/url?q=https://joinlive77.com/
https://images.google.pt/url?q=https://joinlive77.com/
https://images.google.ps/url?sa=t&url=https://joinlive77.com/
https://images.google.ps/url?q=https://joinlive77.com/
https://images.google.pn/url?q=https://joinlive77.com/
https://images.google.pl/url?q=https://joinlive77.com/
https://images.google.nu/url?q=https://joinlive77.com/
https://images.google.nr/url?q=https://joinlive77.com/
https://images.google.no/url?q=https://joinlive77.com/
https://images.google.nl/url?q=https://joinlive77.com/
https://images.google.ne/url?q=https://joinlive77.com/
https://images.google.mw/url?q=https://joinlive77.com/
https://images.google.mv/url?q=https://joinlive77.com/
https://images.google.ms/url?q=https://joinlive77.com/
https://images.google.ml/url?q=https://joinlive77.com/
https://images.google.mk/url?q=https://joinlive77.com/
https://images.google.mg/url?q=https://joinlive77.com/
https://images.google.me/url?q=https://joinlive77.com/
https://images.google.md/url?q=https://joinlive77.com/
https://images.google.lk/url?sa=t&url=https://joinlive77.com/
https://images.google.lk/url?q=https://joinlive77.com/
https://images.google.li/url?sa=t&url=https://joinlive77.com/
https://images.google.la/url?q=https://joinlive77.com/
https://images.google.kz/url?q=https://joinlive77.com/
https://images.google.ki/url?q=https://joinlive77.com/
https://images.google.kg/url?sa=t&url=https://joinlive77.com/
https://images.google.kg/url?q=https://joinlive77.com/
https://images.google.jo/url?q=https://joinlive77.com/
https://images.google.je/url?q=https://joinlive77.com/
https://images.google.it/url?sa=t&url=https://joinlive77.com/
https://images.google.it/url?q=https://joinlive77.com/
https://images.google.iq/url?q=https://joinlive77.com/
https://images.google.im/url?q=https://joinlive77.com/
https://images.google.ie/url?sa=t&url=https://joinlive77.com/
https://images.google.hu/url?sa=t&url=https://joinlive77.com/
https://images.google.hu/url?q=https://joinlive77.com/
https://images.google.ht/url?q=https://joinlive77.com/
https://images.google.hn/url?q=https://joinlive77.com/
https://images.google.gy/url?q=https://joinlive77.com/
https://images.google.gr/url?q=https://joinlive77.com/
https://images.google.gp/url?q=https://joinlive77.com/
https://images.google.gm/url?q=https://joinlive77.com/
https://images.google.gl/url?q=https://joinlive77.com/
https://images.google.gg/url?q=https://joinlive77.com/
https://images.google.ge/url?q=https://joinlive77.com/
https://images.google.ga/url?q=https://joinlive77.com/
https://images.google.fr/url?q=https://joinlive77.com/
https://images.google.fi/url?sa=t&url=https://joinlive77.com/
https://images.google.fi/url?q=https://joinlive77.com/
https://images.google.es/url?q=https://joinlive77.com/
https://images.google.ee/url?sa=t&url=https://joinlive77.com/
https://images.google.dz/url?q=https://joinlive77.com/
https://images.google.dm/url?q=https://joinlive77.com/
https://images.google.dk/url?q=https://joinlive77.com/
https://images.google.dj/url?q=https://joinlive77.com/
https://images.google.de/url?sa=t&url=https://joinlive77.com/
https://images.google.de/url?q=https://joinlive77.com/
https://images.google.cz/url?q=https://joinlive77.com/
https://images.google.cv/url?q=https://joinlive77.com/
https://images.google.com/url?sa=t&url=https://joinlive77.com/
https://images.google.com/url?q=https://joinlive77.com/
https://images.google.com.vn/url?q=https://joinlive77.com/
https://images.google.com.vc/url?q=https://joinlive77.com/
https://images.google.com.ua/url?sa=t&url=https://joinlive77.com/
https://images.google.com.ua/url?q=https://joinlive77.com/
https://images.google.com.tw/url?q=https://joinlive77.com/
https://images.google.com.tr/url?q=https://joinlive77.com/
https://images.google.com.tj/url?q=https://joinlive77.com/
https://images.google.com.sv/url?q=https://joinlive77.com/
https://images.google.com.sl/url?q=https://joinlive77.com/
https://images.google.com.sg/url?q=https://joinlive77.com/
https://images.google.com.sb/url?q=https://joinlive77.com/
https://images.google.com.qa/url?sa=t&url=https://joinlive77.com/
https://images.google.com.py/url?q=https://joinlive77.com/
https://images.google.com.pk/url?sa=t&url=https://joinlive77.com/
https://images.google.com.ph/url?q=https://joinlive77.com/
https://images.google.com.pe/url?sa=t&url=https://joinlive77.com/
https://images.google.com.pa/url?sa=t&url=https://joinlive77.com/
https://images.google.com.pa/url?q=https://joinlive77.com/
https://images.google.com.om/url?q=https://joinlive77.com/
https://images.google.com.np/url?sa=t&url=https://joinlive77.com/
https://images.google.com.ni/url?q=https://joinlive77.com/
https://images.google.com.ng/url?sa=t&url=https://joinlive77.com/
https://images.google.com.na/url?q=https://joinlive77.com/
https://images.google.com.my/url?sa=t&url=https://joinlive77.com/
https://images.google.com.mx/url?sa=t&url=https://joinlive77.com/
https://images.google.com.mx/url?q=https://joinlive77.com/
https://images.google.com.mm/url?sa=t&url=https://joinlive77.com/
https://images.google.com.mm/url?q=https://joinlive77.com/
https://images.google.com.ly/url?sa=t&url=https://joinlive77.com/
https://images.google.com.ly/url?q=https://joinlive77.com/
https://images.google.com.lb/url?sa=t&url=https://joinlive77.com/
https://images.google.com.lb/url?q=https://joinlive77.com/
https://images.google.com.kw/url?sa=t&url=https://joinlive77.com/
https://images.google.com.kw/url?q=https://joinlive77.com/
https://images.google.com.kh/url?sa=t&url=https://joinlive77.com/
https://images.google.com.kh/url?q=https://joinlive77.com/
https://images.google.com.jm/url?q=https://joinlive77.com/
https://images.google.com.hk/url?sa=t&url=https://joinlive77.com/
https://images.google.com.hk/url?q=https://joinlive77.com/
https://images.google.com.gt/url?sa=t&url=https://joinlive77.com/
https://images.google.com.gi/url?q=https://joinlive77.com/
https://images.google.com.gh/url?sa=t&url=https://joinlive77.com/
https://images.google.com.fj/url?q=https://joinlive77.com/
https://images.google.com.et/url?q=https://joinlive77.com/
https://images.google.com.eg/url?sa=t&url=https://joinlive77.com/
https://images.google.com.eg/url?q=https://joinlive77.com/
https://images.google.com.do/url?sa=t&url=https://joinlive77.com/
https://images.google.com.cy/url?sa=t&url=https://joinlive77.com/
https://images.google.com.cy/url?q=https://joinlive77.com/
https://images.google.com.cu/url?q=https://joinlive77.com/
https://images.google.com.bz/url?q=https://joinlive77.com/
https://images.google.com.br/url?sa=t&url=https://joinlive77.com/
https://images.google.com.br/url?q=https://joinlive77.com/
https://images.google.com.bo/url?q=https://joinlive77.com/
https://images.google.com.bn/url?sa=t&url=https://joinlive77.com/
https://images.google.com.bn/url?q=https://joinlive77.com/
https://images.google.com.bd/url?sa=t&url=https://joinlive77.com/
https://images.google.com.bd/url?q=https://joinlive77.com/
https://images.google.com.au/url?q=https://joinlive77.com/
https://images.google.com.ar/url?q=https://joinlive77.com/
https://images.google.com.ai/url?q=https://joinlive77.com/
https://images.google.com.ag/url?sa=t&url=https://joinlive77.com/
https://images.google.com.ag/url?q=https://joinlive77.com/
https://images.google.com.af/url?q=https://joinlive77.com/
https://images.google.co.zw/url?q=https://joinlive77.com/
https://images.google.co.zm/url?q=https://joinlive77.com/
https://images.google.co.za/url?q=https://joinlive77.com/
https://images.google.co.vi/url?q=https://joinlive77.com/
https://images.google.co.ve/url?sa=t&url=https://joinlive77.com/
https://images.google.co.ve/url?q=https://joinlive77.com/
https://images.google.co.uz/url?q=https://joinlive77.com/
https://images.google.co.uk/url?q=https://joinlive77.com/
https://images.google.co.ug/url?q=https://joinlive77.com/
https://images.google.co.tz/url?q=https://joinlive77.com/
https://images.google.co.th/url?q=https://joinlive77.com/
https://images.google.co.nz/url?q=https://joinlive77.com/
https://images.google.co.mz/url?q=https://joinlive77.com/
https://images.google.co.ma/url?q=https://joinlive77.com/
https://images.google.co.ls/url?q=https://joinlive77.com/
https://images.google.co.kr/url?q=https://joinlive77.com/
https://images.google.co.jp/url?q=https://joinlive77.com/
https://images.google.co.in/url?q=https://joinlive77.com/
https://images.google.co.id/url?q=https://joinlive77.com/
https://images.google.co.cr/url?q=https://joinlive77.com/
https://images.google.co.ck/url?q=https://joinlive77.com/
https://images.google.co.bw/url?q=https://joinlive77.com/
https://images.google.cm/url?q=https://joinlive77.com/
https://images.google.ci/url?q=https://joinlive77.com/
https://images.google.ch/url?q=https://joinlive77.com/
https://images.google.cg/url?q=https://joinlive77.com/
https://images.google.cf/url?q=https://joinlive77.com/
https://images.google.cd/url?q=https://joinlive77.com/
https://images.google.cat/url?sa=t&url=https://joinlive77.com/
https://images.google.cat/url?q=https://joinlive77.com/
https://images.google.ca/url?q=https://joinlive77.com/
https://images.google.by/url?q=https://joinlive77.com/
https://images.google.bt/url?q=https://joinlive77.com/
https://images.google.bs/url?q=https://joinlive77.com/
https://images.google.bj/url?q=https://joinlive77.com/
https://images.google.bg/url?sa=t&url=https://joinlive77.com/
https://images.google.bf/url?q=https://joinlive77.com/
https://images.google.be/url?sa=t&url=https://joinlive77.com/
https://images.google.be/url?q=https://joinlive77.com/
https://images.google.ba/url?q=https://joinlive77.com/
https://images.google.at/url?q=https://joinlive77.com/
https://images.google.am/url?q=https://joinlive77.com/
https://images.google.al/url?q=https://joinlive77.com/
https://images.google.ad/url?q=https://joinlive77.com/
https://images.google.ac/url?q=https://joinlive77.com/
https://google.ws/url?q=https://joinlive77.com/
https://google.vu/url?q=https://joinlive77.com/
https://google.vg/url?q=https://joinlive77.com/
https://google.tt/url?q=https://joinlive77.com/
https://google.to/url?q=https://joinlive77.com/
https://google.tm/url?q=https://joinlive77.com/
https://google.tl/url?q=https://joinlive77.com/
https://google.tk/url?q=https://joinlive77.com/
https://google.tg/url?q=https://joinlive77.com/
https://google.st/url?q=https://joinlive77.com/
https://google.sr/url?q=https://joinlive77.com/
https://google.so/url?q=https://joinlive77.com/
https://google.sm/url?q=https://joinlive77.com/
https://google.sh/url?q=https://joinlive77.com/
https://google.sc/url?q=https://joinlive77.com/
https://google.rw/url?q=https://joinlive77.com/
https://google.ps/url?q=https://joinlive77.com/
https://google.pn/url?q=https://joinlive77.com/
https://google.nu/url?q=https://joinlive77.com/
https://google.nr/url?q=https://joinlive77.com/
https://google.ne/url?q=https://joinlive77.com/
https://google.mw/url?q=https://joinlive77.com/
https://google.mv/url?q=https://joinlive77.com/
https://google.ms/url?q=https://joinlive77.com/
https://google.ml/url?q=https://joinlive77.com/
https://google.mg/url?q=https://joinlive77.com/
https://google.md/url?q=https://joinlive77.com/
https://google.lk/url?q=https://joinlive77.com/
https://google.la/url?q=https://joinlive77.com/
https://google.kz/url?q=https://joinlive77.com/
https://google.ki/url?q=https://joinlive77.com/
https://google.kg/url?q=https://joinlive77.com/
https://google.iq/url?q=https://joinlive77.com/
https://google.im/url?q=https://joinlive77.com/
https://google.ht/url?q=https://joinlive77.com/
https://google.hn/url?sa=t&url=https://joinlive77.com/
https://google.gm/url?q=https://joinlive77.com/
https://google.gl/url?q=https://joinlive77.com/
https://google.gg/url?q=https://joinlive77.com/
https://google.ge/url?q=https://joinlive77.com/
https://google.ga/url?q=https://joinlive77.com/
https://google.dz/url?q=https://joinlive77.com/
https://google.dm/url?q=https://joinlive77.com/
https://google.dj/url?q=https://joinlive77.com/
https://google.cv/url?q=https://joinlive77.com/
https://google.com.vc/url?q=https://joinlive77.com/
https://google.com.tj/url?q=https://joinlive77.com/
https://google.com.sv/url?sa=t&url=https://joinlive77.com/
https://google.com.sb/url?q=https://joinlive77.com/
https://google.com.pa/url?q=https://joinlive77.com/
https://google.com.om/url?q=https://joinlive77.com/
https://google.com.ni/url?q=https://joinlive77.com/
https://google.com.na/url?q=https://joinlive77.com/
https://google.com.kw/url?q=https://joinlive77.com/
https://google.com.kh/url?q=https://joinlive77.com/
https://google.com.jm/url?q=https://joinlive77.com/
https://google.com.gi/url?q=https://joinlive77.com/
https://google.com.gh/url?q=https://joinlive77.com/
https://google.com.fj/url?q=https://joinlive77.com/
https://google.com.et/url?q=https://joinlive77.com/
https://google.com.do/url?q=https://joinlive77.com/
https://google.com.bz/url?q=https://joinlive77.com/
https://google.com.ai/url?q=https://joinlive77.com/
https://google.com.ag/url?q=https://joinlive77.com/
https://google.com.af/url?q=https://joinlive77.com/
https://google.co.bw/url?sa=t&url=https://joinlive77.com/
https://google.cm/url?q=https://joinlive77.com/
https://google.ci/url?sa=t&url=https://joinlive77.com/
https://google.cg/url?q=https://joinlive77.com/
https://google.cf/url?q=https://joinlive77.com/
https://google.cd/url?q=https://joinlive77.com/
https://google.bt/url?q=https://joinlive77.com/
https://google.bj/url?q=https://joinlive77.com/
https://google.bf/url?q=https://joinlive77.com/
https://google.am/url?q=https://joinlive77.com/
https://google.al/url?q=https://joinlive77.com/
https://google.ad/url?q=https://joinlive77.com/
https://google.ac/url?q=https://joinlive77.com/
https://www.google.ws/url?q=https://joinlive77.com/
https://www.google.vg/url?q=https://joinlive77.com/
https://www.google.tt/url?sa=t&url=https://joinlive77.com/
https://www.google.tl/url?q=https://joinlive77.com/
https://www.google.tg/url?q=https://joinlive77.com/
https://www.google.st/url?q=https://joinlive77.com/
https://www.google.se/url?q=https://joinlive77.com/
https://www.google.ru/url?q=https://joinlive77.com/
https://www.google.pl/url?q=https://joinlive77.com/
https://www.google.nu/url?q=https://joinlive77.com/
https://www.google.no/url?q=https://joinlive77.com/
https://www.google.nl/url?q=https://joinlive77.com/
https://www.google.ms/url?sa=t&url=https://joinlive77.com/
https://www.google.lu/url?sa=t&url=https://joinlive77.com/
https://www.google.la/url?q=https://joinlive77.com/
https://www.google.it/url?sa=t&url=https://joinlive77.com/
https://www.google.it/url?q=https://joinlive77.com/
https://www.google.is/url?sa=t&url=https://joinlive77.com/
https://www.google.hr/url?sa=t&url=https://joinlive77.com/
https://www.google.gr/url?sa=t&url=https://joinlive77.com/
https://www.google.gl/url?q=https://joinlive77.com/
https://www.google.fm/url?sa=t&url=https://joinlive77.com/
https://www.google.es/url?q=https://joinlive77.com/
https://www.google.dm/url?q=https://joinlive77.com/
https://www.google.dk/url?q=https://joinlive77.com/
https://www.google.de/url?q=https://joinlive77.com/
https://www.google.cz/url?sa=t&url=https://joinlive77.com/
https://www.google.cz/url?q=https://joinlive77.com/
https://www.google.com/url?sa=t&url=https://joinlive77.com/
https://www.google.com/url?q=https://joinlive77.com/
https://www.google.com.vn/url?sa=t&url=https://joinlive77.com/
https://www.google.com.vn/url?q=https://joinlive77.com/
https://www.google.com.uy/url?sa=t&url=https://joinlive77.com/
https://www.google.com.ua/url?q=https://joinlive77.com/
https://www.google.com.tw/url?q=https://joinlive77.com/
https://www.google.com.tr/url?q=https://joinlive77.com/
https://www.google.com.sl/url?q=https://joinlive77.com/
https://www.google.com.sg/url?q=https://joinlive77.com/
https://www.google.com.pr/url?sa=t&url=https://joinlive77.com/
https://www.google.com.pk/url?sa=t&url=https://joinlive77.com/
https://www.google.com.ph/url?q=https://joinlive77.com/
https://www.google.com.pe/url?sa=t&url=https://joinlive77.com/
https://www.google.com.om/url?q=https://joinlive77.com/
https://www.google.com.ng/url?sa=t&url=https://joinlive77.com/
https://www.google.com.my/url?sa=t&url=https://joinlive77.com/
https://www.google.com.mx/url?q=https://joinlive77.com/
https://www.google.com.kh/url?sa=t&url=https://joinlive77.com/
https://www.google.com.hk/url?q=https://joinlive77.com/
https://www.google.com.ec/url?sa=t&url=https://joinlive77.com/
https://www.google.com.bz/url?sa=t&url=https://joinlive77.com/
https://www.google.com.br/url?q=https://joinlive77.com/
https://www.google.com.bh/url?sa=t&url=https://joinlive77.com/
https://www.google.com.au/url?q=https://joinlive77.com/
https://www.google.com.ar/url?q=https://joinlive77.com/
https://www.google.co.za/url?q=https://joinlive77.com/
https://www.google.co.uk/url?sa=t&url=https://joinlive77.com/
https://www.google.co.uk/url?q=https://joinlive77.com/
https://www.google.co.th/url?q=https://joinlive77.com/
https://www.google.co.nz/url?q=https://joinlive77.com/
https://www.google.co.ma/url?sa=t&url=https://joinlive77.com/
https://www.google.co.jp/url?q=https://joinlive77.com/
https://www.google.co.in/url?q=https://joinlive77.com/
https://www.google.co.id/url?q=https://joinlive77.com/
https://www.google.co.ck/url?q=https://joinlive77.com/
https://www.google.co.bw/url?sa=t&url=https://joinlive77.com/
https://www.google.cl/url?sa=t&url=https://joinlive77.com/
https://www.google.ch/url?sa=t&url=https://joinlive77.com/
https://www.google.cd/url?q=https://joinlive77.com/
https://www.google.ca/url?sa=t&url=https://joinlive77.com/
https://www.google.by/url?sa=t&url=https://joinlive77.com/
https://www.google.bt/url?q=https://joinlive77.com/
https://www.google.be/url?q=https://joinlive77.com/
https://www.google.at/url?q=https://joinlive77.com/
https://www.google.as/url?sa=t&url=https://joinlive77.com/
https://www.google.ac/url?q=https://joinlive77.com/
http://www.google.sk/url?q=https://joinlive77.com/
http://www.google.ro/url?q=https://joinlive77.com/
http://www.google.pt/url?q=https://joinlive77.com/
http://www.google.no/url?q=https://joinlive77.com/
http://www.google.lt/url?q=https://joinlive77.com/
http://www.google.kg/url?q=https://joinlive77.com/
http://www.google.ie/url?q=https://joinlive77.com/
http://www.google.com.vn/url?q=https://joinlive77.com/
http://www.google.com.ua/url?q=https://joinlive77.com/
http://www.google.com.tr/url?q=https://joinlive77.com/
http://www.google.com.sg/url?q=https://joinlive77.com/
http://www.google.com.ph/url?q=https://joinlive77.com/
http://www.google.com.ar/url?q=https://joinlive77.com/
http://www.google.co.za/url?q=https://joinlive77.com/
http://www.google.co.nz/url?q=https://joinlive77.com/
http://www.google.co.kr/url?q=https://joinlive77.com/
http://www.google.co.il/url?q=https://joinlive77.com/
http://www.google.co.id/url?q=https://joinlive77.com/
http://www.google.cl/url?q=https://joinlive77.com/
http://cse.google.com.ly/url?sa=i&url=https://joinlive77.com/
http://cse.google.com.lb/url?sa=i&url=https://joinlive77.com/
http://cse.google.com.kw/url?sa=i&url=https://joinlive77.com/
http://cse.google.com.kh/url?sa=i&url=https://joinlive77.com/
http://cse.google.com.jm/url?sa=i&url=https://joinlive77.com/
http://cse.google.com.hk/url?sa=i&url=https://joinlive77.com/
http://cse.google.com.gt/url?sa=i&url=https://joinlive77.com/
http://cse.google.com.gi/url?sa=i&url=https://joinlive77.com/
http://cse.google.com.gh/url?sa=i&url=https://joinlive77.com/
http://cse.google.com.fj/url?sa=i&url=https://joinlive77.com/
http://cse.google.com.et/url?sa=i&url=https://joinlive77.com/
http://cse.google.com.eg/url?sa=i&url=https://joinlive77.com/
http://cse.google.com.ec/url?sa=i&url=https://joinlive77.com/
http://cse.google.com.do/url?sa=i&url=https://joinlive77.com/
http://cse.google.com.cy/url?sa=i&url=https://joinlive77.com/
http://cse.google.com.co/url?sa=i&url=https://joinlive77.com/
http://cse.google.com.bz/url?sa=i&url=https://joinlive77.com/
http://cse.google.com.br/url?sa=i&url=https://joinlive77.com/
http://cse.google.com.bo/url?sa=i&url=https://joinlive77.com/
http://cse.google.com.bn/url?sa=i&url=https://joinlive77.com/
http://cse.google.com.bh/url?sa=i&url=https://joinlive77.com/
http://cse.google.com.bd/url?sa=i&url=https://joinlive77.com/
http://cse.google.com.au/url?sa=i&url=https://joinlive77.com/
http://cse.google.com.ai/url?sa=i&url=https://joinlive77.com/
http://cse.google.com.ag/url?sa=i&url=https://joinlive77.com/
http://cse.google.com.af/url?sa=i&url=https://joinlive77.com/
http://cse.google.co.zw/url?sa=i&url=https://joinlive77.com/
http://cse.google.co.zm/url?sa=i&url=https://joinlive77.com/
http://cse.google.co.za/url?sa=i&url=https://joinlive77.com/
http://cse.google.co.vi/url?sa=i&url=https://joinlive77.com/
http://cse.google.co.ve/url?sa=i&url=https://joinlive77.com/
http://cse.google.co.uz/url?sa=i&url=https://joinlive77.com/
http://cse.google.co.uk/url?sa=i&url=https://joinlive77.com/
http://cse.google.co.ug/url?sa=i&url=https://joinlive77.com/
http://cse.google.co.tz/url?sa=i&url=https://joinlive77.com/
http://cse.google.co.th/url?sa=i&url=https://joinlive77.com/
http://cse.google.co.nz/url?sa=i&url=https://joinlive77.com/
http://cse.google.co.mz/url?sa=i&url=https://joinlive77.com/
http://cse.google.co.ma/url?sa=i&url=https://joinlive77.com/
http://cse.google.co.ls/url?sa=i&url=https://joinlive77.com/
http://cse.google.co.kr/url?sa=i&url=https://joinlive77.com/
http://cse.google.co.ke/url?sa=i&url=https://joinlive77.com/
http://cse.google.co.jp/url?sa=i&url=https://joinlive77.com/
http://cse.google.co.in/url?sa=i&url=https://joinlive77.com/
http://cse.google.co.il/url?sa=i&url=https://joinlive77.com/
http://cse.google.co.id/url?sa=i&url=https://joinlive77.com/
http://cse.google.co.cr/url?sa=i&url=https://joinlive77.com/
http://cse.google.co.ck/url?sa=i&url=https://joinlive77.com/
http://cse.google.co.bw/url?sa=i&url=https://joinlive77.com/
http://cse.google.co.ao/url?sa=i&url=https://joinlive77.com/
http://cse.google.cm/url?sa=i&url=https://joinlive77.com/
http://cse.google.cl/url?sa=i&url=https://joinlive77.com/
http://cse.google.ci/url?sa=i&url=https://joinlive77.com/
http://cse.google.ch/url?sa=i&url=https://joinlive77.com/
http://cse.google.cg/url?sa=i&url=https://joinlive77.com/
http://cse.google.cf/url?sa=i&url=https://joinlive77.com/
http://cse.google.cd/url?sa=i&url=https://joinlive77.com/
http://cse.google.cat/url?sa=i&url=https://joinlive77.com/
http://cse.google.ca/url?sa=i&url=https://joinlive77.com/
http://cse.google.by/url?sa=i&url=https://joinlive77.com/
http://cse.google.bt/url?sa=i&url=https://joinlive77.com/
http://cse.google.bs/url?sa=i&url=https://joinlive77.com/
http://cse.google.bj/url?sa=i&url=https://joinlive77.com/
http://cse.google.bi/url?sa=i&url=https://joinlive77.com/
http://cse.google.bg/url?sa=i&url=https://joinlive77.com/
http://cse.google.bf/url?sa=i&url=https://joinlive77.com/
http://cse.google.be/url?sa=i&url=https://joinlive77.com/
http://cse.google.ba/url?sa=i&url=https://joinlive77.com/
http://cse.google.az/url?sa=i&url=https://joinlive77.com/
http://cse.google.at/url?sa=i&url=https://joinlive77.com/
http://cse.google.as/url?sa=i&url=https://joinlive77.com/
http://cse.google.am/url?sa=i&url=https://joinlive77.com/
http://cse.google.al/url?sa=i&url=https://joinlive77.com/
http://cse.google.ae/url?sa=i&url=https://joinlive77.com/
http://cse.google.ad/url?sa=i&url=https://joinlive77.com/
http://cse.google.ac/url?sa=i&url=https://joinlive77.com/
http://maps.google.ws/url?q=https://joinlive77.com/
http://maps.google.vu/url?q=https://joinlive77.com/
http://maps.google.vg/url?q=https://joinlive77.com/
http://maps.google.tt/url?q=https://joinlive77.com/
http://maps.google.sn/url?q=https://joinlive77.com/
http://maps.google.sm/url?q=https://joinlive77.com/
http://maps.google.sk/url?sa=t&url=https://joinlive77.com/
http://maps.google.si/url?sa=t&url=https://joinlive77.com/
http://maps.google.sh/url?q=https://joinlive77.com/
http://maps.google.sc/url?q=https://joinlive77.com/
http://maps.google.rw/url?q=https://joinlive77.com/
http://maps.google.ru/url?sa=t&url=https://joinlive77.com/
http://maps.google.ro/url?sa=t&url=https://joinlive77.com/
http://maps.google.pt/url?sa=t&url=https://joinlive77.com/
http://maps.google.pn/url?q=https://joinlive77.com/
http://maps.google.pl/url?sa=t&url=https://joinlive77.com/
http://maps.google.nr/url?q=https://joinlive77.com/
http://maps.google.nl/url?sa=t&url=https://joinlive77.com/
http://maps.google.mw/url?q=https://joinlive77.com/
http://maps.google.mv/url?q=https://joinlive77.com/
http://maps.google.ms/url?q=https://joinlive77.com/
http://maps.google.mn/url?q=https://joinlive77.com/
http://maps.google.ml/url?q=https://joinlive77.com/
http://maps.google.mg/url?q=https://joinlive77.com/
http://maps.google.lv/url?sa=t&url=https://joinlive77.com/
http://maps.google.lt/url?sa=t&url=https://joinlive77.com/
http://maps.google.li/url?q=https://joinlive77.com/
http://maps.google.la/url?q=https://joinlive77.com/
http://maps.google.kg/url?q=https://joinlive77.com/
http://maps.google.je/url?q=https://joinlive77.com/
http://maps.google.it/url?sa=t&url=https://joinlive77.com/
http://maps.google.iq/url?q=https://joinlive77.com/
http://maps.google.im/url?q=https://joinlive77.com/
http://maps.google.ie/url?sa=t&url=https://joinlive77.com/
http://maps.google.ie/url?q=https://joinlive77.com/
http://maps.google.hu/url?sa=t&url=https://joinlive77.com/
http://maps.google.ht/url?q=https://joinlive77.com/
http://maps.google.hr/url?sa=t&url=https://joinlive77.com/
http://maps.google.gr/url?sa=t&url=https://joinlive77.com/
http://maps.google.gm/url?q=https://joinlive77.com/
http://maps.google.gg/url?q=https://joinlive77.com/
http://maps.google.fr/url?sa=t&url=https://joinlive77.com/
http://maps.google.fm/url?q=https://joinlive77.com/
http://maps.google.fi/url?sa=t&url=https://joinlive77.com/
http://maps.google.es/url?sa=t&url=https://joinlive77.com/
http://maps.google.ee/url?sa=t&url=https://joinlive77.com/
http://maps.google.dm/url?q=https://joinlive77.com/
http://maps.google.dk/url?sa=t&url=https://joinlive77.com/
http://maps.google.dj/url?q=https://joinlive77.com/
http://maps.google.cz/url?sa=t&url=https://joinlive77.com/
http://maps.google.com/url?sa=t&url=https://joinlive77.com/
http://maps.google.com.ua/url?sa=t&url=https://joinlive77.com/
http://maps.google.com.tw/url?sa=t&url=https://joinlive77.com/
http://maps.google.com.tr/url?sa=t&url=https://joinlive77.com/
http://maps.google.com.sg/url?sa=t&url=https://joinlive77.com/
http://maps.google.com.sa/url?sa=t&url=https://joinlive77.com/
http://maps.google.com.qa/url?q=https://joinlive77.com/
http://maps.google.com.om/url?q=https://joinlive77.com/
http://maps.google.com.na/url?q=https://joinlive77.com/
http://maps.google.com.my/url?sa=t&url=https://joinlive77.com/
http://maps.google.com.mx/url?sa=t&url=https://joinlive77.com/
http://maps.google.com.mm/url?q=https://joinlive77.com/
http://maps.google.com.ly/url?q=https://joinlive77.com/
http://maps.google.com.jm/url?q=https://joinlive77.com/
http://maps.google.com.hk/url?sa=t&url=https://joinlive77.com/
http://maps.google.com.gi/url?q=https://joinlive77.com/
http://maps.google.com.fj/url?q=https://joinlive77.com/
http://maps.google.com.et/url?q=https://joinlive77.com/
http://maps.google.com.eg/url?sa=t&url=https://joinlive77.com/
http://maps.google.com.do/url?sa=t&url=https://joinlive77.com/
http://maps.google.com.cu/url?q=https://joinlive77.com/
http://maps.google.com.co/url?sa=t&url=https://joinlive77.com/
http://maps.google.com.bz/url?q=https://joinlive77.com/
http://maps.google.com.br/url?sa=t&url=https://joinlive77.com/
http://maps.google.com.bn/url?q=https://joinlive77.com/
http://maps.google.com.bh/url?q=https://joinlive77.com/
http://maps.google.com.au/url?sa=t&url=https://joinlive77.com/
http://maps.google.com.ag/url?q=https://joinlive77.com/
http://maps.google.co.zw/url?q=https://joinlive77.com/
http://maps.google.co.zm/url?q=https://joinlive77.com/
http://maps.google.co.za/url?sa=t&url=https://joinlive77.com/
http://maps.google.co.vi/url?q=https://joinlive77.com/
http://maps.google.co.ve/url?sa=t&url=https://joinlive77.com/
http://maps.google.co.uk/url?sa=t&url=https://joinlive77.com/
http://maps.google.co.ug/url?q=https://joinlive77.com/
http://maps.google.co.tz/url?q=https://joinlive77.com/
http://maps.google.co.th/url?sa=t&url=https://joinlive77.com/
http://maps.google.co.nz/url?sa=t&url=https://joinlive77.com/
http://maps.google.co.mz/url?q=https://joinlive77.com/
http://maps.google.co.ls/url?q=https://joinlive77.com/
http://maps.google.co.jp/url?sa=t&url=https://joinlive77.com/
http://maps.google.co.in/url?sa=t&url=https://joinlive77.com/
http://maps.google.co.il/url?sa=t&url=https://joinlive77.com/
http://maps.google.co.id/url?sa=t&url=https://joinlive77.com/
http://maps.google.co.ck/url?q=https://joinlive77.com/
http://maps.google.co.bw/url?q=https://joinlive77.com/
http://maps.google.co.ao/url?q=https://joinlive77.com/
http://maps.google.cm/url?q=https://joinlive77.com/
http://maps.google.cl/url?sa=t&url=https://joinlive77.com/
http://maps.google.ci/url?q=https://joinlive77.com/
http://maps.google.ch/url?sa=t&url=https://joinlive77.com/
http://maps.google.cg/url?q=https://joinlive77.com/
http://maps.google.cd/url?q=https://joinlive77.com/
http://maps.google.ca/url?sa=t&url=https://joinlive77.com/
http://maps.google.bt/url?q=https://joinlive77.com/
http://maps.google.bs/url?q=https://joinlive77.com/
http://maps.google.bj/url?q=https://joinlive77.com/
http://maps.google.bi/url?q=https://joinlive77.com/
http://maps.google.bg/url?sa=t&url=https://joinlive77.com/
http://maps.google.be/url?sa=t&url=https://joinlive77.com/
http://maps.google.ba/url?sa=t&url=https://joinlive77.com/
http://maps.google.at/url?sa=t&url=https://joinlive77.com/
http://maps.google.as/url?q=https://joinlive77.com/
http://maps.google.ae/url?sa=t&url=https://joinlive77.com/
http://maps.google.ad/url?q=https://joinlive77.com/
http://images.google.ws/url?q=https://joinlive77.com/
http://images.google.vu/url?q=https://joinlive77.com/
http://images.google.vg/url?q=https://joinlive77.com/
http://images.google.tm/url?q=https://joinlive77.com/
http://images.google.sr/url?q=https://joinlive77.com/
http://images.google.sn/url?q=https://joinlive77.com/
http://images.google.sm/url?q=https://joinlive77.com/
http://images.google.sk/url?sa=t&url=https://joinlive77.com/
http://images.google.si/url?sa=t&url=https://joinlive77.com/
http://images.google.sh/url?q=https://joinlive77.com/
http://images.google.sc/url?q=https://joinlive77.com/
http://images.google.rw/url?q=https://joinlive77.com/
http://images.google.ru/url?sa=t&url=https://joinlive77.com/
http://images.google.ro/url?sa=t&url=https://joinlive77.com/
http://images.google.pt/url?sa=t&url=https://joinlive77.com/
http://images.google.ps/url?q=https://joinlive77.com/
http://images.google.pn/url?q=https://joinlive77.com/
http://images.google.pl/url?sa=t&url=https://joinlive77.com/
http://images.google.nr/url?q=https://joinlive77.com/
http://images.google.nl/url?sa=t&url=https://joinlive77.com/
http://images.google.mw/url?q=https://joinlive77.com/
http://images.google.mv/url?q=https://joinlive77.com/
http://images.google.ms/url?q=https://joinlive77.com/
http://images.google.mn/url?q=https://joinlive77.com/
http://images.google.ml/url?q=https://joinlive77.com/
http://images.google.mg/url?q=https://joinlive77.com/
http://images.google.me/url?q=https://joinlive77.com/
http://images.google.md/url?q=https://joinlive77.com/
http://images.google.lv/url?sa=t&url=https://joinlive77.com/
http://images.google.lk/url?sa=t&url=https://joinlive77.com/
http://images.google.li/url?q=https://joinlive77.com/
http://images.google.la/url?q=https://joinlive77.com/
http://images.google.kg/url?q=https://joinlive77.com/
http://images.google.je/url?q=https://joinlive77.com/
http://images.google.it/url?sa=t&url=https://joinlive77.com/
http://images.google.iq/url?q=https://joinlive77.com/
http://images.google.im/url?q=https://joinlive77.com/
http://images.google.ie/url?sa=t&url=https://joinlive77.com/
http://images.google.ie/url?q=https://joinlive77.com/
http://images.google.hu/url?sa=t&url=https://joinlive77.com/
http://images.google.ht/url?q=https://joinlive77.com/
http://images.google.hr/url?sa=t&url=https://joinlive77.com/
http://images.google.gr/url?sa=t&url=https://joinlive77.com/
http://images.google.gm/url?q=https://joinlive77.com/
http://images.google.gg/url?q=https://joinlive77.com/
http://images.google.fr/url?sa=t&url=https://joinlive77.com/
http://images.google.fm/url?q=https://joinlive77.com/
http://images.google.fi/url?sa=t&url=https://joinlive77.com/
http://images.google.es/url?sa=t&url=https://joinlive77.com/
http://images.google.ee/url?sa=t&url=https://joinlive77.com/
http://images.google.dm/url?q=https://joinlive77.com/
http://images.google.dk/url?sa=t&url=https://joinlive77.com/
http://images.google.dj/url?q=https://joinlive77.com/
http://images.google.de/url?sa=t&url=https://joinlive77.com/
http://images.google.cz/url?sa=t&url=https://joinlive77.com/
http://images.google.com/url?sa=t&url=https://joinlive77.com/
http://images.google.com.vn/url?sa=t&url=https://joinlive77.com/
http://images.google.com.uy/url?sa=t&url=https://joinlive77.com/
http://images.google.com.ua/url?sa=t&url=https://joinlive77.com/
http://images.google.com.tw/url?sa=t&url=https://joinlive77.com/
http://images.google.com.tr/url?sa=t&url=https://joinlive77.com/
http://images.google.com.tj/url?q=https://joinlive77.com/
http://images.google.com.sg/url?sa=t&url=https://joinlive77.com/
http://images.google.com.sa/url?sa=t&url=https://joinlive77.com/
http://images.google.com.qa/url?q=https://joinlive77.com/
http://images.google.com.pk/url?sa=t&url=https://joinlive77.com/
http://images.google.com.pe/url?sa=t&url=https://joinlive77.com/
http://images.google.com.om/url?q=https://joinlive77.com/
http://images.google.com.ng/url?sa=t&url=https://joinlive77.com/
http://images.google.com.na/url?q=https://joinlive77.com/
http://images.google.com.my/url?sa=t&url=https://joinlive77.com/
http://images.google.com.mx/url?sa=t&url=https://joinlive77.com/
http://images.google.com.mm/url?q=https://joinlive77.com/
http://images.google.com.ly/url?q=https://joinlive77.com/
http://images.google.com.jm/url?q=https://joinlive77.com/
http://images.google.com.hk/url?sa=t&url=https://joinlive77.com/
http://images.google.com.gi/url?q=https://joinlive77.com/
http://images.google.com.fj/url?q=https://joinlive77.com/
http://images.google.com.et/url?q=https://joinlive77.com/
http://images.google.com.eg/url?sa=t&url=https://joinlive77.com/
http://images.google.com.ec/url?sa=t&url=https://joinlive77.com/
http://images.google.com.do/url?sa=t&url=https://joinlive77.com/
http://images.google.com.cy/url?q=https://joinlive77.com/
http://images.google.com.cu/url?q=https://joinlive77.com/
http://images.google.com.co/url?sa=t&url=https://joinlive77.com/
http://images.google.com.bz/url?q=https://joinlive77.com/
http://images.google.com.br/url?sa=t&url=https://joinlive77.com/
http://images.google.com.bn/url?q=https://joinlive77.com/
http://images.google.com.bh/url?q=https://joinlive77.com/
http://images.google.com.bd/url?sa=t&url=https://joinlive77.com/
http://images.google.com.au/url?sa=t&url=https://joinlive77.com/
http://images.google.com.ag/url?q=https://joinlive77.com/
http://images.google.com.af/url?q=https://joinlive77.com/
http://images.google.co.zw/url?q=https://joinlive77.com/
http://images.google.co.zm/url?q=https://joinlive77.com/
http://images.google.co.za/url?sa=t&url=https://joinlive77.com/
http://images.google.co.vi/url?q=https://joinlive77.com/
http://images.google.co.ve/url?sa=t&url=https://joinlive77.com/
http://images.google.co.uz/url?q=https://joinlive77.com/
http://images.google.co.uk/url?sa=t&url=https://joinlive77.com/
http://images.google.co.tz/url?q=https://joinlive77.com/
http://images.google.co.th/url?sa=t&url=https://joinlive77.com/
http://images.google.co.nz/url?sa=t&url=https://joinlive77.com/
http://images.google.co.mz/url?q=https://joinlive77.com/
http://images.google.co.ma/url?q=https://joinlive77.com/
http://images.google.co.ls/url?q=https://joinlive77.com/
http://images.google.co.jp/url?sa=t&url=https://joinlive77.com/
http://images.google.co.in/url?sa=t&url=https://joinlive77.com/
http://images.google.co.il/url?sa=t&url=https://joinlive77.com/
http://images.google.co.id/url?sa=t&url=https://joinlive77.com/
http://images.google.co.ck/url?q=https://joinlive77.com/
http://images.google.co.bw/url?q=https://joinlive77.com/
http://images.google.co.ao/url?q=https://joinlive77.com/
http://images.google.cl/url?sa=t&url=https://joinlive77.com/
http://images.google.ci/url?q=https://joinlive77.com/
http://images.google.ch/url?sa=t&url=https://joinlive77.com/
http://images.google.cg/url?q=https://joinlive77.com/
http://images.google.cd/url?q=https://joinlive77.com/
http://images.google.ca/url?sa=t&url=https://joinlive77.com/
http://images.google.bt/url?q=https://joinlive77.com/
http://images.google.bs/url?q=https://joinlive77.com/
http://images.google.bj/url?q=https://joinlive77.com/
http://images.google.bi/url?q=https://joinlive77.com/
http://images.google.bg/url?sa=t&url=https://joinlive77.com/
http://images.google.be/url?sa=t&url=https://joinlive77.com/
http://images.google.az/url?q=https://joinlive77.com/
http://images.google.at/url?sa=t&url=https://joinlive77.com/
http://images.google.as/url?q=https://joinlive77.com/
http://images.google.al/url?q=https://joinlive77.com/
http://images.google.ae/url?sa=t&url=https://joinlive77.com/
http://images.google.ad/url?q=https://joinlive77.com/
https://toolbarqueries.google.iq/url?q=https://joinlive77.com/
https://toolbarqueries.google.hu/url?q=https://joinlive77.com/
https://toolbarqueries.google.ht/url?q=https://joinlive77.com/
https://toolbarqueries.google.hr/url?q=https://joinlive77.com/
https://toolbarqueries.google.hn/url?q=https://joinlive77.com/
https://toolbarqueries.google.gy/url?q=https://joinlive77.com/
https://toolbarqueries.google.gr/url?q=https://joinlive77.com/
https://toolbarqueries.google.gp/url?q=https://joinlive77.com/
https://toolbarqueries.google.gm/url?q=https://joinlive77.com/
https://toolbarqueries.google.gl/url?q=https://joinlive77.com/
https://toolbarqueries.google.gg/url?q=https://joinlive77.com/
https://toolbarqueries.google.ge/url?q=https://joinlive77.com/
https://toolbarqueries.google.ga/url?q=https://joinlive77.com/
https://toolbarqueries.google.fr/url?q=https://joinlive77.com/
https://toolbarqueries.google.fm/url?q=https://joinlive77.com/
https://toolbarqueries.google.fi/url?q=https://joinlive77.com/
https://toolbarqueries.google.es/url?q=https://joinlive77.com/
https://toolbarqueries.google.ee/url?q=https://joinlive77.com/
https://toolbarqueries.google.dz/url?q=https://joinlive77.com/
https://toolbarqueries.google.dm/url?q=https://joinlive77.com/
https://toolbarqueries.google.dk/url?q=https://joinlive77.com/
https://toolbarqueries.google.dj/url?q=https://joinlive77.com/
https://toolbarqueries.google.de/url?q=https://joinlive77.com/
https://toolbarqueries.google.cz/url?q=https://joinlive77.com/
https://toolbarqueries.google.cv/url?q=https://joinlive77.com/
https://toolbarqueries.google.com/url?q=https://joinlive77.com/
https://toolbarqueries.google.com.kh/url?q=https://joinlive77.com/
https://toolbarqueries.google.com.hk/url?q=https://joinlive77.com/
https://toolbarqueries.google.com.gt/url?q=https://joinlive77.com/
https://toolbarqueries.google.com.gi/url?q=https://joinlive77.com/
https://toolbarqueries.google.com.gh/url?q=https://joinlive77.com/
https://toolbarqueries.google.com.fj/url?q=https://joinlive77.com/
https://toolbarqueries.google.com.et/url?q=https://joinlive77.com/
https://toolbarqueries.google.com.eg/url?q=https://joinlive77.com/
https://toolbarqueries.google.com.ec/url?q=https://joinlive77.com/
https://toolbarqueries.google.com.do/url?q=https://joinlive77.com/
https://toolbarqueries.google.com.cy/url?q=https://joinlive77.com/
https://toolbarqueries.google.com.cu/url?q=https://joinlive77.com/
https://toolbarqueries.google.com.co/url?q=https://joinlive77.com/
https://toolbarqueries.google.com.bz/url?q=https://joinlive77.com/
https://toolbarqueries.google.com.br/url?q=https://joinlive77.com/
https://toolbarqueries.google.com.bo/url?q=https://joinlive77.com/
https://toolbarqueries.google.com.bn/url?q=https://joinlive77.com/
https://toolbarqueries.google.com.bh/url?q=https://joinlive77.com/
https://toolbarqueries.google.com.bd/url?q=https://joinlive77.com/
https://toolbarqueries.google.com.au/url?q=https://joinlive77.com/
https://toolbarqueries.google.com.ar/url?sa=i&url=https://joinlive77.com/
https://toolbarqueries.google.com.ar/url?q=https://joinlive77.com/
https://toolbarqueries.google.com.ai/url?q=https://joinlive77.com/
https://toolbarqueries.google.com.ag/url?q=https://joinlive77.com/
https://toolbarqueries.google.com.af/url?q=https://joinlive77.com/
https://toolbarqueries.google.co.il/url?q=https://joinlive77.com/
https://toolbarqueries.google.co.id/url?q=https://joinlive77.com/
https://toolbarqueries.google.co.ck/url?q=https://joinlive77.com/
https://toolbarqueries.google.co.ao/url?q=https://joinlive77.com/
https://toolbarqueries.google.cn/url?q=https://joinlive77.com/
https://toolbarqueries.google.cm/url?q=https://joinlive77.com/
https://toolbarqueries.google.cl/url?q=https://joinlive77.com/
https://toolbarqueries.google.ci/url?q=https://joinlive77.com/
https://toolbarqueries.google.ch/url?q=https://joinlive77.com/
https://toolbarqueries.google.cg/url?q=https://joinlive77.com/
https://toolbarqueries.google.cf/url?q=https://joinlive77.com/
https://toolbarqueries.google.cd/url?q=https://joinlive77.com/
https://toolbarqueries.google.cc/url?q=https://joinlive77.com/
https://toolbarqueries.google.cat/url?q=https://joinlive77.com/
https://toolbarqueries.google.ca/url?q=https://joinlive77.com/
https://toolbarqueries.google.by/url?q=https://joinlive77.com/
https://toolbarqueries.google.bt/url?q=https://joinlive77.com/
https://toolbarqueries.google.bs/url?q=https://joinlive77.com/
https://toolbarqueries.google.bj/url?q=https://joinlive77.com/
https://toolbarqueries.google.bi/url?q=https://joinlive77.com/
https://toolbarqueries.google.bg/url?q=https://joinlive77.com/
https://toolbarqueries.google.bf/url?q=https://joinlive77.com/
https://toolbarqueries.google.be/url?q=https://joinlive77.com/
https://toolbarqueries.google.ba/url?q=https://joinlive77.com/
https://toolbarqueries.google.az/url?q=https://joinlive77.com/
https://toolbarqueries.google.at/url?q=https://joinlive77.com/
https://toolbarqueries.google.as/url?q=https://joinlive77.com/
https://toolbarqueries.google.am/url?q=https://joinlive77.com/
https://toolbarqueries.google.al/url?q=https://joinlive77.com/
https://toolbarqueries.google.ae/url?q=https://joinlive77.com/
https://toolbarqueries.google.ad/url?q=https://joinlive77.com/
https://toolbarqueries.google.ac/url?q=https://joinlive77.com/
https://bora-casino.com/
https://bora-casino.com/shangrilacasino/
https://bora-casino.com/pharaohcasino/
https://bora-casino.com/coolcasino/
https://bora-casino.com/baccarat/
https://bora-casino.com/orangecasino/
안전 카지노사이트 추천
안전 바카라사이트 추천
안전 온라인카지노 추천
파라오카지노
쿨카지노
바카라사이트 게임
샹그릴라카지노
오렌지카지노
안전 카지노사이트 추천_https://bora-casino.com/
안전 바카라사이트 추천_https://bora-casino.com/
안전 온라인카지노 추천_https://bora-casino.com/
파라오카지노_https://bora-casino.com/shangrilacasino/
쿨카지노_https://bora-casino.com/pharaohcasino/
바카라사이트 게임_https://bora-casino.com/coolcasino/
샹그릴라카지노_https://bora-casino.com/baccarat/
오렌지카지노_https://bora-casino.com/orangecasino/
https://www.bing.com/news/apiclick.aspx?ref=FexRss&aid=&tid=9BB77FDA801248A5AD23FDBDD5922800&url=https://bora-casino.com/
https://trello.com/add-card?source=mode=popup&name=click+here&desc=https://bora-casino.com/
https://tvtropes.org/pmwiki/no_outbounds.php?o=https://bora-casino.com/
https://xat.com/web_gear/chat/linkvalidator.php?link=https://bora-casino.com/
https://ipv4.google.com/url?q=https://bora-casino.com/
https://contacts.google.com/url?sa=t&url=https://bora-casino.com/
https://justpaste.it/redirect/172fy/https://bora-casino.com/
https://bbs.pku.edu.cn/v2/jump-to.php?url=https://bora-casino.com/
http://www.etis.ford.com/externalURL.do?url=https://bora-casino.com/
https://bares.blog.idnes.cz/redir.aspx?url=https://bora-casino.com/
http://jump.5ch.net/?https://bora-casino.com
http://guru.sanook.com/?URL=https://bora-casino.com/
http://branch.app.link/?$deeplink_path=article/jan/123&$fallback_url=https://bora-casino.com/
https://underwood.ru/away.html?url=https://bora-casino.com/
https://unicom.ru/links.php?go=https://bora-casino.com/
http://www.unifin.ru/bitrix/redirect.php?goto=https://bora-casino.com/
https://uogorod.ru/feed/520?redirect=https://bora-casino.com/
https://uziolog.ru/redirect?url=https://bora-casino.com/
https://utmagazine.ru/r?url=https://bora-casino.com/
http://uvbnb.ru/go?https://bora-casino.com/
https://ulfishing.ru/forum/go.php?https://bora-casino.com/
https://skibaza.ru/bitrix/rk.php?goto=https://bora-casino.com/
http://www.skladcom.ru/(S(qdiwhk55jkcyok45u4ti0a55))/banners.aspx?url=https://bora-casino.com/
https://smartservices.ru/bitrix/rk.php?goto=https://bora-casino.com/
http://www.topkam.ru/gtu/?url=https://bora-casino.com/
http://torgi-rybinsk.ru/bitrix/rk.php?goto=https://bora-casino.com/
http://tpprt.ru/bitrix/rk.php?goto=https://bora-casino.com/
https://twilightrussia.ru/go?https://bora-casino.com/
https://www.ibm.com/links/?cc=us&lc=en&prompt=1&url=https://bora-casino.com/
https://www.meetme.com/apps/redirect/?url=https://bora-casino.com/
http://frienddo.com/out.php?url=https://bora-casino.com/
http://onlinemanuals.txdot.gov/help/urlstatusgo.html?url=https://bora-casino.com/
https://community.rsa.com/external-link.jspa?url=https://bora-casino.com/
https://community.nxp.com/external-link.jspa?url=https://bora-casino.com/
https://supplier-portal-uat.daimler.com/external-link.jspa?url=https://bora-casino.com/
http://gfmis.crru.ac.th/web/redirect.php?url=https://bora-casino.com/
https://creativecommons.org/choose/results-one?q_1=2&q_1=1&field_attribute_to_url=https://bora-casino.com/
https://www.hobowars.com/game/linker.php?url=https://bora-casino.com/
http://tharp.me/?url_to_shorten=https://bora-casino.com/
https://images.google.com.vn/url?q=https://bora-casino.com/
https://images.google.be/url?q=https://bora-casino.com/
https://images.google.at/url?q=https://bora-casino.com/
https://ru.xhamster3.com/exit.php?url=https://bora-casino.com/
http://www.erotikplatz.at/redirect.php?id=939&mode=fuhrer&url=https://bora-casino.com/
http://www.imsnet.at/LangChange.aspx?uri=https://bora-casino.com/
https://www.kath-kirche-kaernten.at/pfarren/pfarre/C3014?URL=https://bora-casino.com/
http://gs.matzendorf.at/includes/linkaufruf.asp?art=kapitel&link=https://bora-casino.com/
http://www.nuttenzone.at/jump.php?url=https://bora-casino.com/
https://www.oebb.at/nightjet_newsletter/tc/xxxx?url=https://bora-casino.com/
https://ramset.com.au/document/url/?url=https://bora-casino.com/
https://www.vicsport.com.au/analytics/outbound?url=https://bora-casino.com/
http://www.rss.geodles.com/fwd.php?url=https://bora-casino.com/
http://imperialoptical.com/news-redirect.aspx?url=https://bora-casino.com/
https://www.interecm.com/interecm/tracker?op=click&id=5204.db2&url=https://bora-casino.com/
http://kenchow.keensdesign.com/out.php?url=https://bora-casino.com/
http://landbidz.com/redirect.asp?url=https://bora-casino.com/
https://www.viecngay.vn/go?to=https://bora-casino.com/
http://smile.wjp.am/link-free/link3.cgi?mode=cnt&no=8&hpurl=https://bora-casino.com/
https://dakke.co/redirect/?url=https://bora-casino.com/
http://www.aurki.com/jarioa/redirect?id_feed=510&url=https://bora-casino.com/
http://www.bdsmandfetish.com/cgi-bin/sites/out.cgi?id=mandymon&url=https://bora-casino.com/
https://www.bettnet.com/blog/?URL=https://bora-casino.com/
http://www.chungshingelectronic.com/redirect.asp?url=https://bora-casino.com/
https://www.freemusic123.com/karaoke/cgi-bin/out.cgi?id=castillo&url=https://bora-casino.com/
http://www.glorioustronics.com/redirect.php?link=https://bora-casino.com/
http://hellothai.com/wwwlink/wwwredirect.asp?hp_id=1242&url=https://bora-casino.com/
http://www.johnvorhees.com/gbook/go.php?url=https://bora-casino.com/
http://www.mistress-and-slave.com/cgi-bin/out.cgi?id=123crush&url=https://bora-casino.com/
http://www.myhottiewife.com/cgi-bin/arpro/out.cgi?id=Jojo&url=https://bora-casino.com/
https://cse.google.com.do/url?sa=i&url=https://bora-casino.com/
https://google.com.do/url?q=https://bora-casino.com/
https://maps.google.kz/url?q=https://bora-casino.com/
https://google.kz/url?q=https://bora-casino.com/
https://images.google.kz/url?q=https://bora-casino.com/
https://google.co.ma/url?q=https://bora-casino.com/
https://cse.google.co.ma/url?sa=i&url=https://bora-casino.com/
https://images.google.co.ma/url?q=https://bora-casino.com/
https://images.google.jo/url?q=https://bora-casino.com/
https://maps.google.jo/url?q=https://bora-casino.com/
https://maps.google.lk/url?q=https://bora-casino.com/
https://google.lk/url?q=https://bora-casino.com/
https://images.google.lk/url?q=https://bora-casino.com/
https://cse.google.com.cu/url?sa=i&url=https://bora-casino.com/
https://images.google.com.cu/url?q=https://bora-casino.com/
https://google.com.cu/url?q=https://bora-casino.com/
https://maps.google.com.cu/url?q=https://bora-casino.com/
https://google.com.gi/url?q=https://bora-casino.com/
https://images.google.com.gi/url?q=https://bora-casino.com/
https://cse.google.com.gi/url?sa=i&url=https://bora-casino.com/
https://maps.google.com.gi/url?q=https://bora-casino.com/
https://images.google.vu/url?q=https://bora-casino.com/
https://google.vu/url?q=https://bora-casino.com/
https://maps.google.vg/url?q=https://bora-casino.com/
https://google.vg/url?q=https://bora-casino.com/
https://images.google.vg/url?q=https://bora-casino.com/
https://maps.google.com.ni/url?q=https://bora-casino.com/
https://google.com.ni/url?q=https://bora-casino.com/
https://images.google.com.ni/url?q=https://bora-casino.com/
https://images.google.md/url?q=https://bora-casino.com/
https://google.md/url?q=https://bora-casino.com/
https://google.mg/url?q=https://bora-casino.com/
https://images.google.mg/url?q=https://bora-casino.com/
https://maps.google.mg/url?q=https://bora-casino.com/
https://maps.google.la/url?q=https://bora-casino.com/
https://google.la/url?q=https://bora-casino.com/
https://images.google.la/url?q=https://bora-casino.com/
https://maps.google.com.jm/url?q=https://bora-casino.com/
https://google.com.jm/url?q=https://bora-casino.com/
https://cse.google.com.jm/url?sa=i&url=https://bora-casino.com/
https://images.google.com.jm/url?q=https://bora-casino.com/
https://maps.google.com.vc/url?q=https://bora-casino.com/
https://images.google.com.vc/url?q=https://bora-casino.com/
https://google.com.vc/url?q=https://bora-casino.com/
https://google.com.tj/url?q=https://bora-casino.com/
https://images.google.com.tj/url?q=https://bora-casino.com/
https://cse.google.com.cy/url?sa=i&url=https://bora-casino.com/
https://images.google.com.cy/url?q=https://bora-casino.com/
https://google.com.sv/url?sa=t&url=https://bora-casino.com/
https://images.google.com.sv/url?q=https://bora-casino.com/
https://maps.google.com.sv/url?q=https://bora-casino.com/
https://images.google.rw/url?q=https://bora-casino.com/
https://google.rw/url?q=https://bora-casino.com/
https://maps.google.com.om/url?q=https://bora-casino.com/
https://google.com.om/url?q=https://bora-casino.com/
https://images.google.com.om/url?q=https://bora-casino.com/
https://google.ps/url?q=https://bora-casino.com/
https://images.google.ps/url?q=https://bora-casino.com/
https://images.google.com.bo/url?q=https://bora-casino.com/
https://maps.google.com.bo/url?q=https://bora-casino.com/
https://cse.google.com.bo/url?sa=i&url=https://bora-casino.com/
https://google.co.mz/url?q=https://bora-casino.com/
https://images.google.co.mz/url?q=https://bora-casino.com/
https://cse.google.co.mz/url?sa=i&url=https://bora-casino.com/
https://maps.google.co.mz/url?q=https://bora-casino.com/
https://maps.google.mk/url?q=https://bora-casino.com/
https://images.google.mk/url?q=https://bora-casino.com/
https://images.google.co.bw/url?q=https://bora-casino.com/
https://google.co.bw/url?sa=t&url=https://bora-casino.com/
https://maps.google.co.bw/url?q=https://bora-casino.com/
https://cse.google.co.bw/url?sa=i&url=https://bora-casino.com/
https://images.google.al/url?q=https://bora-casino.com/
https://google.al/url?q=https://bora-casino.com/
https://cse.google.al/url?sa=i&url=https://bora-casino.com/
https://google.sm/url?q=https://bora-casino.com/
https://maps.google.sm/url?q=https://bora-casino.com/
https://images.google.sm/url?q=https://bora-casino.com/
https://images.google.tm/url?q=https://bora-casino.com/
https://google.tm/url?q=https://bora-casino.com/
https://google.com.af/url?q=https://bora-casino.com/
https://images.google.com.af/url?q=https://bora-casino.com/
https://cse.google.com.af/url?sa=i&url=https://bora-casino.com/
https://maps.google.com.fj/url?q=https://bora-casino.com/
https://google.com.fj/url?q=https://bora-casino.com/
https://cse.google.com.fj/url?sa=i&url=https://bora-casino.com/
https://images.google.com.fj/url?q=https://bora-casino.com/
https://cse.google.com.kh/url?sa=i&url=https://bora-casino.com/
https://images.google.com.kh/url?q=https://bora-casino.com/
https://google.com.kh/url?q=https://bora-casino.com/
https://maps.google.com.kh/url?q=https://bora-casino.com/
https://images.google.cg/url?q=https://bora-casino.com/
https://cse.google.cg/url?sa=i&url=https://bora-casino.com/
https://google.cg/url?q=https://bora-casino.com/
https://maps.google.cg/url?q=https://bora-casino.com/
https://images.google.mw/url?q=https://bora-casino.com/
https://google.mw/url?q=https://bora-casino.com/
https://maps.google.mw/url?q=https://bora-casino.com/
https://images.google.com.kw/url?q=https://bora-casino.com/
https://maps.google.com.kw/url?q=https://bora-casino.com/
https://google.com.kw/url?q=https://bora-casino.com/
https://cse.google.com.kw/url?sa=i&url=https://bora-casino.com/
https://cse.google.com.lb/url?sa=i&url=https://bora-casino.com/
https://maps.google.com.lb/url?q=https://bora-casino.com/
https://images.google.com.lb/url?q=https://bora-casino.com/
https://google.co.ls/url?q=https://bora-casino.com/
https://images.google.co.ls/url?q=https://bora-casino.com/
https://cse.google.co.ls/url?sa=i&url=https://bora-casino.com/
https://maps.google.co.ls/url?q=https://bora-casino.com/
https://google.tt/url?q=https://bora-casino.com/
https://images.google.tt/url?q=https://bora-casino.com/
https://maps.google.tt/url?q=https://bora-casino.com/
https://google.ms/url?q=https://bora-casino.com/
https://images.google.ms/url?q=https://bora-casino.com/
https://maps.google.ms/url?q=https://bora-casino.com/
https://google.ci/url?sa=t&url=https://bora-casino.com/
https://cse.google.ci/url?sa=i&url=https://bora-casino.com/
https://maps.google.ci/url?q=https://bora-casino.com/
https://images.google.ci/url?q=https://bora-casino.com/
https://google.dm/url?q=https://bora-casino.com/
https://maps.google.dm/url?q=https://bora-casino.com/
https://images.google.dm/url?q=https://bora-casino.com/
https://google.dz/url?q=https://bora-casino.com/
https://maps.google.dz/url?q=https://bora-casino.com/
https://images.google.dz/url?q=https://bora-casino.com/
https://cse.google.co.vi/url?sa=i&url=https://bora-casino.com/
https://images.google.co.vi/url?q=https://bora-casino.com/
https://maps.google.co.vi/url?q=https://bora-casino.com/
https://google.co.vi/url?q=https://bora-casino.com/
https://maps.google.dj/url?q=https://bora-casino.com/
https://images.google.dj/url?q=https://bora-casino.com/
https://google.dj/url?q=https://bora-casino.com/
https://maps.google.hn/url?q=https://bora-casino.com/
https://images.google.hn/url?q=https://bora-casino.com/
https://google.hn/url?sa=t&url=https://bora-casino.com/
https://images.google.kg/url?q=https://bora-casino.com/
https://maps.google.kg/url?q=https://bora-casino.com/
https://google.kg/url?q=https://bora-casino.com/
https://maps.google.co.tz/url?q=https://bora-casino.com/
https://cse.google.co.tz/url?sa=i&url=https://bora-casino.com/
https://images.google.co.tz/url?q=https://bora-casino.com/
https://foro.infojardin.com/proxy.php?link=https://bora-casino.com/
https://maps.google.sc/url?q=https://bora-casino.com/
https://images.google.sc/url?q=https://bora-casino.com/
https://google.sc/url?q=https://bora-casino.com/
https://images.google.gm/url?q=https://bora-casino.com/
https://maps.google.gm/url?q=https://bora-casino.com/
https://google.gm/url?q=https://bora-casino.com/
https://maps.google.com.py/url?q=https://bora-casino.com/
https://images.google.com.py/url?q=https://bora-casino.com/
https://www.talgov.com/Main/exit.aspx?url=https://bora-casino.com/
https://cse.google.am/url?sa=i&url=https://bora-casino.com/
https://images.google.am/url?q=https://bora-casino.com/
https://google.am/url?q=https://bora-casino.com/
https://cse.google.ad/url?sa=i&url=https://bora-casino.com/
https://maps.google.ad/url?q=https://bora-casino.com/
https://images.google.ad/url?q=https://bora-casino.com/
https://google.ad/url?q=https://bora-casino.com/
https://google.com.gh/url?q=https://bora-casino.com/
https://maps.google.com.gh/url?q=https://bora-casino.com/
https://cse.google.com.gh/url?sa=i&url=https://bora-casino.com/
https://images.google.com.bz/url?q=https://bora-casino.com/
https://google.com.bz/url?q=https://bora-casino.com/
https://cse.google.com.bz/url?sa=i&url=https://bora-casino.com/
https://maps.google.com.bz/url?q=https://bora-casino.com/
https://maps.google.iq/url?q=https://bora-casino.com/
https://google.iq/url?q=https://bora-casino.com/
https://images.google.iq/url?q=https://bora-casino.com/
https://images.google.to/url?q=https://bora-casino.com/
https://maps.google.to/url?q=https://bora-casino.com/
https://google.to/url?q=https://bora-casino.com/
https://images.google.ws/url?q=https://bora-casino.com/
https://maps.google.ws/url?q=https://bora-casino.com/
https://google.ws/url?q=https://bora-casino.com/
https://images.google.com.bn/url?q=https://bora-casino.com/
https://cse.google.com.bn/url?sa=i&url=https://bora-casino.com/
https://maps.google.com.bn/url?q=https://bora-casino.com/
https://images.google.cat/url?q=https://bora-casino.com/
https://maps.google.cat/url?q=https://bora-casino.com/
https://cse.google.cat/url?sa=i&url=https://bora-casino.com/
https://google.cat/url?q=https://bora-casino.com/
https://images.google.sh/url?q=https://bora-casino.com/
https://google.sh/url?q=https://bora-casino.com/
https://maps.google.sh/url?q=https://bora-casino.com/
https://google.cm/url?q=https://bora-casino.com/
https://images.google.cm/url?q=https://bora-casino.com/
https://cse.google.cm/url?sa=i&url=https://bora-casino.com/
https://maps.google.cm/url?q=https://bora-casino.com/
https://google.gg/url?q=https://bora-casino.com/
https://maps.google.gg/url?q=https://bora-casino.com/
https://images.google.gg/url?q=https://bora-casino.com/
https://maps.google.com.ly/url?q=https://bora-casino.com/
https://cse.google.com.ly/url?sa=i&url=https://bora-casino.com/
https://images.google.com.ly/url?q=https://bora-casino.com/
https://images.google.co.uz/url?q=https://bora-casino.com/
https://cse.google.co.uz/url?sa=i&url=https://bora-casino.com/
https://google.co.uz/url?q=https://bora-casino.com/
https://maps.google.co.zm/url?q=https://bora-casino.com/
https://images.google.co.zm/url?q=https://bora-casino.com/
https://cse.google.co.zm/url?sa=i&url=https://bora-casino.com/
https://google.co.zm/url?q=https://bora-casino.com/
https://maps.google.com.na/url?q=https://bora-casino.com/
https://images.google.com.na/url?q=https://bora-casino.com/
https://google.com.na/url?q=https://bora-casino.com/
https://maps.google.com.ag/url?q=https://bora-casino.com/
https://images.google.com.ag/url?q=https://bora-casino.com/
https://google.com.ag/url?q=https://bora-casino.com/
https://cse.google.com.ag/url?sa=i&url=https://bora-casino.com/
https://maps.google.cd/url?q=https://bora-casino.com/
https://cse.google.cd/url?sa=i&url=https://bora-casino.com/
https://google.cd/url?q=https://bora-casino.com/
https://images.google.cd/url?q=https://bora-casino.com/
https://images.google.co.ck/url?q=https://bora-casino.com/
https://google.co.ck/url?q=https://bora-casino.com/
https://cse.google.co.ck/url?sa=i&url=https://bora-casino.com/
https://maps.google.co.ck/url?q=https://bora-casino.com/
https://google.com.et/url?q=https://bora-casino.com/
https://maps.google.com.et/url?q=https://bora-casino.com/
https://images.google.com.et/url?q=https://bora-casino.com/
https://cse.google.com.et/url?sa=i&url=https://bora-casino.com/
https://images.google.com.pa/url?q=https://bora-casino.com/
https://maps.google.com.pa/url?q=https://bora-casino.com/
https://google.com.pa/url?q=https://bora-casino.com/
https://images.google.gl/url?q=https://bora-casino.com/
https://maps.google.gl/url?q=https://bora-casino.com/
https://google.gl/url?q=https://bora-casino.com/
https://maps.google.ge/url?q=https://bora-casino.com/
https://images.google.ge/url?q=https://bora-casino.com/
https://google.ge/url?q=https://bora-casino.com/
https://maps.google.ht/url?q=https://bora-casino.com/
https://google.ht/url?q=https://bora-casino.com/
https://images.google.ht/url?q=https://bora-casino.com/
https://google.com.ai/url?q=https://bora-casino.com/
https://cse.google.com.ai/url?sa=i&url=https://bora-casino.com/
https://maps.google.com.ai/url?q=https://bora-casino.com/
https://images.google.com.ai/url?q=https://bora-casino.com/
https://google.im/url?q=https://bora-casino.com/
https://maps.google.im/url?q=https://bora-casino.com/
https://images.google.im/url?q=https://bora-casino.com/
https://maps.google.cf/url?q=https://bora-casino.com/
https://images.google.cf/url?q=https://bora-casino.com/
https://google.cf/url?q=https://bora-casino.com/
https://cse.google.cf/url?sa=i&url=https://bora-casino.com/
https://maps.google.pn/url?q=https://bora-casino.com/
https://google.pn/url?q=https://bora-casino.com/
https://images.google.pn/url?q=https://bora-casino.com/
https://images.google.tg/url?q=https://bora-casino.com/
https://google.tg/url?q=https://bora-casino.com/
https://maps.google.tg/url?q=https://bora-casino.com/
https://google.tk/url?q=https://bora-casino.com/
https://images.google.tk/url?q=https://bora-casino.com/
https://maps.google.tk/url?q=https://bora-casino.com/
https://google.ne/url?q=https://bora-casino.com/
https://maps.google.ne/url?q=https://bora-casino.com/
https://images.google.ne/url?q=https://bora-casino.com/
https://cse.google.co.zw/url?sa=i&url=https://bora-casino.com/
https://images.google.co.zw/url?q=https://bora-casino.com/
https://maps.google.co.zw/url?q=https://bora-casino.com/
https://images.google.gy/url?q=https://bora-casino.com/
https://maps.google.gy/url?q=https://bora-casino.com/
https://maps.google.com.sl/url?q=https://bora-casino.com/
https://images.google.com.sl/url?q=https://bora-casino.com/
https://images.google.ki/url?q=https://bora-casino.com/
https://google.ki/url?q=https://bora-casino.com/
https://maps.google.ki/url?q=https://bora-casino.com/
https://images.google.sr/url?q=https://bora-casino.com/
https://google.sr/url?q=https://bora-casino.com/
https://maps.google.bj/url?q=https://bora-casino.com/
https://images.google.bj/url?q=https://bora-casino.com/
https://google.bj/url?q=https://bora-casino.com/
https://cse.google.bj/url?sa=i&url=https://bora-casino.com/
https://maps.google.ml/url?q=https://bora-casino.com/
https://images.google.ml/url?q=https://bora-casino.com/
https://google.ml/url?q=https://bora-casino.com/
https://images.google.bf/url?q=https://bora-casino.com/
https://maps.google.bf/url?q=https://bora-casino.com/
https://google.bf/url?q=https://bora-casino.com/
https://cse.google.bf/url?sa=i&url=https://bora-casino.com/
https://google.com.sb/url?q=https://bora-casino.com/
https://maps.google.com.sb/url?q=https://bora-casino.com/
https://images.google.com.sb/url?q=https://bora-casino.com/
https://images.google.cv/url?q=https://bora-casino.com/
https://google.cv/url?q=https://bora-casino.com/
https://maps.google.tl/url?q=https://bora-casino.com/
https://google.tl/url?q=https://bora-casino.com/
https://images.google.tl/url?q=https://bora-casino.com/
https://maps.google.com.mm/url?q=https://bora-casino.com/
https://images.google.com.mm/url?q=https://bora-casino.com/
https://images.google.ga/url?q=https://bora-casino.com/
https://google.ga/url?q=https://bora-casino.com/
https://maps.google.ga/url?q=https://bora-casino.com/
https://images.google.so/url?q=https://bora-casino.com/
https://maps.google.so/url?q=https://bora-casino.com/
https://google.so/url?q=https://bora-casino.com/
https://images.google.nu/url?q=https://bora-casino.com/
https://maps.google.nu/url?q=https://bora-casino.com/
https://google.nu/url?q=https://bora-casino.com/
https://images.google.nr/url?q=https://bora-casino.com/
https://google.nr/url?q=https://bora-casino.com/
https://maps.google.nr/url?q=https://bora-casino.com/
https://maps.google.mv/url?q=https://bora-casino.com/
https://google.mv/url?q=https://bora-casino.com/
https://images.google.mv/url?q=https://bora-casino.com/
https://maps.google.bt/url?q=https://bora-casino.com/
https://cse.google.bt/url?sa=i&url=https://bora-casino.com/
https://images.google.bt/url?q=https://bora-casino.com/
https://google.bt/url?q=https://bora-casino.com/
https://cse.google.ac/url?sa=i&url=https://bora-casino.com/
https://images.google.ac/url?q=https://bora-casino.com/
https://google.ac/url?q=https://bora-casino.com/
https://ditu.google.com/url?q=https://bora-casino.com/
https://www.adminer.org/redirect/?url=https://bora-casino.com/
https://google.st/url?q=https://bora-casino.com/
https://images.google.st/url?q=https://bora-casino.com/
https://maps.google.st/url?q=https://bora-casino.com/
https://plus.google.com/url?q=https://bora-casino.com/
https://toolbarqueries.google.com/url?q=https://bora-casino.com/
https://toolbarqueries.google.ac/url?q=https://bora-casino.com/
https://toolbarqueries.google.ad/url?q=https://bora-casino.com/
https://toolbarqueries.google.ae/url?q=https://bora-casino.com/
https://toolbarqueries.google.com.af/url?q=https://bora-casino.com/
https://toolbarqueries.google.com.ag/url?q=https://bora-casino.com/
https://toolbarqueries.google.com.ai/url?q=https://bora-casino.com/
https://toolbarqueries.google.al/url?q=https://bora-casino.com/
https://toolbarqueries.google.am/url?q=https://bora-casino.com/
https://toolbarqueries.google.co.ao/url?q=https://bora-casino.com/
https://toolbarqueries.google.com.ar/url?q=https://bora-casino.com/
https://toolbarqueries.google.as/url?q=https://bora-casino.com/
https://toolbarqueries.google.at/url?q=https://bora-casino.com/
https://toolbarqueries.google.com.au/url?q=https://bora-casino.com/
https://toolbarqueries.google.az/url?q=https://bora-casino.com/
https://toolbarqueries.google.ba/url?q=https://bora-casino.com/
https://toolbarqueries.google.com.bd/url?q=https://bora-casino.com/
https://toolbarqueries.google.bf/url?q=https://bora-casino.com/
https://toolbarqueries.google.be/url?q=https://bora-casino.com/
https://toolbarqueries.google.bg/url?q=https://bora-casino.com/
https://toolbarqueries.google.com.bh/url?q=https://bora-casino.com/
https://toolbarqueries.google.bi/url?q=https://bora-casino.com/
https://toolbarqueries.google.bj/url?q=https://bora-casino.com/
https://toolbarqueries.google.com.bn/url?q=https://bora-casino.com/
https://toolbarqueries.google.com.bo/url?q=https://bora-casino.com/
https://toolbarqueries.google.com.br/url?q=https://bora-casino.com/
https://toolbarqueries.google.bs/url?q=https://bora-casino.com/
https://toolbarqueries.google.bt/url?q=https://bora-casino.com/
https://toolbarqueries.google.by/url?q=https://bora-casino.com/
https://toolbarqueries.google.com.bz/url?q=https://bora-casino.com/
https://toolbarqueries.google.ca/url?q=https://bora-casino.com/
https://toolbarqueries.google.com.kh/url?q=https://bora-casino.com/
https://toolbarqueries.google.cc/url?q=https://bora-casino.com/
https://toolbarqueries.google.cd/url?q=https://bora-casino.com/
https://toolbarqueries.google.cf/url?q=https://bora-casino.com/
https://toolbarqueries.google.cat/url?q=https://bora-casino.com/
https://toolbarqueries.google.cg/url?q=https://bora-casino.com/
https://toolbarqueries.google.ch/url?q=https://bora-casino.com/
https://toolbarqueries.google.ci/url?q=https://bora-casino.com/
https://toolbarqueries.google.co.ck/url?q=https://bora-casino.com/
https://toolbarqueries.google.cl/url?q=https://bora-casino.com/
https://toolbarqueries.google.cm/url?q=https://bora-casino.com/
https://toolbarqueries.google.cn/url?q=https://bora-casino.com/
https://toolbarqueries.google.com.co/url?q=https://bora-casino.com/
https://toolbarqueries.google.com.cu/url?q=https://bora-casino.com/
https://toolbarqueries.google.cv/url?q=https://bora-casino.com/
https://toolbarqueries.google.com.cy/url?q=https://bora-casino.com/
https://toolbarqueries.google.cz/url?q=https://bora-casino.com/
https://toolbarqueries.google.de/url?q=https://bora-casino.com/
https://toolbarqueries.google.dj/url?q=https://bora-casino.com/
https://toolbarqueries.google.dk/url?q=https://bora-casino.com/
https://toolbarqueries.google.dm/url?q=https://bora-casino.com/
https://toolbarqueries.google.com.do/url?q=https://bora-casino.com/
https://toolbarqueries.google.dz/url?q=https://bora-casino.com/
https://toolbarqueries.google.com.ec/url?q=https://bora-casino.com/
https://toolbarqueries.google.ee/url?q=https://bora-casino.com/
https://toolbarqueries.google.com.eg/url?q=https://bora-casino.com/
https://toolbarqueries.google.es/url?q=https://bora-casino.com/
https://toolbarqueries.google.com.et/url?q=https://bora-casino.com/
https://toolbarqueries.google.fi/url?q=https://bora-casino.com/
https://toolbarqueries.google.com.fj/url?q=https://bora-casino.com/
https://toolbarqueries.google.fm/url?q=https://bora-casino.com/
https://toolbarqueries.google.fr/url?q=https://bora-casino.com/
https://toolbarqueries.google.ga/url?q=https://bora-casino.com/
https://toolbarqueries.google.ge/url?q=https://bora-casino.com/
https://toolbarqueries.google.gg/url?q=https://bora-casino.com/
https://toolbarqueries.google.com.gh/url?q=https://bora-casino.com/
https://toolbarqueries.google.com.gi/url?q=https://bora-casino.com/
https://toolbarqueries.google.gl/url?q=https://bora-casino.com/
https://toolbarqueries.google.gm/url?q=https://bora-casino.com/
https://toolbarqueries.google.gp/url?q=https://bora-casino.com/
https://toolbarqueries.google.gr/url?q=https://bora-casino.com/
https://toolbarqueries.google.com.gt/url?q=https://bora-casino.com/
https://toolbarqueries.google.gy/url?q=https://bora-casino.com/
https://toolbarqueries.google.com.hk/url?q=https://bora-casino.com/
https://toolbarqueries.google.hn/url?q=https://bora-casino.com/
https://toolbarqueries.google.hr/url?q=https://bora-casino.com/
https://toolbarqueries.google.ht/url?q=https://bora-casino.com/
https://toolbarqueries.google.hu/url?q=https://bora-casino.com/
https://toolbarqueries.google.co.id/url?q=https://bora-casino.com/
https://toolbarqueries.google.co.il/url?q=https://bora-casino.com/
https://toolbarqueries.google.iq/url?q=https://bora-casino.com/
http://www.google.sk/url?q=https://bora-casino.com/
http://www.google.ro/url?q=https://bora-casino.com/
http://www.google.pt/url?q=https://bora-casino.com/
http://www.google.no/url?q=https://bora-casino.com/
http://www.google.lt/url?q=https://bora-casino.com/
http://www.google.ie/url?q=https://bora-casino.com/
http://www.google.com.vn/url?q=https://bora-casino.com/
http://www.google.com.ua/url?q=https://bora-casino.com/
http://www.google.com.tr/url?q=https://bora-casino.com/
http://www.google.com.sg/url?q=https://bora-casino.com/
http://www.google.com.ph/url?q=https://bora-casino.com/
http://www.google.com.mx/url?q=https://bora-casino.com/
http://www.google.com.ar/url?q=https://bora-casino.com/
http://www.google.co.za/url?q=https://bora-casino.com/
http://www.google.co.th/url?q=https://bora-casino.com/
http://www.google.co.nz/url?q=https://bora-casino.com/
http://www.google.co.kr/url?q=https://bora-casino.com/
http://www.google.co.il/url?q=https://bora-casino.com/
http://www.google.co.id/url?q=https://bora-casino.com/
http://www.google.cl/url?q=https://bora-casino.com/
https://www.moneydj.com/ads/adredir.aspx?bannerid=39863&url=https://bora-casino.com/
http://seriesandtv.com/?wptouch_switch=desktop&redirect=https://bora-casino.com/
https://offers.sidex.ru/stat_ym_new.php?redir=https://bora-casino.com/&hash=1577762
https://passport.sfacg.com/LoginOut.aspx?Returnurl=https://bora-casino.com/
http://www.laosubenben.com/home/link.php?url=https://bora-casino.com/
http://www.kollabora.com/external?url=https://bora-casino.com/
https://golden-resort.ru/out.php?out=https://bora-casino.com/
https://es.catholic.net/ligas/ligasframe.phtml?liga=https://bora-casino.com/
https://gektor-nsk.ru/bitrix/redirect.php?goto=https://bora-casino.com/
http://www.interempresas.net/estadisticas/r.asp?idsector=129&e=221083&c=195&d=https://bora-casino.com/
http://www.internettrafficreport.com/cgi-bin/cgirdir.exe?https://bora-casino.com/
http://avalon.gondor.ru/away.php?link=https://bora-casino.com/
http://www.shippingchina.com/pagead.php?id=RW4uU2hpcC5tYWluLjE=&tourl=https://bora-casino.com/
https://gcup.ru/go?https://bora-casino.com/
http://www.fertilab.net/background_manager.aspx?ajxname=link_banner&id_banner=50&url=https://bora-casino.com/
http://page.yicha.cn/tp/j?url=https://bora-casino.com/
http://tido.al/vazhdo.php?url=https://bora-casino.com/
https://track.effiliation.com/servlet/effi.redir?id_compteur=13215059&url=https://bora-casino.com/
http://www.humanbrainmapping.org/i4a/etrack/track.cfm?rType=2&campaignID=3572&contactID=4524&origURL=https://bora-casino.com/
https://www.info-realty.ru/bitrix/rk.php?goto=https://bora-casino.com/
https://uk.kindofbook.com/redirect.php/?red=https://bora-casino.com/
http://ms1.caps.ntct.edu.tw/school/netlink/hits.php?id=107&url=https://bora-casino.com/
https://www.cossa.ru/bitrix/redirect.php?event1=click&event2=&event3=&goto=https://bora-casino.com/
https://meguro.keizai.biz/banner.php?type=image_banner&position=right&id=13&uri=https://bora-casino.com/
http://www.laopinpai.com/gourl.asp?url=/gourl.asp?url=https://bora-casino.com/
https://lekoufa.ru/banner/go?banner_id=4&link=https://bora-casino.com/
https://temptationsaga.com/buy.php?url=https://bora-casino.com/
https://splash.hume.vic.gov.au/analytics/outbound?url=https://bora-casino.com/
http://gbi-12.ru/links.php?go=https://bora-casino.com/
https://good-surf.ru/r.php?g=https://bora-casino.com/
https://www.snek.ai/redirect?url=https://bora-casino.com/
https://spb-medcom.ru/redirect.php?https://bora-casino.com/
http://gfaq.ru/go?https://bora-casino.com/
https://advisor.wmtransfer.com/SiteDetails.aspx?url=https://bora-casino.com/
https://www.kyoto-good.jp/ad.php?url=https://bora-casino.com/
http://www.jkes.tyc.edu.tw/dyna/webs/gotourl.php?id=357&url=https://bora-casino.com/
http://www.torrent.ai/lt/redirect.php?url=https://bora-casino.com/
http://www.gigaalert.com/view.php?h=&s=https://bora-casino.com/
http://edcommunity.ru/bitrix/rk.php?goto=https://bora-casino.com/
https://www.hradycz.cz/redir.php?b=445&t=https://bora-casino.com/
https://www.moonbbs.com/dm/dmlink.php?dmurl=https://bora-casino.com/
https://kakaku-navi.net/items/detail.php?url=https://bora-casino.com/
http://go.gomtv.com/rd?link_id=10805&code=SHARE_DREAMWIZ&send=https://bora-casino.com/
http://www.global-flat.com/mobile/mobile_switch.php?dir=tofull&url=https://bora-casino.com/
http://www.paladiny.ru/go.php?url=https://bora-casino.com/
http://www.gigatran.ru/go?url=https://bora-casino.com/
https://www.cheerunion.org/tracker/index.html?t=ad&pool_id=2&ad_id=5&url=https://bora-casino.com/
https://heaven.porn/te3/out.php?u=https://bora-casino.com/
http://ads.cars.cz/adclick.php?bannerid=333&zoneid=237&source=&dest=https://bora-casino.com/
https://im.tonghopdeal.net/pic.php?q=https://bora-casino.com/
https://www.usjournal.com/go.php?campusID=190&url=https://bora-casino.com/
http://www.cyprus-net.com/banner_click.php?banid=4&link=https://bora-casino.com/
http://m.17ll.com/apply/tourl/?url=https://bora-casino.com/
http://www.gearguide.ru/phpbb/go.php?https://bora-casino.com/
https://forsto.ru/bitrix/redirect.php?goto=https://bora-casino.com/
http://www.sermemole.com/public/serbook/redirect.php?url=https://bora-casino.com/
https://globalmedia51.ru/bitrix/redirect.php?goto=https://bora-casino.com/
https://www.lionscup.dk/?side_unique=4fb6493f-b9cf-11e0-8802-a9051d81306c&s_id=30&s_d_id=64&go=https://bora-casino.com/
http://a.gongkong.com/db/adredir.asp?id=16757&url=https://bora-casino.com/
http://mbrf.ae/knowledgeaward/language/ar/?redirect_url=https://bora-casino.com/
http://www.interfacelift.com/goto.php?url=https://bora-casino.com/
http://www.compusystems.com/servlet/Et?x=270.-101.233736| https://bora-casino.com/
https://torggrad.ru/bitrix/rk.php?goto=https://bora-casino.com/
해외배팅사이트 추천_https://top3spo.com/
해외스포츠배팅사이트 추천_https://top3spo.com/
해외배팅사이트에이전시 추천_https://top3spo.com/
해외 온라인카지노 추천_https://top3spo.com/
해외 카지노사이트 추천_https://top3spo.com/
머니라인247_https://top3spo.com/moneyline247/
황룡카지노_https://top3spo.com/gdcasino/
아시안커넥트_https://top3spo.com/asian/
스보벳_https://top3spo.com/sbobet/
피나클_https://top3spo.com/pinnacle/
맥스벳_https://top3spo.com/maxbet/
파워볼_https://top3spo.com/powerball/
해외배팅사이트 추천
해외스포츠배팅사이트 추천
해외배팅사이트에이전시 추천
해외 온라인카지노 추천
해외 카지노사이트 추천
머니라인247
황룡카지노
아시안커넥트
스보벳
피나클
맥스벳
파워볼
https://www.ibm.com/links/?cc=us&lc=en&prompt=1&url=https://top3spo.com/
https://www.meetme.com/apps/redirect/?url=https://top3spo.com/
http://frienddo.com/out.php?url=https://top3spo.com/
http://onlinemanuals.txdot.gov/help/urlstatusgo.html?url=https://top3spo.com/
https://community.rsa.com/external-link.jspa?url=https://top3spo.com/
https://community.nxp.com/external-link.jspa?url=https://top3spo.com/
https://supplier-portal-uat.daimler.com/external-link.jspa?url=https://top3spo.com/
http://gfmis.crru.ac.th/web/redirect.php?url=https://top3spo.com/
https://creativecommons.org/choose/results-one?q_1=2&q_1=1&field_attribute_to_url=https://top3spo.com/
https://www.hobowars.com/game/linker.php?url=https://top3spo.com/
http://tharp.me/?url_to_shorten=https://top3spo.com/
https://images.google.com.vn/url?q=https://top3spo.com/
https://images.google.be/url?q=https://top3spo.com/
https://images.google.at/url?q=https://top3spo.com/
https://ru.xhamster3.com/exit.php?url=https://top3spo.com/
http://www.erotikplatz.at/redirect.php?id=939&mode=fuhrer&url=https://top3spo.com/
http://www.imsnet.at/LangChange.aspx?uri=https://top3spo.com/
https://www.kath-kirche-kaernten.at/pfarren/pfarre/C3014?URL=https://top3spo.com/
http://gs.matzendorf.at/includes/linkaufruf.asp?art=kapitel&link=https://top3spo.com/
http://www.nuttenzone.at/jump.php?url=https://top3spo.com/
https://www.oebb.at/nightjet_newsletter/tc/xxxx?url=https://top3spo.com/
https://ramset.com.au/document/url/?url=https://top3spo.com/
https://www.vicsport.com.au/analytics/outbound?url=https://top3spo.com/
http://www.rss.geodles.com/fwd.php?url=https://top3spo.com/
http://imperialoptical.com/news-redirect.aspx?url=https://top3spo.com/
https://www.interecm.com/interecm/tracker?op=click&id=5204.db2&url=https://top3spo.com/
http://kenchow.keensdesign.com/out.php?url=https://top3spo.com/
http://landbidz.com/redirect.asp?url=https://top3spo.com/
https://www.viecngay.vn/go?to=https://top3spo.com/
http://smile.wjp.am/link-free/link3.cgi?mode=cnt&no=8&hpurl=https://top3spo.com/
https://dakke.co/redirect/?url=https://top3spo.com/
http://www.aurki.com/jarioa/redirect?id_feed=510&url=https://top3spo.com/
http://www.bdsmandfetish.com/cgi-bin/sites/out.cgi?id=mandymon&url=https://top3spo.com/
https://www.bettnet.com/blog/?URL=https://top3spo.com/
http://www.chungshingelectronic.com/redirect.asp?url=https://top3spo.com/
https://www.freemusic123.com/karaoke/cgi-bin/out.cgi?id=castillo&url=https://top3spo.com/
http://www.glorioustronics.com/redirect.php?link=https://top3spo.com/
http://hellothai.com/wwwlink/wwwredirect.asp?hp_id=1242&url=https://top3spo.com/
http://www.johnvorhees.com/gbook/go.php?url=https://top3spo.com/
http://www.mistress-and-slave.com/cgi-bin/out.cgi?id=123crush&url=https://top3spo.com/
http://www.myhottiewife.com/cgi-bin/arpro/out.cgi?id=Jojo&url=https://top3spo.com/
https://plus.google.com/url?q=https://top3spo.com/
https://www.bing.com/news/apiclick.aspx?ref=FexRss&aid=&tid=9BB77FDA801248A5AD23FDBDD5922800&url=https://top3spo.com/
https://trello.com/add-card?source=mode=popup&name=click+here&desc=https://top3spo.com/
https://tvtropes.org/pmwiki/no_outbounds.php?o=https://top3spo.com/
https://xat.com/web_gear/chat/linkvalidator.php?link=https://top3spo.com/
https://ipv4.google.com/url?q=https://top3spo.com/
https://contacts.google.com/url?sa=t&url=https://top3spo.com/
https://justpaste.it/redirect/172fy/https://top3spo.com/
https://bbs.pku.edu.cn/v2/jump-to.php?url=https://top3spo.com/
http://www.etis.ford.com/externalURL.do?url=https://top3spo.com/
https://bares.blog.idnes.cz/redir.aspx?url=https://top3spo.com/
http://jump.5ch.net/?https://top3spo.com/
http://guru.sanook.com/?URL=https://top3spo.com/
http://branch.app.link/?$deeplink_path=article/jan/123&$fallback_url=https://top3spo.com/
https://underwood.ru/away.html?url=https://top3spo.com/
https://unicom.ru/links.php?go=https://top3spo.com/
http://www.unifin.ru/bitrix/redirect.php?goto=https://top3spo.com/
https://uogorod.ru/feed/520?redirect=https://top3spo.com/
https://uziolog.ru/redirect?url=https://top3spo.com/
https://utmagazine.ru/r?url=https://top3spo.com/
http://uvbnb.ru/go?https://top3spo.com/
https://ulfishing.ru/forum/go.php?https://top3spo.com/
https://skibaza.ru/bitrix/rk.php?goto=https://top3spo.com/
http://www.skladcom.ru/(S(qdiwhk55jkcyok45u4ti0a55))/banners.aspx?url=https://top3spo.com/
https://smartservices.ru/bitrix/rk.php?goto=https://top3spo.com/
http://www.topkam.ru/gtu/?url=https://top3spo.com/
http://torgi-rybinsk.ru/bitrix/rk.php?goto=https://top3spo.com/
http://tpprt.ru/bitrix/rk.php?goto=https://top3spo.com/
https://twilightrussia.ru/go?https://top3spo.com/
https://www.moneydj.com/ads/adredir.aspx?bannerid=39863&url=https://top3spo.com/
http://seriesandtv.com/?wptouch_switch=desktop&redirect=https://top3spo.com/
https://offers.sidex.ru/stat_ym_new.php?redir=https://top3spo.com/&hash=1577762
https://passport.sfacg.com/LoginOut.aspx?Returnurl=https://top3spo.com/
http://www.laosubenben.com/home/link.php?url=https://top3spo.com/
http://www.kollabora.com/external?url=https://top3spo.com/
https://golden-resort.ru/out.php?out=https://top3spo.com/
https://es.catholic.net/ligas/ligasframe.phtml?liga=https://top3spo.com/
https://gektor-nsk.ru/bitrix/redirect.php?goto=https://top3spo.com/
http://www.interempresas.net/estadisticas/r.asp?idsector=129&e=221083&c=195&d=https://top3spo.com/
http://www.internettrafficreport.com/cgi-bin/cgirdir.exe?https://top3spo.com/
http://avalon.gondor.ru/away.php?link=https://top3spo.com/
http://www.shippingchina.com/pagead.php?id=RW4uU2hpcC5tYWluLjE=&tourl=https://top3spo.com/
https://gcup.ru/go?https://top3spo.com/
http://www.fertilab.net/background_manager.aspx?ajxname=link_banner&id_banner=50&url=https://top3spo.com/
http://page.yicha.cn/tp/j?url=https://top3spo.com/
http://tido.al/vazhdo.php?url=https://top3spo.com/
https://track.effiliation.com/servlet/effi.redir?id_compteur=13215059&url=https://top3spo.com/
http://www.humanbrainmapping.org/i4a/etrack/track.cfm?rType=2&campaignID=3572&contactID=4524&origURL=https://top3spo.com/
https://www.info-realty.ru/bitrix/rk.php?goto=https://top3spo.com/
https://uk.kindofbook.com/redirect.php/?red=https://top3spo.com/
http://ms1.caps.ntct.edu.tw/school/netlink/hits.php?id=107&url=https://top3spo.com/
https://www.cossa.ru/bitrix/redirect.php?event1=click&event2=&event3=&goto=https://top3spo.com/
https://meguro.keizai.biz/banner.php?type=image_banner&position=right&id=13&uri=https://top3spo.com/
http://www.laopinpai.com/gourl.asp?url=/gourl.asp?url=https://top3spo.com/
https://lekoufa.ru/banner/go?banner_id=4&link=https://top3spo.com/
https://temptationsaga.com/buy.php?url=https://top3spo.com/
https://splash.hume.vic.gov.au/analytics/outbound?url=https://top3spo.com/
http://gbi-12.ru/links.php?go=https://top3spo.com/
https://good-surf.ru/r.php?g=https://top3spo.com/
https://www.snek.ai/redirect?url=https://top3spo.com/
https://spb-medcom.ru/redirect.php?https://top3spo.com/
http://gfaq.ru/go?https://top3spo.com/
https://advisor.wmtransfer.com/SiteDetails.aspx?url=https://top3spo.com/
https://www.kyoto-good.jp/ad.php?url=https://top3spo.com/
http://www.jkes.tyc.edu.tw/dyna/webs/gotourl.php?id=357&url=https://top3spo.com/
http://www.torrent.ai/lt/redirect.php?url=https://top3spo.com/
http://www.gigaalert.com/view.php?h=&s=https://top3spo.com/
http://edcommunity.ru/bitrix/rk.php?goto=https://top3spo.com/
https://www.hradycz.cz/redir.php?b=445&t=https://top3spo.com/
https://www.moonbbs.com/dm/dmlink.php?dmurl=https://top3spo.com/
https://kakaku-navi.net/items/detail.php?url=https://top3spo.com/
http://go.gomtv.com/rd?link_id=10805&code=SHARE_DREAMWIZ&send=https://top3spo.com/
http://www.global-flat.com/mobile/mobile_switch.php?dir=tofull&url=https://top3spo.com/
http://www.paladiny.ru/go.php?url=https://top3spo.com/
http://www.gigatran.ru/go?url=https://top3spo.com/
https://www.cheerunion.org/tracker/index.html?t=ad&pool_id=2&ad_id=5&url=https://top3spo.com/
https://heaven.porn/te3/out.php?u=https://top3spo.com/
http://ads.cars.cz/adclick.php?bannerid=333&zoneid=237&source=&dest=https://top3spo.com/
https://im.tonghopdeal.net/pic.php?q=https://top3spo.com/
https://www.usjournal.com/go.php?campusID=190&url=https://top3spo.com/
http://www.cyprus-net.com/banner_click.php?banid=4&link=https://top3spo.com/
http://m.17ll.com/apply/tourl/?url=https://top3spo.com/
http://www.gearguide.ru/phpbb/go.php?https://top3spo.com/
https://forsto.ru/bitrix/redirect.php?goto=https://top3spo.com/
http://www.sermemole.com/public/serbook/redirect.php?url=https://top3spo.com/
https://globalmedia51.ru/bitrix/redirect.php?goto=https://top3spo.com/
https://www.lionscup.dk/?side_unique=4fb6493f-b9cf-11e0-8802-a9051d81306c&s_id=30&s_d_id=64&go=https://top3spo.com/
http://a.gongkong.com/db/adredir.asp?id=16757&url=https://top3spo.com/
http://mbrf.ae/knowledgeaward/language/ar/?redirect_url=https://top3spo.com/
http://www.interfacelift.com/goto.php?url=https://top3spo.com/
http://www.compusystems.com/servlet/Et?x=270.-101.233736| https://top3spo.com/
https://torggrad.ru/bitrix/rk.php?goto=https://top3spo.com/
https://cse.google.com.do/url?sa=i&url=https://top3spo.com/
https://google.com.do/url?q=https://top3spo.com/
https://maps.google.kz/url?q=https://top3spo.com/
https://google.kz/url?q=https://top3spo.com/
https://images.google.kz/url?q=https://top3spo.com/
https://google.co.ma/url?q=https://top3spo.com/
https://cse.google.co.ma/url?sa=i&url=https://top3spo.com/
https://images.google.co.ma/url?q=https://top3spo.com/
https://images.google.jo/url?q=https://top3spo.com/
https://maps.google.jo/url?q=https://top3spo.com/
https://maps.google.lk/url?q=https://top3spo.com/
https://google.lk/url?q=https://top3spo.com/
https://images.google.lk/url?q=https://top3spo.com/
https://cse.google.com.cu/url?sa=i&url=https://top3spo.com/
https://images.google.com.cu/url?q=https://top3spo.com/
https://google.com.cu/url?q=https://top3spo.com/
https://maps.google.com.cu/url?q=https://top3spo.com/
https://google.com.gi/url?q=https://top3spo.com/
https://images.google.com.gi/url?q=https://top3spo.com/
https://cse.google.com.gi/url?sa=i&url=https://top3spo.com/
https://maps.google.com.gi/url?q=https://top3spo.com/
https://images.google.vu/url?q=https://top3spo.com/
https://google.vu/url?q=https://top3spo.com/
https://maps.google.vg/url?q=https://top3spo.com/
https://google.vg/url?q=https://top3spo.com/
https://images.google.vg/url?q=https://top3spo.com/
https://maps.google.com.ni/url?q=https://top3spo.com/
https://google.com.ni/url?q=https://top3spo.com/
https://images.google.com.ni/url?q=https://top3spo.com/
https://images.google.md/url?q=https://top3spo.com/
https://google.md/url?q=https://top3spo.com/
https://google.mg/url?q=https://top3spo.com/
https://images.google.mg/url?q=https://top3spo.com/
https://maps.google.mg/url?q=https://top3spo.com/
https://maps.google.la/url?q=https://top3spo.com/
https://google.la/url?q=https://top3spo.com/
https://images.google.la/url?q=https://top3spo.com/
https://maps.google.com.jm/url?q=https://top3spo.com/
https://google.com.jm/url?q=https://top3spo.com/
https://cse.google.com.jm/url?sa=i&url=https://top3spo.com/
https://images.google.com.jm/url?q=https://top3spo.com/
https://maps.google.com.vc/url?q=https://top3spo.com/
https://images.google.com.vc/url?q=https://top3spo.com/
https://google.com.vc/url?q=https://top3spo.com/
https://google.com.tj/url?q=https://top3spo.com/
https://images.google.com.tj/url?q=https://top3spo.com/
https://cse.google.com.cy/url?sa=i&url=https://top3spo.com/
https://images.google.com.cy/url?q=https://top3spo.com/
https://google.com.sv/url?sa=t&url=https://top3spo.com/
https://images.google.com.sv/url?q=https://top3spo.com/
https://maps.google.com.sv/url?q=https://top3spo.com/
https://images.google.rw/url?q=https://top3spo.com/
https://google.rw/url?q=https://top3spo.com/
https://maps.google.com.om/url?q=https://top3spo.com/
https://google.com.om/url?q=https://top3spo.com/
https://images.google.com.om/url?q=https://top3spo.com/
https://google.ps/url?q=https://top3spo.com/
https://images.google.ps/url?q=https://top3spo.com/
https://images.google.com.bo/url?q=https://top3spo.com/
https://maps.google.com.bo/url?q=https://top3spo.com/
https://cse.google.com.bo/url?sa=i&url=https://top3spo.com/
https://google.co.mz/url?q=https://top3spo.com/
https://images.google.co.mz/url?q=https://top3spo.com/
https://cse.google.co.mz/url?sa=i&url=https://top3spo.com/
https://maps.google.co.mz/url?q=https://top3spo.com/
https://maps.google.mk/url?q=https://top3spo.com/
https://images.google.mk/url?q=https://top3spo.com/
https://images.google.co.bw/url?q=https://top3spo.com/
https://google.co.bw/url?sa=t&url=https://top3spo.com/
https://maps.google.co.bw/url?q=https://top3spo.com/
https://cse.google.co.bw/url?sa=i&url=https://top3spo.com/
https://images.google.al/url?q=https://top3spo.com/
https://google.al/url?q=https://top3spo.com/
https://cse.google.al/url?sa=i&url=https://top3spo.com/
https://google.sm/url?q=https://top3spo.com/
https://maps.google.sm/url?q=https://top3spo.com/
https://images.google.sm/url?q=https://top3spo.com/
https://images.google.tm/url?q=https://top3spo.com/
https://google.tm/url?q=https://top3spo.com/
https://google.com.af/url?q=https://top3spo.com/
https://images.google.com.af/url?q=https://top3spo.com/
https://cse.google.com.af/url?sa=i&url=https://top3spo.com/
https://maps.google.com.fj/url?q=https://top3spo.com/
https://google.com.fj/url?q=https://top3spo.com/
https://cse.google.com.fj/url?sa=i&url=https://top3spo.com/
https://images.google.com.fj/url?q=https://top3spo.com/
https://cse.google.com.kh/url?sa=i&url=https://top3spo.com/
https://images.google.com.kh/url?q=https://top3spo.com/
https://google.com.kh/url?q=https://top3spo.com/
https://maps.google.com.kh/url?q=https://top3spo.com/
https://images.google.cg/url?q=https://top3spo.com/
https://cse.google.cg/url?sa=i&url=https://top3spo.com/
https://google.cg/url?q=https://top3spo.com/
https://maps.google.cg/url?q=https://top3spo.com/
https://images.google.mw/url?q=https://top3spo.com/
https://google.mw/url?q=https://top3spo.com/
https://maps.google.mw/url?q=https://top3spo.com/
https://images.google.com.kw/url?q=https://top3spo.com/
https://maps.google.com.kw/url?q=https://top3spo.com/
https://google.com.kw/url?q=https://top3spo.com/
https://cse.google.com.kw/url?sa=i&url=https://top3spo.com/
https://cse.google.com.lb/url?sa=i&url=https://top3spo.com/
https://maps.google.com.lb/url?q=https://top3spo.com/
https://images.google.com.lb/url?q=https://top3spo.com/
https://google.co.ls/url?q=https://top3spo.com/
https://images.google.co.ls/url?q=https://top3spo.com/
https://cse.google.co.ls/url?sa=i&url=https://top3spo.com/
https://maps.google.co.ls/url?q=https://top3spo.com/
https://google.tt/url?q=https://top3spo.com/
https://images.google.tt/url?q=https://top3spo.com/
https://maps.google.tt/url?q=https://top3spo.com/
https://google.ms/url?q=https://top3spo.com/
https://images.google.ms/url?q=https://top3spo.com/
https://maps.google.ms/url?q=https://top3spo.com/
https://google.ci/url?sa=t&url=https://top3spo.com/
https://cse.google.ci/url?sa=i&url=https://top3spo.com/
https://maps.google.ci/url?q=https://top3spo.com/
https://images.google.ci/url?q=https://top3spo.com/
https://google.dm/url?q=https://top3spo.com/
https://maps.google.dm/url?q=https://top3spo.com/
https://images.google.dm/url?q=https://top3spo.com/
https://google.dz/url?q=https://top3spo.com/
https://maps.google.dz/url?q=https://top3spo.com/
https://images.google.dz/url?q=https://top3spo.com/
https://cse.google.co.vi/url?sa=i&url=https://top3spo.com/
https://images.google.co.vi/url?q=https://top3spo.com/
https://maps.google.co.vi/url?q=https://top3spo.com/
https://google.co.vi/url?q=https://top3spo.com/
https://maps.google.dj/url?q=https://top3spo.com/
https://images.google.dj/url?q=https://top3spo.com/
https://google.dj/url?q=https://top3spo.com/
https://maps.google.hn/url?q=https://top3spo.com/
https://images.google.hn/url?q=https://top3spo.com/
https://google.hn/url?sa=t&url=https://top3spo.com/
https://images.google.kg/url?q=https://top3spo.com/
https://maps.google.kg/url?q=https://top3spo.com/
https://google.kg/url?q=https://top3spo.com/
https://maps.google.co.tz/url?q=https://top3spo.com/
https://cse.google.co.tz/url?sa=i&url=https://top3spo.com/
https://images.google.co.tz/url?q=https://top3spo.com/
https://foro.infojardin.com/proxy.php?link=https://top3spo.com/
https://maps.google.sc/url?q=https://top3spo.com/
https://images.google.sc/url?q=https://top3spo.com/
https://google.sc/url?q=https://top3spo.com/
https://images.google.gm/url?q=https://top3spo.com/
https://maps.google.gm/url?q=https://top3spo.com/
https://google.gm/url?q=https://top3spo.com/
https://maps.google.com.py/url?q=https://top3spo.com/
https://images.google.com.py/url?q=https://top3spo.com/
https://www.talgov.com/Main/exit.aspx?url=https://top3spo.com/
https://cse.google.am/url?sa=i&url=https://top3spo.com/
https://images.google.am/url?q=https://top3spo.com/
https://google.am/url?q=https://top3spo.com/
https://cse.google.ad/url?sa=i&url=https://top3spo.com/
https://maps.google.ad/url?q=https://top3spo.com/
https://images.google.ad/url?q=https://top3spo.com/
https://google.ad/url?q=https://top3spo.com/
https://google.com.gh/url?q=https://top3spo.com/
https://maps.google.com.gh/url?q=https://top3spo.com/
https://cse.google.com.gh/url?sa=i&url=https://top3spo.com/
https://images.google.com.bz/url?q=https://top3spo.com/
https://google.com.bz/url?q=https://top3spo.com/
https://cse.google.com.bz/url?sa=i&url=https://top3spo.com/
https://maps.google.com.bz/url?q=https://top3spo.com/
https://maps.google.iq/url?q=https://top3spo.com/
https://google.iq/url?q=https://top3spo.com/
https://images.google.iq/url?q=https://top3spo.com/
https://images.google.to/url?q=https://top3spo.com/
https://maps.google.to/url?q=https://top3spo.com/
https://google.to/url?q=https://top3spo.com/
https://images.google.ws/url?q=https://top3spo.com/
https://maps.google.ws/url?q=https://top3spo.com/
https://google.ws/url?q=https://top3spo.com/
https://images.google.com.bn/url?q=https://top3spo.com/
https://cse.google.com.bn/url?sa=i&url=https://top3spo.com/
https://maps.google.com.bn/url?q=https://top3spo.com/
https://images.google.cat/url?q=https://top3spo.com/
https://maps.google.cat/url?q=https://top3spo.com/
https://cse.google.cat/url?sa=i&url=https://top3spo.com/
https://google.cat/url?q=https://top3spo.com/
https://images.google.sh/url?q=https://top3spo.com/
https://google.sh/url?q=https://top3spo.com/
https://maps.google.sh/url?q=https://top3spo.com/
https://google.cm/url?q=https://top3spo.com/
https://images.google.cm/url?q=https://top3spo.com/
https://cse.google.cm/url?sa=i&url=https://top3spo.com/
https://maps.google.cm/url?q=https://top3spo.com/
https://google.gg/url?q=https://top3spo.com/
https://maps.google.gg/url?q=https://top3spo.com/
https://images.google.gg/url?q=https://top3spo.com/
https://maps.google.com.ly/url?q=https://top3spo.com/
https://cse.google.com.ly/url?sa=i&url=https://top3spo.com/
https://images.google.com.ly/url?q=https://top3spo.com/
https://images.google.co.uz/url?q=https://top3spo.com/
https://cse.google.co.uz/url?sa=i&url=https://top3spo.com/
https://google.co.uz/url?q=https://top3spo.com/
https://maps.google.co.zm/url?q=https://top3spo.com/
https://images.google.co.zm/url?q=https://top3spo.com/
https://cse.google.co.zm/url?sa=i&url=https://top3spo.com/
https://google.co.zm/url?q=https://top3spo.com/
https://maps.google.com.na/url?q=https://top3spo.com/
https://images.google.com.na/url?q=https://top3spo.com/
https://google.com.na/url?q=https://top3spo.com/
https://maps.google.com.ag/url?q=https://top3spo.com/
https://images.google.com.ag/url?q=https://top3spo.com/
https://google.com.ag/url?q=https://top3spo.com/
https://cse.google.com.ag/url?sa=i&url=https://top3spo.com/
https://maps.google.cd/url?q=https://top3spo.com/
https://cse.google.cd/url?sa=i&url=https://top3spo.com/
https://google.cd/url?q=https://top3spo.com/
https://images.google.cd/url?q=https://top3spo.com/
https://images.google.co.ck/url?q=https://top3spo.com/
https://google.co.ck/url?q=https://top3spo.com/
https://cse.google.co.ck/url?sa=i&url=https://top3spo.com/
https://maps.google.co.ck/url?q=https://top3spo.com/
https://google.com.et/url?q=https://top3spo.com/
https://maps.google.com.et/url?q=https://top3spo.com/
https://images.google.com.et/url?q=https://top3spo.com/
https://cse.google.com.et/url?sa=i&url=https://top3spo.com/
https://images.google.com.pa/url?q=https://top3spo.com/
https://maps.google.com.pa/url?q=https://top3spo.com/
https://google.com.pa/url?q=https://top3spo.com/
https://images.google.gl/url?q=https://top3spo.com/
https://maps.google.gl/url?q=https://top3spo.com/
https://google.gl/url?q=https://top3spo.com/
https://maps.google.ge/url?q=https://top3spo.com/
https://images.google.ge/url?q=https://top3spo.com/
https://google.ge/url?q=https://top3spo.com/
https://maps.google.ht/url?q=https://top3spo.com/
https://google.ht/url?q=https://top3spo.com/
https://images.google.ht/url?q=https://top3spo.com/
https://google.com.ai/url?q=https://top3spo.com/
https://cse.google.com.ai/url?sa=i&url=https://top3spo.com/
https://maps.google.com.ai/url?q=https://top3spo.com/
https://images.google.com.ai/url?q=https://top3spo.com/
https://google.im/url?q=https://top3spo.com/
https://maps.google.im/url?q=https://top3spo.com/
https://images.google.im/url?q=https://top3spo.com/
https://maps.google.cf/url?q=https://top3spo.com/
https://images.google.cf/url?q=https://top3spo.com/
https://google.cf/url?q=https://top3spo.com/
https://cse.google.cf/url?sa=i&url=https://top3spo.com/
https://maps.google.pn/url?q=https://top3spo.com/
https://google.pn/url?q=https://top3spo.com/
https://images.google.pn/url?q=https://top3spo.com/
https://images.google.tg/url?q=https://top3spo.com/
https://google.tg/url?q=https://top3spo.com/
https://maps.google.tg/url?q=https://top3spo.com/
https://google.tk/url?q=https://top3spo.com/
https://images.google.tk/url?q=https://top3spo.com/
https://maps.google.tk/url?q=https://top3spo.com/
https://google.ne/url?q=https://top3spo.com/
https://maps.google.ne/url?q=https://top3spo.com/
https://images.google.ne/url?q=https://top3spo.com/
https://cse.google.co.zw/url?sa=i&url=https://top3spo.com/
https://images.google.co.zw/url?q=https://top3spo.com/
https://maps.google.co.zw/url?q=https://top3spo.com/
https://images.google.gy/url?q=https://top3spo.com/
https://maps.google.gy/url?q=https://top3spo.com/
https://maps.google.com.sl/url?q=https://top3spo.com/
https://images.google.com.sl/url?q=https://top3spo.com/
https://images.google.ki/url?q=https://top3spo.com/
https://google.ki/url?q=https://top3spo.com/
https://maps.google.ki/url?q=https://top3spo.com/
https://images.google.sr/url?q=https://top3spo.com/
https://google.sr/url?q=https://top3spo.com/
https://maps.google.bj/url?q=https://top3spo.com/
https://images.google.bj/url?q=https://top3spo.com/
https://google.bj/url?q=https://top3spo.com/
https://cse.google.bj/url?sa=i&url=https://top3spo.com/
https://maps.google.ml/url?q=https://top3spo.com/
https://images.google.ml/url?q=https://top3spo.com/
https://google.ml/url?q=https://top3spo.com/
https://images.google.bf/url?q=https://top3spo.com/
https://maps.google.bf/url?q=https://top3spo.com/
https://google.bf/url?q=https://top3spo.com/
https://cse.google.bf/url?sa=i&url=https://top3spo.com/
https://google.com.sb/url?q=https://top3spo.com/
https://maps.google.com.sb/url?q=https://top3spo.com/
https://images.google.com.sb/url?q=https://top3spo.com/
https://images.google.cv/url?q=https://top3spo.com/
https://google.cv/url?q=https://top3spo.com/
https://maps.google.tl/url?q=https://top3spo.com/
https://google.tl/url?q=https://top3spo.com/
https://images.google.tl/url?q=https://top3spo.com/
https://maps.google.com.mm/url?q=https://top3spo.com/
https://images.google.com.mm/url?q=https://top3spo.com/
https://images.google.ga/url?q=https://top3spo.com/
https://google.ga/url?q=https://top3spo.com/
https://maps.google.ga/url?q=https://top3spo.com/
https://images.google.so/url?q=https://top3spo.com/
https://maps.google.so/url?q=https://top3spo.com/
https://google.so/url?q=https://top3spo.com/
https://images.google.nu/url?q=https://top3spo.com/
https://maps.google.nu/url?q=https://top3spo.com/
https://google.nu/url?q=https://top3spo.com/
https://images.google.nr/url?q=https://top3spo.com/
https://google.nr/url?q=https://top3spo.com/
https://maps.google.nr/url?q=https://top3spo.com/
https://maps.google.mv/url?q=https://top3spo.com/
https://google.mv/url?q=https://top3spo.com/
https://images.google.mv/url?q=https://top3spo.com/
https://maps.google.bt/url?q=https://top3spo.com/
https://cse.google.bt/url?sa=i&url=https://top3spo.com/
https://images.google.bt/url?q=https://top3spo.com/
https://google.bt/url?q=https://top3spo.com/
https://cse.google.ac/url?sa=i&url=https://top3spo.com/
https://images.google.ac/url?q=https://top3spo.com/
https://google.ac/url?q=https://top3spo.com/
https://ditu.google.com/url?q=https://top3spo.com/
https://www.adminer.org/redirect/?url=https://top3spo.com/
https://google.st/url?q=https://top3spo.com/
https://images.google.st/url?q=https://top3spo.com/
https://maps.google.st/url?q=https://top3spo.com/
https://toolbarqueries.google.com/url?q=https://top3spo.com/
https://toolbarqueries.google.ac/url?q=https://top3spo.com/
https://toolbarqueries.google.ad/url?q=https://top3spo.com/
https://toolbarqueries.google.ae/url?q=https://top3spo.com/
https://toolbarqueries.google.com.af/url?q=https://top3spo.com/
https://toolbarqueries.google.com.ag/url?q=https://top3spo.com/
https://toolbarqueries.google.com.ai/url?q=https://top3spo.com/
https://toolbarqueries.google.al/url?q=https://top3spo.com/
https://toolbarqueries.google.am/url?q=https://top3spo.com/
https://toolbarqueries.google.co.ao/url?q=https://top3spo.com/
https://toolbarqueries.google.com.ar/url?q=https://top3spo.com/
https://toolbarqueries.google.as/url?q=https://top3spo.com/
https://toolbarqueries.google.at/url?q=https://top3spo.com/
https://toolbarqueries.google.com.au/url?q=https://top3spo.com/
https://toolbarqueries.google.az/url?q=https://top3spo.com/
https://toolbarqueries.google.ba/url?q=https://top3spo.com/
https://toolbarqueries.google.com.bd/url?q=https://top3spo.com/
https://toolbarqueries.google.bf/url?q=https://top3spo.com/
https://toolbarqueries.google.be/url?q=https://top3spo.com/
https://toolbarqueries.google.bg/url?q=https://top3spo.com/
https://toolbarqueries.google.com.bh/url?q=https://top3spo.com/
https://toolbarqueries.google.bi/url?q=https://top3spo.com/
https://toolbarqueries.google.bj/url?q=https://top3spo.com/
https://toolbarqueries.google.com.bn/url?q=https://top3spo.com/
https://toolbarqueries.google.com.bo/url?q=https://top3spo.com/
https://toolbarqueries.google.com.br/url?q=https://top3spo.com/
https://toolbarqueries.google.bs/url?q=https://top3spo.com/
https://toolbarqueries.google.bt/url?q=https://top3spo.com/
https://toolbarqueries.google.by/url?q=https://top3spo.com/
https://toolbarqueries.google.com.bz/url?q=https://top3spo.com/
https://toolbarqueries.google.ca/url?q=https://top3spo.com/
https://toolbarqueries.google.com.kh/url?q=https://top3spo.com/
https://toolbarqueries.google.cc/url?q=https://top3spo.com/
https://toolbarqueries.google.cd/url?q=https://top3spo.com/
https://toolbarqueries.google.cf/url?q=https://top3spo.com/
https://toolbarqueries.google.cat/url?q=https://top3spo.com/
https://toolbarqueries.google.cg/url?q=https://top3spo.com/
https://toolbarqueries.google.ch/url?q=https://top3spo.com/
https://toolbarqueries.google.ci/url?q=https://top3spo.com/
https://toolbarqueries.google.co.ck/url?q=https://top3spo.com/
https://toolbarqueries.google.cl/url?q=https://top3spo.com/
https://toolbarqueries.google.cm/url?q=https://top3spo.com/
https://toolbarqueries.google.cn/url?q=https://top3spo.com/
https://toolbarqueries.google.com.co/url?q=https://top3spo.com/
https://toolbarqueries.google.com.cu/url?q=https://top3spo.com/
https://toolbarqueries.google.cv/url?q=https://top3spo.com/
https://toolbarqueries.google.com.cy/url?q=https://top3spo.com/
https://toolbarqueries.google.cz/url?q=https://top3spo.com/
https://toolbarqueries.google.de/url?q=https://top3spo.com/
https://toolbarqueries.google.dj/url?q=https://top3spo.com/
https://toolbarqueries.google.dk/url?q=https://top3spo.com/
https://toolbarqueries.google.dm/url?q=https://top3spo.com/
https://toolbarqueries.google.com.do/url?q=https://top3spo.com/
https://toolbarqueries.google.dz/url?q=https://top3spo.com/
https://toolbarqueries.google.com.ec/url?q=https://top3spo.com/
https://toolbarqueries.google.ee/url?q=https://top3spo.com/
https://toolbarqueries.google.com.eg/url?q=https://top3spo.com/
https://toolbarqueries.google.es/url?q=https://top3spo.com/
https://toolbarqueries.google.com.et/url?q=https://top3spo.com/
https://toolbarqueries.google.fi/url?q=https://top3spo.com/
https://toolbarqueries.google.com.fj/url?q=https://top3spo.com/
https://toolbarqueries.google.fm/url?q=https://top3spo.com/
https://toolbarqueries.google.fr/url?q=https://top3spo.com/
https://toolbarqueries.google.ga/url?q=https://top3spo.com/
https://toolbarqueries.google.ge/url?q=https://top3spo.com/
https://toolbarqueries.google.gg/url?q=https://top3spo.com/
https://toolbarqueries.google.com.gh/url?q=https://top3spo.com/
https://toolbarqueries.google.com.gi/url?q=https://top3spo.com/
https://toolbarqueries.google.gl/url?q=https://top3spo.com/
https://toolbarqueries.google.gm/url?q=https://top3spo.com/
https://toolbarqueries.google.gp/url?q=https://top3spo.com/
https://toolbarqueries.google.gr/url?q=https://top3spo.com/
https://toolbarqueries.google.com.gt/url?q=https://top3spo.com/
https://toolbarqueries.google.gy/url?q=https://top3spo.com/
https://toolbarqueries.google.com.hk/url?q=https://top3spo.com/
https://toolbarqueries.google.hn/url?q=https://top3spo.com/
https://toolbarqueries.google.hr/url?q=https://top3spo.com/
https://toolbarqueries.google.ht/url?q=https://top3spo.com/
https://toolbarqueries.google.hu/url?q=https://top3spo.com/
https://toolbarqueries.google.co.id/url?q=https://top3spo.com/
https://toolbarqueries.google.co.il/url?q=https://top3spo.com/
https://toolbarqueries.google.iq/url?q=https://top3spo.com/
http://www.google.sk/url?q=https://top3spo.com/
http://www.google.ro/url?q=https://top3spo.com/
http://www.google.pt/url?q=https://top3spo.com/
http://www.google.no/url?q=https://top3spo.com/
http://www.google.lt/url?q=https://top3spo.com/
http://www.google.ie/url?q=https://top3spo.com/
http://www.google.com.vn/url?q=https://top3spo.com/
http://www.google.com.ua/url?q=https://top3spo.com/
http://www.google.com.tr/url?q=https://top3spo.com/
http://www.google.com.sg/url?q=https://top3spo.com/
http://www.google.com.ph/url?q=https://top3spo.com/
http://www.google.com.mx/url?q=https://top3spo.com/
http://www.google.com.ar/url?q=https://top3spo.com/
http://www.google.co.za/url?q=https://top3spo.com/
http://www.google.co.th/url?q=https://top3spo.com/
http://www.google.co.nz/url?q=https://top3spo.com/
http://www.google.co.kr/url?q=https://top3spo.com/
http://www.google.co.il/url?q=https://top3spo.com/
http://www.google.co.id/url?q=https://top3spo.com/
http://www.google.cl/url?q=https://top3spo.com/